Sync eases your everyday job of parsing a JSON response and syncing it with Core Data. Sync is a lightweight Swift library that uses a convention-over-configuration paradigm to facilitate your workflow.
Syncing JSON to Core Data is a repetitive tasks that often demands adding a lot of boilerplate code. Mapping attributes, mapping relationships, diffing for inserts, removals and updates are often tasks that don't change between apps. Taking this in account we took the challenge to abstract this into a library. Sync uses the knowledge of your Core Data model to infer all the mapping between your JSON and Core Data, once you use it, it feels so obvious that you'll wonder why you weren't doing this before.
- Automatic mapping of camelCase or snake_case JSON into Core Data
- Thread-safe saving, we handle retrieving and storing objects in the right threads
- Diffing of changes, updated, inserted and deleted objects (which are automatically purged for you)
- Auto-mapping of relationships (one-to-one, one-to-many and many-to-many)
- Smart-updates, only updates your
NSManagedObjects if the server values are different from your local ones - Uniquing, one Core Data entry per primary key
NSOperationsubclass, any Sync process can be queued and cancelled at any time!
Table of Contents
Basic example
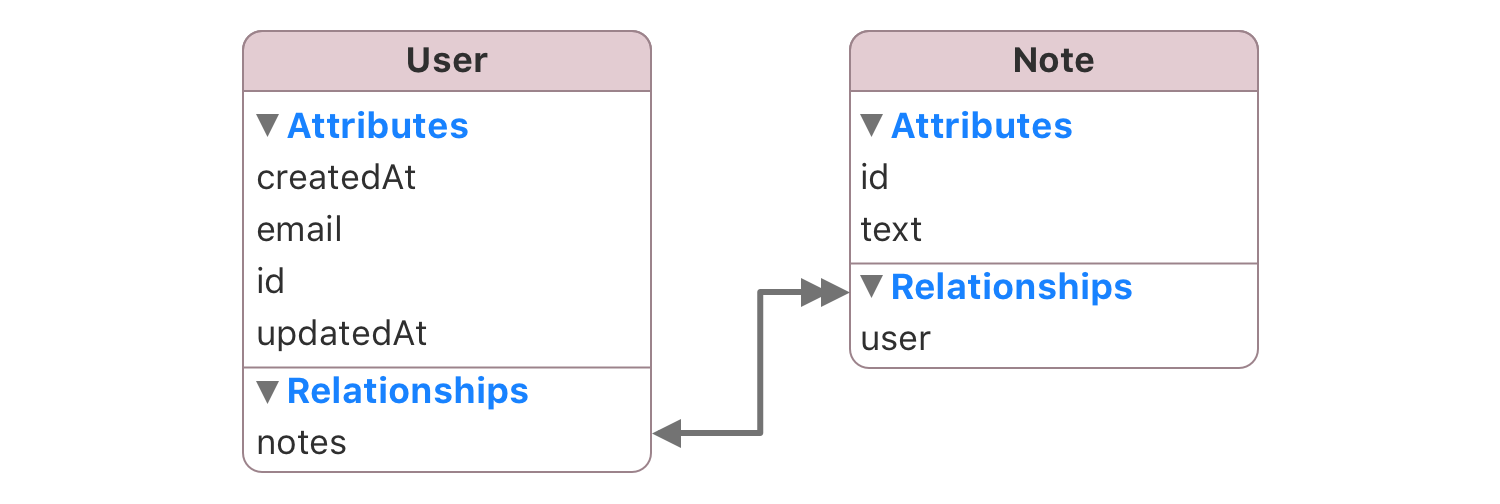
Model
JSON
[
  {
    "id": 6,
    "name": "Shawn Merrill",
    "email": "[email protected]",
    "created_at": "2014-02-14T04:30:10+00:00",
    "updated_at": "2014-02-17T10:01:12+00:00",
    "notes": [
      {
        "id": 0,
        "text": "Shawn Merril's diary, episode 1",
        "created_at": "2014-03-11T19:11:00+00:00",
        "updated_at": "2014-04-18T22:01:00+00:00"
      }
    ]
  }
]
DataStack
DataStack is a wrapper on top of the Core Data boilerplate, it encapsulates dealing with NSPersistentStoreCoordinator and NSManageObjectContexts.
self.dataStack = DataStack(modelName: "DataModel")You can find here more ways of initializing your DataStack.
Sync
dataStack.sync(json, inEntityNamed: "User") { error in
    // New objects have been inserted
    // Existing objects have been updated
    // And not found objects have been deleted
}
Alternatively, if you only want to sync users that have been created in the last 24 hours, you could do this by using a NSPredicate.
let now = NSDate()
let yesterday = now.dateByAddingTimeInterval(-24*60*60)
let predicate = NSPredicate(format:@"createdAt > %@", yesterday)

dataStack.sync(json, inEntityNamed: "User", predicate: predicate) { error in
    //..
}
Demo Project
We have a simple demo project of how to set up and use Sync to fetch data from the network and display it in a UITableView. The demo project features both Networking and Alamofire as the networking libraries.
DataStack with Storyboards
Configuring a DataStack with Storyboard is different than doing it via dependency injection here you'll find a sample project in how to achieve this setup.
https://github.com/3lvis/StoryboardDemo
Getting Started
Core Data Stack
Replace your Core Data stack with an instance of DataStack.
self.dataStack = DataStack(modelName: "Demo")Primary key
Sync requires your entities to have a primary key, this is important for diffing, otherwise Sync doesn’t know how to differentiate between entries.
By default Sync uses id from the JSON and id (or remoteID) from Core Data as the primary key.
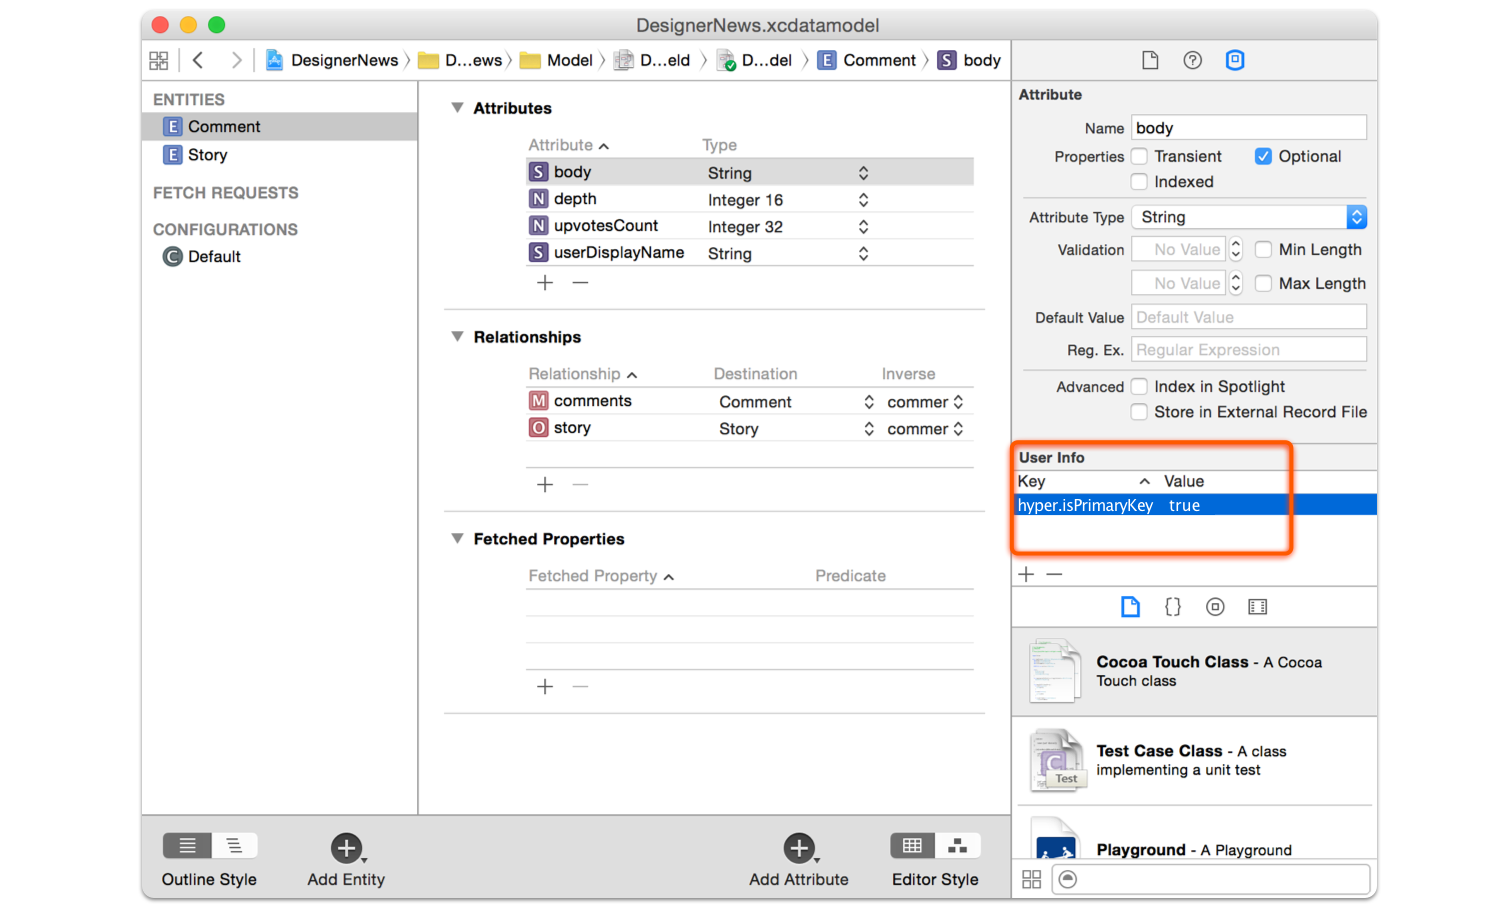
You can mark any attribute as primary key by adding sync.isPrimaryKey and the value true (or YES). For example, in our Designer News project we have a Comment entity that uses body as the primary key.
If you add the flag sync.isPrimaryKey to the attribute contractID then:
- Local primary key will be:
contractID - Remote primary key will be:
contract_id
If you want to use id for the remote primary key you also have to add the flag sync.remoteKey and write id as the value.
- Local primary key will be:
articleBody - Remote primary key will be:
id
Attribute Mapping
Your attributes should match their JSON counterparts in camelCase notation instead of snake_case. For example first_name in the JSON maps to firstName in Core Data and address in the JSON maps to address in Core Data.
There are some exception to this rule:
- Reserved attributes should be prefixed with the
entityName(typebecomesuserType,descriptionbecomesuserDescriptionand so on). In the JSON they don't need to change, you can keeptypeanddescriptionfor example. A full list of reserved attributes can be found here - Attributes with acronyms will be normalized (
id,pdf,url,png,jpg,uri,json,xml). For exampleuser_idwill be mapped touserIDand so on. You can find the entire list of supported acronyms here.
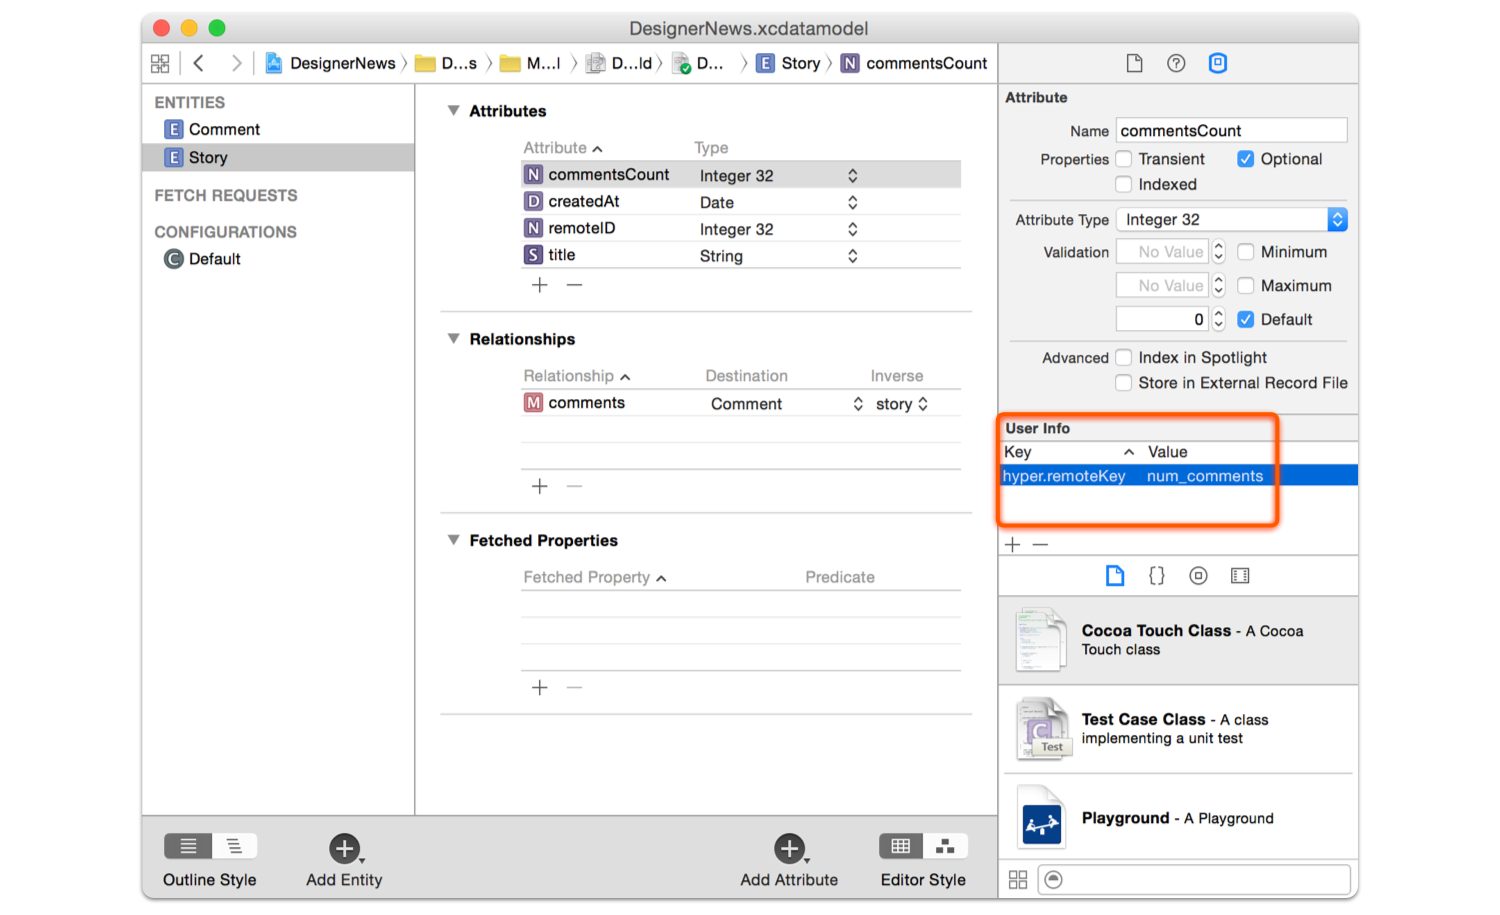
If you want to map your Core Data attribute with a JSON attribute that has different naming, you can do by adding sync.remoteKey in the user info box with the value you want to map.
Attribute Types
Array/Dictionary
To map arrays or dictionaries just set attributes as Binary Data on the Core Data modeler.
Retrieving mapped arrays
{
  "hobbies": [
    "football",
    "soccer",
    "code"
  ]
}
let hobbies = NSKeyedUnarchiver.unarchiveObjectWithData(managedObject.hobbies) as? [String]
// ==> "football", "soccer", "code"Retrieving mapped dictionaries
{
  "expenses" : {
    "cake" : 12.50,
    "juice" : 0.50
  }
}
let expenses = NSKeyedUnarchiver.unarchiveObjectWithData(managedObject.expenses) as? [String: Double]
// ==> "cake" : 12.50, "juice" : 0.50Dates
We went for supporting ISO8601 and unix timestamp out of the box because those are the most common formats when parsing dates, also we have a quite performant way to parse this strings which overcomes the performance issues of using NSDateFormatter.
let values = ["created_at" : "2014-01-01T00:00:00+00:00",
              "updated_at" : "2014-01-02",
              "published_at": "1441843200"
              "number_of_attendes": 20]

managedObject.fill(values)

let createdAt = managedObject.value(forKey: "createdAt")
// ==> "2014-01-01 00:00:00 +00:00"

let updatedAt = managedObject.value(forKey: "updatedAt")
// ==> "2014-01-02 00:00:00 +00:00"

let publishedAt = managedObject.value(forKey: "publishedAt")
// ==> "2015-09-10 00:00:00 +00:00"
Relationship mapping
Sync will map your relationships to their JSON counterparts. In the Example presented at the beginning of this document you can see a very basic example of relationship mapping.
One-to-many
Lets consider the following Core Data model.
This model has a one-to-many relationship between User and Note, so in other words a user has many notes. Here can also find an inverse relationship to user on the Note model. This is required for Sync to have more context on how your models are presented. Finally, in the Core Data model there is a cascade relationship between user and note, so when a user is deleted all the notes linked to that user are also removed (you can specify any delete rule).
So when Sync, looks into the following JSON, it will sync all the notes for that specific user, doing the necessary inverse relationship dance.
[
  {
    "id": 6,
    "name": "Shawn Merrill",
    "notes": [
      {
        "id": 0,
        "text": "Shawn Merril's diary, episode 1",
      }
    ]
  }
]
One-to-many Simplified
As you can see this procedures require the full JSON object to be included, but when working with APIs, sometimes you already have synced all the required items. Sync supports this too.
For example, in the one-to-many example, you have a user, that has many notes. If you already have synced all the notes then your JSON would only need the notes_ids, this can be an array of strings or integers. As a side-note only do this if you are 100% sure that all the required items (notes) have been synced, otherwise this relationships will get ignored and an error will be logged. Also if you want to remove all the notes from a user, just provide "notes_ids": null and Sync will do the clean up for you.
[
  {
    "id": 6,
    "name": "Shawn Merrill",
    "notes_ids": [0, 1, 2]
  }
]
One-to-one
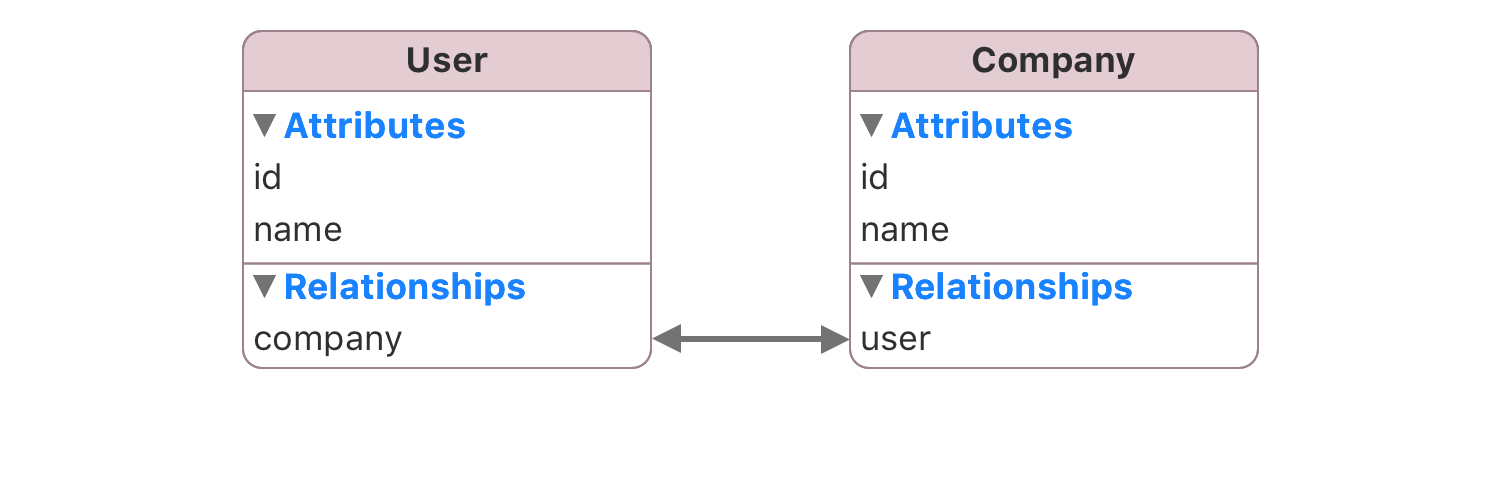
A similar procedure is applied to one-to-one relationships. For example lets say you have the following model:
This model is simple, a user as a company. A compatible JSON would look like this:
[
  {
    "id": 6,
    "name": "Shawn Merrill",
    "company": {
      "id": 0,
      "text": "Facebook",
    }
  }
]
One-to-one Simplified
As you can see this procedures require the full JSON object to be included, but when working with APIs, sometimes you already have synced all the required items. Sync supports this too.
For example, in the one-to-one example, you have a user, that has one company. If you already have synced all the companies then your JSON would only need the company_id. As a sidenote only do this if you are 100% sure that all the required items (companies) have been synced, otherwise this relationships will get ignored and an error will be logged. Also if you want to remove the company from the user, just provide "company_id": null and Sync will do the clean up for you.
[
  {
    "id": 6,
    "name": "Shawn Merrill",
    "company_id": 0
  }
]
JSON Exporting
Sync provides an easy way to convert your NSManagedObject back into JSON. Just use the export() method.
let user = //...
user.set(value: "John" for: "firstName")
user.set(value: "Sid" for: "lastName")

let userValues = user.export()
That's it, that's all you have to do, the keys will be magically transformed into a snake_case convention.
{
  "first_name": "John",
  "last_name": "Sid"
}
Excluding
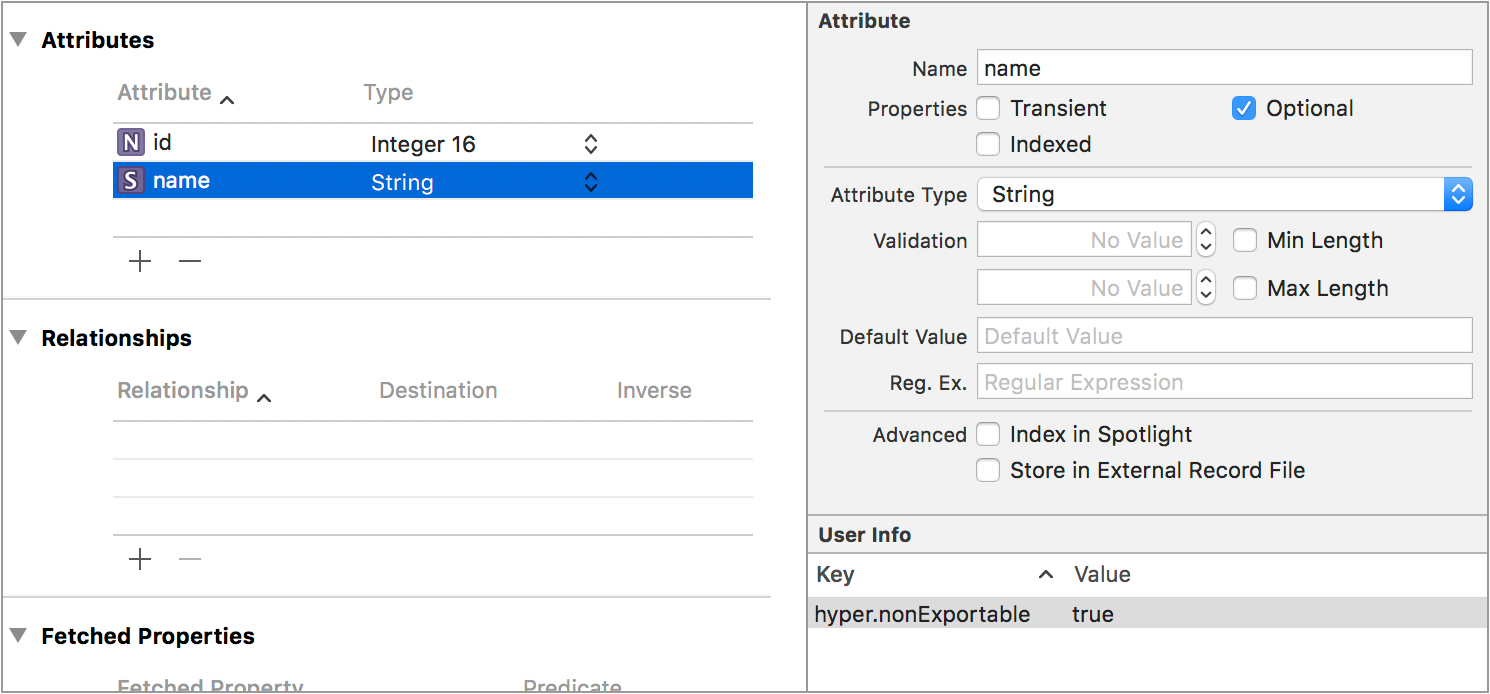
If you don't want to export certain attribute or relationship, you can prohibit exporting by adding sync.nonExportable in the user info of the excluded attribute or relationship.
Relationships
It supports exporting relationships too.
"first_name": "John",
"last_name": "Sid",
"notes": [
  {
    "id": 0,
    "text": "This is the text for the note A"
  },
  {
    "id": 1,
    "text": "This is the text for the note B"
  }
]
If you don't want relationships you can also ignore relationships:
let dictionary = user.export(using: .excludedRelationships)"first_name": "John",
"last_name": "Sid"Or get them as nested attributes, something that Ruby on Rails uses (accepts_nested_attributes_for), for example for a user that has many notes:
var exportOptions = ExportOptions()
exportOptions.relationshipType = .nested
let dictionary = user.export(using: exportOptions)"first_name": "John",
"last_name": "Sid",
"notes_attributes": [
{
"0": {
"id": 0,
"text": "This is the text for the note A"
},
"1": {
"id": 1,
"text": "This is the text for the note B"
}
}
]FAQ
Installation
CocoaPods
pod 'Sync', '~> 6'Carthage
github "3lvis/Sync" ~> 6.0Supported iOS, OS X, watchOS and tvOS Versions
- iOS 8 or above
- OS X 10.10 or above
- watchOS 2.0 or above
- tvOS 9.0 or above
Backers
Finding Sync helpful? Consider supporting further development and support by becoming a sponsor:
License
Sync is available under the MIT license. See the LICENSE file for more info.


