MYSForms 0.1.3
| TestsTested | ✗ |
| LangLanguage | Obj-CObjective C |
| License | MIT |
| ReleasedLast Release | Aug 2015 |
Maintained by Adam Kirk.
MYSForms 0.1.3
- By
- Adam Kirk
- atomkirk
Easy forms for iOS.
Used in the Firehose Chat iOS app.
Contents
- Installation
- Requirements
- Introduction
- Usage
- Examples
- Customization
- Screenshots
- Extras
- Contributing
- Author
Installation
To try it out, clone this repo with --recursive and open the demo application which showcases a few different types of forms and form elements.
Requirements
iOS 7+
Introduction
MYSForms allows you to easily build forms to present on iOS. Forms are bound to a model, which can be any object or dictionary or even [NSUserDefaults standardUserDefaults]. You can validate your form, display error/success/loading messages and much more.
MYSForms are based on UICollectionViewController. This means they are very flexible and customizable. It also means they are extremely easy use in an application. All you do is create an instance of MYSFormViewController, configure it, and present it like any other view controller. Or, you can subclass MYSFormViewController and present your subclass.
To configure a form, you just add MYSFormElement objects to it. That's it.
Usage
Forms
Forms are:
- Bound to a model.
- An array of form elements, each element bound to a key path on the model. As the form is updated by the user, the model is updated. As the model changes, the form automatically reflects the model's data.
There are two ways to create a form:
- Create an instance of
MYSFormViewControllerand add form elements to it. - Create a subclass of
MYSFormViewControllerand overrideconfigureForm, where you add form elements.
Read the API docs for MYSFormViewController
Storyboards
If you're using storyboards, the subclassing method is best. Just drag a UICollectionViewController onto your storyboard and set the class of the view controller to your custom subclass. When your application segues to that scene (subclassed MYSFormViewController) the form will appear and "just work."
Form Elements
A form is an MYSFormViewController with an array of MYSFormElement subclass objects. Each MYSFormElement subclass represents a different type of form element like a header, descriptive text, a text field, a text view, a picker, a toggle button, an image picker, etc.
MYSForms comes with a large selection of MYSFormElement subclasses that are ready to use, but you can also create your own or further subclass what's already available to tweak their appearance and behavior.
Validations
Validations are objects you can add to form elements that will make sure the values of those elements are valid. If they are not valid, it will display a validation error automatically next to that form element explaining the problem so the user can fix it. MYSForms comes with some standard validation classes like making sure a value is not blank or making sure a value conforms to a certain format. Validation objects are subclasses of MYSFormValidation.
Value Transformers
Because each editable form element will likely be bound to a property on the model, you may want to add a transformer to the element so that as the model value is read from the model, it can be transformed to a type fit for visual display. Likewise, when a user changes a value, your transformer can convert the visual form to a type that your model expects. Transformers are subclasses of NSValueTransformer.
Examples
Creating Forms
Let's say we want to create a form by creating an instance of MYSFormViewController and adding some form elements to it:
// create an instance of MYSFormViewController
MYSFormViewController *formViewController = [MYSFormViewController new];

// setting the model
formViewController.model = self.fakeUser;

// add a header element
MYSFormLabelElement *headline = [MYSFormLabelElement labelElementWithText:@"Log In"];
[formViewController addFormElement:headline];

// add a text field for the user to type in an email
MYSFormTextFieldElement *emailField = [MYSFormTextFieldElement textFieldElementWithLabel:@"E-mail" modelKeyPath:@"email"];
emailField.keyboardType = UIKeyboardTypeEmailAddress;
[formViewController addFormElement:emailField];

// push the form onto the navigation stack and that's it!
[self.navigationController pushViewController:formViewController animated:YES];
Second, the more robust approach, you can subclass MYSFormViewController like so:
MYSSignUpFormViewController.h
#import "MYSForms.h"

@interface MYSSignUpFormViewController : MYSFormViewController
@end
MYSSignUpFormViewController.m
#import "MYSSignUpFormViewController.h"
#import "MYSExampleUser.h"


@implementation MYSSignUpFormViewController

- (void)viewDidLoad
{
    [super viewDidLoad];
    self.model = [MYSExampleUser new];
}

- (void)configureForm
{
    [super configureForm];

    [self addFormElement:[MYSFormLabelElement labelElementWithText:@"Sign Up"]];

    [self addFormElement:[MYSFormLabelElement labelElementWithText:
                          @"Example of a subclassed form view controller where a blank model is created in its viewDidLoad."]];

    [self addFormElement:[MYSFormTextFieldElement textFieldElementWithLabel:@"First Name" modelKeyPath:@"firstName"]];

    [self addFormElement:[MYSFormTextFieldElement textFieldElementWithLabel:@"Last Name" modelKeyPath:@"lastName"]];

    MYSFormTextFieldElement *emailField = [MYSFormTextFieldElement textFieldElementWithLabel:@"E-mail" modelKeyPath:@"email"];
    emailField.keyboardType = UIKeyboardTypeEmailAddress;
    [self addFormElement:emailField];

    MYSFormTextFieldElement *passwordField = [MYSFormTextFieldElement textFieldElementWithLabel:@"Password" modelKeyPath:@"password"];
    passwordField.secure = YES;
    [self addFormElement:passwordField];
}
Adding Validations
An example of an e-mail field with validations:
MYSFormTextFieldElement *emailField = [MYSFormTextFieldElement textFieldElementWithLabel:@"E-mail" modelKeyPath:@"email"];
emailField.keyboardType = UIKeyboardTypeEmailAddress;
[emailField addFormValidation:[MYSFormPresenceValidation new]];
[emailField addFormValidation:[MYSFormRegexValidation regexValidationWithName:MYSFormRegexValidationPatternEmail]];
[self addFormElement:emailField];
Using Value Transformers
Here we are adding a form element that presents a UIPickerView when tapped. A value transformer is used to convert the model's NSNumber value to an NSString to be presented by the picker element.
MYSFormPickerElement *pickerElement = [MYSFormPickerElement pickerElementWithLabel:@"Age" modelKeyPath:@"yearsOld"];
pickerElement.valueTransformer = [MYSFormStringFromNumberValueTransformer new];
for (NSInteger i = 0; i < 120; i++) {
    [pickerElement addValue:@(i)];
}
[self addFormElement:pickerElement];
Showing Error, Success and Loading Messages
Show an error message below a specific form element:
[self addFormElement:[MYSFormLabelAndButtonElement buttonElementWithLabel:@"A label" title:@"And button" block:^(MYSFormButtonElement *element) {
    [self showErrorMessage:@"An error message." belowElement:element duration:3 completion:nil];
}]];
Show an success message below a specific form element:
[self addFormElement:[MYSFormButtonElement buttonElementWithTitle:@"Button" block:^(MYSFormElement *element) {
    [self showSuccessMessage:@"A success message." belowElement:element duration:3 completion:nil];
}]];
Show a loading message above a specific form element:
[self addFormElement:[MYSFormButtonElement buttonElementWithTitle:@"Show Loading Specific" block:^(MYSFormElement *element) {
    [self showLoadingMessage:@"Loading for a specific form element." aboveElement:self.firstNameElement completion:nil];
    dispatch_after(dispatch_time(DISPATCH_TIME_NOW, (int64_t)(4 * NSEC_PER_SEC)), dispatch_get_main_queue(), ^{
        [self hideLoadingAboveElement:self.firstNameElement completion:nil];
    });
}]];
Customization
There are two ways to customize forms:
- Using
MYSFormTheme - Subclassing Elements/Cells and replacing xibs.
Method 1: MYSFormTheme
You can create a MYSFormTheme, tweak the properties on that object and then assign it to any MYSFormElement. If
you customize the label font/color properties on the theme, the label(s) any elements you assign the theme to will
have those customizations applied.
You can also assign a theme to the entire form which will be subsequently passed to all elements. The properties
set on an element theme takes precedence over a form theme passed to the element. For example, if you set the tintColor
property on two different themes, assign one to the form and another to an element, the element will use the tintColor
on the theme assigned directly to it.
Here's an example of setting some properties on the form's theme (set on self.theme) and a theme assigned to an
element:
- (void)configureForm
{
    [super configureForm];

    // set a form-wide theme
    self.theme = [MYSFormTheme new];
    self.theme.buttonStyle = @(MYSFormButtonStyleFilled);
    self.theme.labelFont = [UIFont fontWithName:@"Avenir" size:12];
    self.theme.inputTextFont = [UIFont fontWithName:@"Noteworthy" size:14];

    MYSFormLabelElement *headlineElement = [MYSFormLabelElement labelElementWithText:@"A Headline"];
    headlineElement.theme = [MYSFormTheme formThemeWithLabelFont:[UIFont fontWithName:@"Zapfino" size:26]];
    [self addFormElement:headlineElement];
}
Method 2:
Depending on how crazy you want to get, you can subclass an entire element, just its cell or just replace it's xib with your own. If all you want to do is change how auto layout works for an cell or move views around in the element's cell, you can get away with just replacing the xib with your own. If you want to customize animations, behavior or how height is calculated based on content, then you'll want to subclass the cell for the element. If you subclass a cell you must also replace the xib with your own. The following walks you through how to subclass an element's cell:
Let's say you want to customize how the header element looks. You could subclass MYSFormHeadlineCell.h like this:
FCIFormHeaderCell.h
#import <MYSForms.h>

@interface FCIFormHeaderCell : MYSFormHeadlineCell
@end
FCIFormHeaderCell.m
#import "FCIFormHeaderCell.h"

@implementation FCIFormHeaderCell

+ (CGSize)sizeRequiredForElement:(MYSFormElement *)element width:(CGFloat)width
{
    return CGSizeMake(width, 100);
}

@end
Then, where you actually provide the UI:
FCIFormHeaderCell.xib
The trick is to make sure that you hook up the outlets of the views in your xibs to the properties on the MYSFormHeadlineCell superclass.
YourFormViewController.m
- (void)configureForm
{
    [super configureForm];

    MYSFormHeadlineElement *headlineElement = [labelElementWithText labelElementWithText:@"Sign Up"];
    headlineElement.cellClass = [FCIFormHeaderCell class];
    [self addFormElement:headlineElement];
}
That's it. To recap:
- Create a subclass of the cell you want to customize. In this example we created the
FCIFormHeaderCellclass that subclassedMYSFormHeadlineCell. - Create a xib file that matches the name of your custom cell subclass.
- Customize the look of the cell in this xib and make sure all outlets are hooked up.
- Make sure the reuse identifier of the cell is the name of your custom class.
- When configuring the form, make sure you tell the element to use your custom cell class/xib.
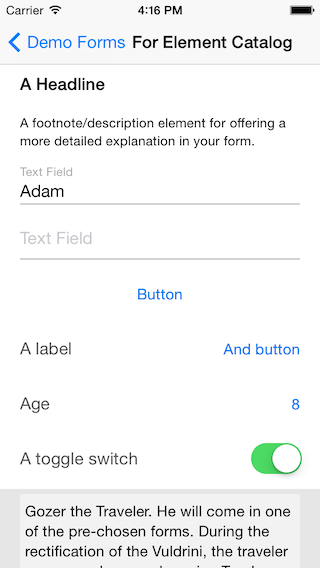
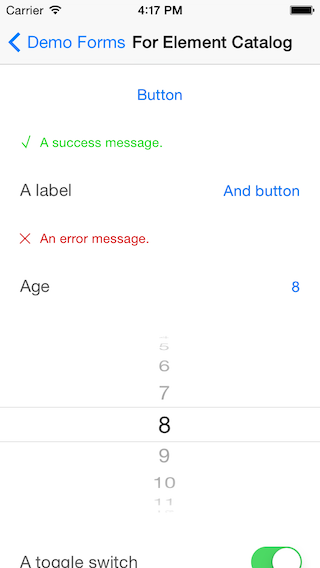
Screenshots
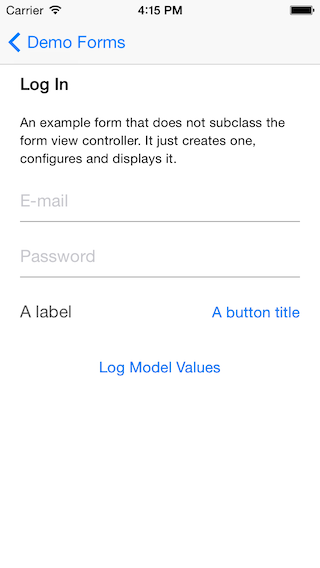
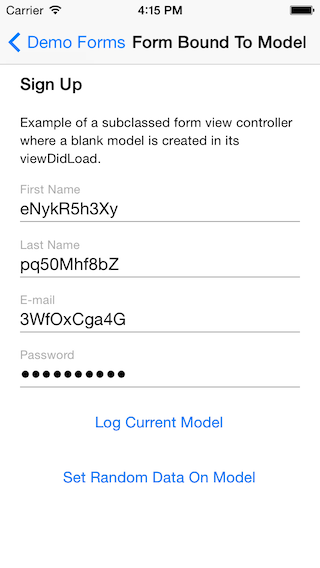
A log in form and sign up form:
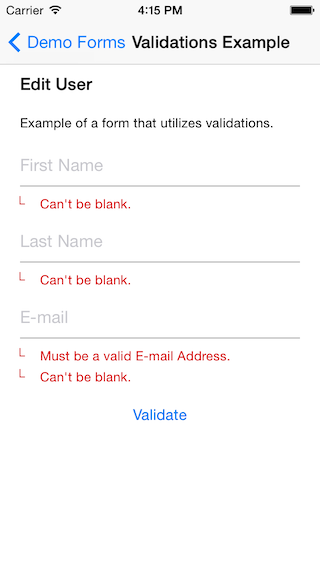
Validation errors and loading message:
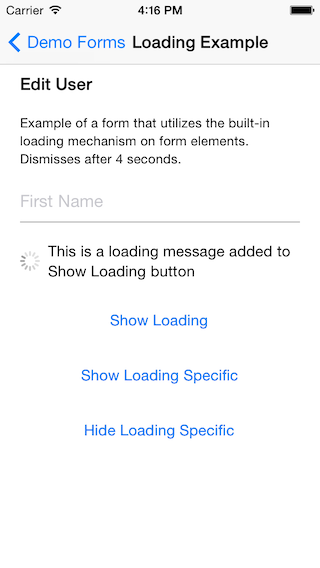
Misc element examples:
Extras
There is also a subclass of MYSFormViewController that comes with MYSForms called MYSFormSlideViewController that slides your form up from the bottom when it is displayed.
If you use MYSCollectionView and have it use the MYSCollectionViewSpringyLayout, you'll get a cool springy effect between the elements in your form.
Contributing
Clone the repo with --recursive because there are important submodules that need to be included.
Please update and run the tests before submitting a pull request. Thanks.
Author
Check out Firehose Chat and add a free chat box to your website so you can chat with your visitors. You'll receive push notifications, even when offline, when a visitor wants to chat. You can respond immediately with the iOS app or Mac app.