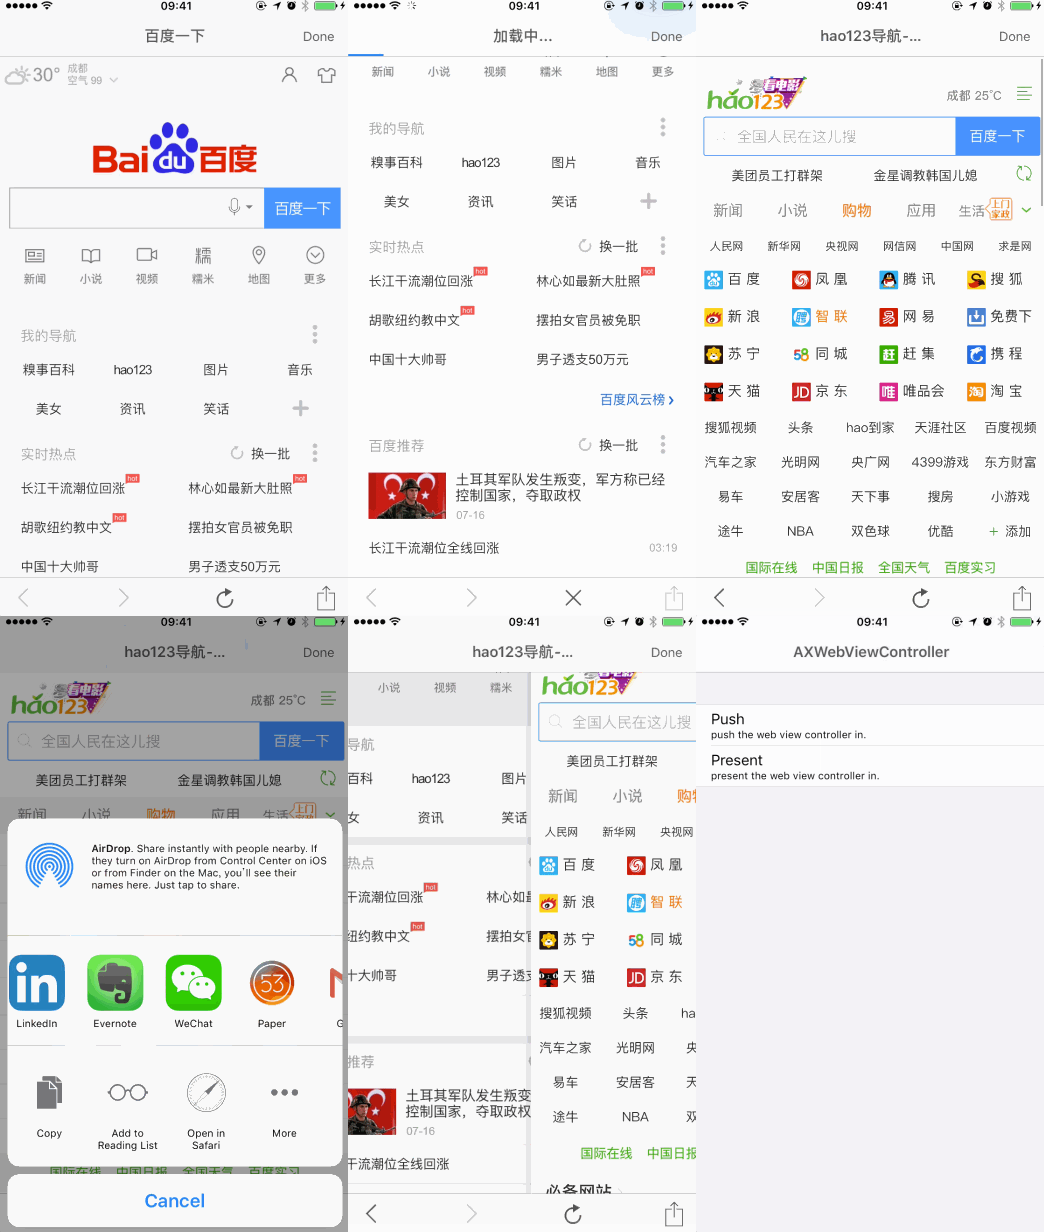
KNAXWebViewController
➜  AXWebViewController git:(master) ✗ kngit 0.7.4
➜  AXWebViewController git:(master) git tag -a 0.7.4 -m "0.7.4"
➜  AXWebViewController git:(master) git push origin --tags
➜  AXWebViewController git:(master) ✗ pod lib lint KNAXWebViewController.podspec --allow-warnings --no-clean

pod trunk push  KNAXWebViewController.podspec --allow-warnings
see also
Ensure that Xcode -> Window -> Devices has at least oneios simulator listed or otherwise add one.) during validation.
➜ AXWebViewController git:(master) ✗ sudo gem install cocoapods
Summary
AXWebViewController是一款基于WKWebView(WebKit)封装的view controller,高度集成,一行代码即可使用;能够满足大部分的App加载html网页的场景,AXWebViewController实现了WKUIDelegate和WKNavigationDelegate两个协议,在使用过程中,若需要自定义功能,可自行Overrides相关方法予以实现;
AXWebViewController可实现微信样式的网页浏览导航控制,可在导航栏显示返回和关闭两个功能按钮,这个功能主要基于AXNavigationBackItemInjection而实现,AXNavigationBackItemInjection可以拦截点击返回导航或者手势滑动返回,有兴趣的朋友可以了解了解!
Features
- 手势滑动返回上个页面
- 微信样式导航返回、关闭
- 网页加载失败提示
- 网页加载进度提示
- 网页来源host提示
- 支持__Peek__和__Pop__浏览网页,并且commit之后在本网页进行加载,不用跳转到Safari进行浏览,这里使用到了很多运行时的方法,因此,谨慎使用!
Requirements
AXWebViewController 对系统版本支持到iOS7.0;版本0.7.0以后仅支持Xcode9,需要使用到:
- Foundation.framework
- UIKit.framework
使用的时候最好使用最新版Xcode。
Adding AXWebViewController to your projet
CocoaPods
CocoaPods is the recommended way to add AXWebViewController to your project.
- Add a pod entry for
AXWebViewControllerto your Podfilepod 'AXWebViewController', '~> 0.6.0' - Install the pod(s) by running
pod install. - Include
AXWebViewControllerwherever you need it with#import "AXWebViewController.h".
Source files
Alternatively you can directly add the source files under path */AXWebViewController/ to your project.
- Download the latest code version or add the repository as a git submodule to your git-tracked project.
- Open your project in Xcode, then drag and drop the source files onto your project (use the "Product Navigator view"). Make sure to select Copy items when asked if you extracted the code archive outside of your project.
- Include
AXWebViewControllerwherever you need it with#import "AXWebViewController.h".
License
This code is distributed under the terms and conditions of the MIT license.
Usage
AXWebViewController使用和使用普通UIViewController一样简单,只需要在需要使用的地方使用URL初始化即可:
AXWebViewController *webVC = [[AXWebViewController alloc] initWithAddress:@"http://www.baidu.com"];
webVC.showsToolBar = NO;
webVC.navigationController.navigationBar.translucent = NO;
self.navigationController.navigationBar.tintColor = [UIColor colorWithRed:0.100f green:0.100f blue:0.100f alpha:0.800f];
self.navigationController.navigationBar.barTintColor = [UIColor colorWithRed:0.996f green:0.867f blue:0.522f alpha:1.00f];
[self.navigationController pushViewController:webVC animated:YES];
使用工具条导航
使用工具条只需在AXWebViewController初始化之后加入一句代码:
webVC.navigationType = AXWebViewControllerNavigationToolItem;
webVC.showsToolBar = YES;
注意,在设置navigationType为AXWebViewControllerNavigationToolItem之后,须确认showsToolBar为YES才能生效.
使用微信样式导航
在AXWebViewController初始化之后加入一句代码:
webVC.navigationType = AXWebViewControllerNavigationBarItem;
即可生效.
Peek&Pop
Peek和Pop使用的是原生的系统功能,在使用的时候只需要将webView.allowsLinkPreview设置为YES即可使用,这里需要注意下,在实现Peek和Pop的时候,使用了Runtime的相关知识,而且使用AOP的一个框架__Aspects__进行了编程,在使用的过程中可能会出错,当然,出错的几率也是很小的(苹果不可能隔三差五的去修改自家的Private API吧= =),实现原理就不多讲了,基本上就是运行时的一些知识,代码如下:
- (void)hookWebContentCommitPreviewHandler {
    // Find the `WKContentView` in the webview.
    __weak typeof(self) wself = self;
    for (UIView *_view in _webView.scrollView.subviews) {
    if ([_view isKindOfClass:NSClassFromString(@"WKContentView")]) {
    id _previewItemController = object_getIvar(_view, class_getInstanceVariable([_view class], "_previewItemController"));
    Class _class = [_previewItemController class];
    SEL _performCustomCommitSelector = NSSelectorFromString(@"previewInteractionController:interactionProgress:forRevealAtLocation:inSourceView:containerView:");
    [_previewItemController aspect_hookSelector:_performCustomCommitSelector withOptions:AspectPositionAfter usingBlock:^() {
        UIViewController *pred = [_previewItemController valueForKeyPath:@"presentedViewController"];
        [pred aspect_hookSelector:NSSelectorFromString(@"_addRemoteView") withOptions:AspectPositionAfter usingBlock:^() {
            UIViewController *_remoteViewController = object_getIvar(pred, class_getInstanceVariable([pred class], "_remoteViewController"));

            [_remoteViewController aspect_hookSelector:@selector(viewDidLoad) withOptions:AspectPositionAfter usingBlock:^() {
                _remoteViewController.view.tintColor = wself.navigationController.navigationBar.tintColor;
            } error:NULL];
        } error:NULL];

        NSArray *ddActions = [pred valueForKeyPath:@"ddActions"];
        id openURLAction = [ddActions firstObject];

        [openURLAction aspect_hookSelector:NSSelectorFromString(@"perform") withOptions:AspectPositionInstead usingBlock:^ () {
            NSURL *_url = object_getIvar(openURLAction, class_getInstanceVariable([openURLAction class], "_url"));
            [wself loadURL:_url];
        } error:NULL];

        id _lookupItem = object_getIvar(_previewItemController, class_getInstanceVariable([_class class], "_lookupItem"));
        [_lookupItem aspect_hookSelector:NSSelectorFromString(@"commit") withOptions:AspectPositionInstead usingBlock:^() {
            NSURL *_url = object_getIvar(_lookupItem, class_getInstanceVariable([_lookupItem class], "_url"));
            [wself loadURL:_url];
        } error:NULL];
        [_lookupItem aspect_hookSelector:NSSelectorFromString(@"commitWithTransitionForPreviewViewController:inViewController:completion:") withOptions:AspectPositionInstead usingBlock:^() {
            NSURL *_url = object_getIvar(_lookupItem, class_getInstanceVariable([_lookupItem class], "_url"));
            [wself loadURL:_url];
        } error:NULL];
        /*
         UIWindow
         -UITransitionView
         --UIVisualEffectView
         ---_UIVisualEffectContentView
         ----UIView
         -----_UIPreviewActionSheetView
         */
        /*
         for (UIView * transitionView in [UIApplication sharedApplication].keyWindow.subviews) {
         if ([transitionView isMemberOfClass:NSClassFromString(@"UITransitionView")]) {
         transitionView.tintColor = wself.navigationController.navigationBar.tintColor;
         for (UIView *__view in transitionView.subviews) {
         if ([__view isMemberOfClass:NSClassFromString(@"UIVisualEffectView")]) {
         for (UIView *___view in __view.subviews) {
         if ([___view isMemberOfClass:NSClassFromString(@"_UIVisualEffectContentView")]) {
         for (UIView *____view in ___view.subviews) {
         if ([____view isMemberOfClass:NSClassFromString(@"UIView")]) {
         __weak typeof(____view) w____view = ____view;
         [____view aspect_hookSelector:@selector(addSubview:) withOptions:AspectPositionAfter usingBlock:^() {
         for (UIView *actionSheet in w____view.subviews) {
         if ([actionSheet isMemberOfClass:NSClassFromString(@"_UIPreviewActionSheetView")]) {
         break;
         }
         }
         } error:NULL];
         }
         }break;
         }
         }break;
         }
         }break;
         }
         }
         */
    } error:NULL];
    break;
    }
    }
}
致谢
RxWebViewController为我提供了思路,有些地方做了参考
iOS8.0以下使用了NJKWebViewProgress作为进度条,感谢!
更新日志
0.1.10
使用基于UIWebView的实现,进度条使用NJKWebViewProgress实现.
0.2.0
iOS8.0以上使用WKWebView实现,进度条使用UIProgressView实现. 实现了本页面Peek&Pop而不用跳转到Safari进行浏览.
0.3.0
使用AXNavigationBackItemInjection实现微信导航样式,也可以自定义返回的操作,只需要几行代码就可以搞定!


