YOLOVisionML 0.0.1
- By
- Jade Choghari
- jadechoghari
YOLOVisionML
By: Jade Choghari

![]()

YOLOVisionML simplifies YOLO model output processing. Achieve accurate bounding boxes and mask calculations, advancing object detection and machine learning capabilities.
This library performs conversion for any YOLO Model that has been converted to CoreML, as well as outputs that are tensors and conforms to Ultralytics form
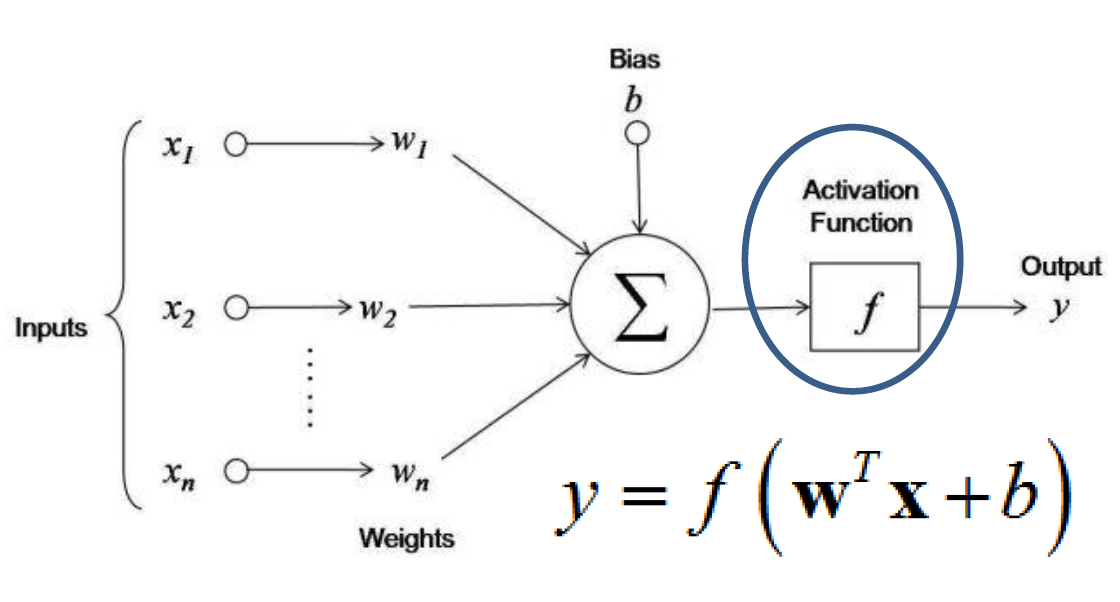
Overview on the model employing a neural network architecture to extract intricate patterns from input data. However, to achieve accurate and actionable results, we perform additional post-processing on the initial output 'y'.
| Swift Function | Description | Math Formula (if applicable) |
|---|---|---|
| sigmoidMatrix | Applies the sigmoid function to a matrix, transforming neural network outputs into probabilities within the range of [0, 1]. | sigmoid(x) = 1 / (1 + e^(-x)) |
| createMask | Generates a binary mask from input data. | 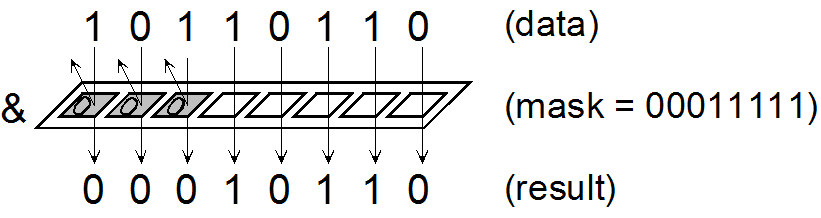 |
| parseRow | Parses and filter a row of data returning [x1, y1, x2, y2, Decimal(classId), maxProbability] | Processing the outputs of a neural network during object detection tasks. It extracts information from the network's output and translates it into meaningful object attributes and associated probabilities, enabling further analysis and interpretation of detected objects in an image. |
| get_mask | Retrieves a mask based on certain conditions. | Outpout of values between 0 and 1 |
| parseRowMask | Parses a row of mask data. | Same as parse row but with an additional output, the mask. |
| overlayMask | Overlays a mask onto an image. | |
| nonMax: intersection | Calculates the intersection area between boxes. | Area = width * height |
| nonMax: union | Calculates the union area between boxes. | Area = A + B - intersection |
| nonMax: iou | Computes the Intersection over Union (IoU). | 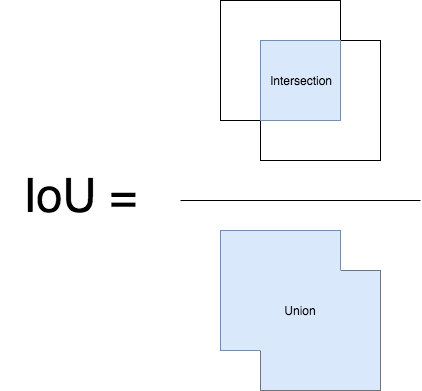 |
| nonMaxSuppression | Performs non-maximum suppression for boxes. |  |
| nonMaxSuppressionMask | Non-maximum suppression for segmented masks. | |
| imageToArray | Converts a pixelated mask image into an array of bit masks represented as [UInt8]. | ie: [[0, 0, 0, 0, 1, 1, ,1 ,1, 0 …]] |
| convertToUIImage | Converts a bit masks represented as [UInt8] into a pixelated mask image. | |
| resizeMask | Resizes a mask to a specified size. | |
| MLMultiArrayToCGImage | Converts MLMultiArray to CGImage for display. | |
| drawRectanglesOnImage | Draws rectangles on an image. |
Installation
You can install YOLOVisionML using CocoaPods. To integrate it into your Xcode project, follow these steps:
- Open your project's
Podfile:
$ open Podfile- Add the following line to your
Podfile:
pod 'YOLOVisionML'
pod 'MatrixFlow'
This line specifies that you want to include the YOLOVisionML CocoaPod in your project with version 1.0 or the latest compatible version.
- Save the
Podfileand run the following command in your project's root directory:
$ pod installThis command installs the specified pod into your project.
Open your project by clicking the
.xcworkspacefile created after runningpod install.Import the YOLOVisionML module wherever you plan to use it:
import YOLOVisionML
import MatrixFlow
Note: You'll also need to install another pod I've built called 'MatrixFlow,' specifically designed for matrix manipulation.
And inside the pod code it's very important that you change the width and heigh of .
Usage
When using the YOLOVisionML pod, make sure to initialize the 'YOLOVisionML' class with the desired image width and height before calling its functions. This allows you to seamlessly apply these dimensions across different functionalities within the pod:
let yoloInstance = YOLOVisionML(imageWidth: 1170, imageHeight: 1516)To utilize any of these functions, you simply need to mention the name of the module instance, followed by the function name:
i.e:
For parsing a row (please keep in mind that in future use, you'll need to loop through each individual row; the following is just a demonstration of a single row):
```swift
let parsedRow = yoloInstance.parseRowMask(row: TestParsedMask)
Happy coding and data manipulation! 🧠💡

## Context

When I tried converting from YOLO to CoreML for a model that gives bounding box and segmentation mask outputs, I thought it'd be easy with CoreML. But after exploring CoreML-tools and Ultralytics tools, I found limitations in Swift, YOLO, and CoreML. They lack functions like matrix processing (available in my Cocoa project 'MatrixFlow'), image segmentation processing, input/output handling, and more.

This library propose a solution. This is result of an 80+ hours of trial and errors to try and make the output work.
Please note: Some of you might have different index result as mine, but this is normal since every input is different, every predictions is different so you’ll need to when told to do so.


First and foremost, my YOLO model requires input images of size 640x640. Therefore, we must resize the images from their original dimensions to this new width and height. However, it's crucial to always verify the CoreML-specific format during the check within CoreML. Here's how I've handled it:
swift
let config = MLModelConfiguration()
let model = try best_2(configuration: config)
let input = best_2Input(image: buffer)
// Make the prediction
let output = try model.prediction(input: input)
The output prediction of this model is:
Output 0 : var [1, 37, 8400] and Output1: p [1, 32, 160, 160]

The YOLOv8 model is equipped with a predetermined capability to identify up to 8400 bounding boxes. This constraint is a foundational aspect established during the design phase of the neural network architecture. Consequently, the model consistently generates 8400 lines of output for each image, regardless of the actual count of objects detected within that image. This consistent output structure remains unaltered due to the model's inherent construction. Subsequently, a significant portion of these output rows typically lacks meaningful content, rendering them essentially inconsequential or what is colloquially referred to as "garbage." Moving forward, let's delve into the next steps: We will be dealing with two outputs that are categorized as MLMultiArray. To enable further manipulation, it becomes necessary to convert them into standard arrays. For this purpose, we will employ the 'MatrixFlow' pod.

For output0, we’re also removing the first dimension since it’s unnecessary
swift
// Convert MLMultiArray to a normal Swift array
let array = MatrixFlow.convertMultiArrayToArray(output0)
// Perform dimension reduction
let reducedArray = array[0]
For output1 three dimensions:
let fourArray = MatrixFlow.convertMultiArrayToArray4d(output1)
let reducedArray1 = fourArray[0]
Upon inspecting the dimensions of `reducedArray` (output0) and `reducedArray1`, a noteworthy observation emerges: the count of columns in the first matrix corresponds to the count of rows in the second matrix. This alignment implies the possibility of matrix multiplication to unite these two matrices. Upon this union, an outcome akin to (8400,160,160) can be attained. This configuration signifies segmentation masks for all the detected boxes. Each segmentation mask, encompassing dimensions of 160x160, is a distinctive entity. However, for matrix multiplication to transpire, the `output1` matrix must be reshaped to ensure a matching number of dimensions. The subsequent phase involves the fusion of these matrices. To be specific, the incorporation entails the addition of 25600 columns originating from the second matrix and appending them to the first matrix. This fusion operation will harmoniously blend the two matrices into an integrated structure.swift
// we need to reshape the array
let reshapedArray = reducedArray1.map { subArray in
return subArray.flatMap { $0 }
} (to 160x160)
//perform matrix multiplication:
let result = MatrixFlow.multiplyMatrices(masks1, reshapedArray)
print("after multip", result!.count, result![0].count)
//after multiplication we’ll need obi connect
//perform additions
var combinedMask: [[Decimal]] = []
// for (box, mask) in zip(reshapedArray, masks1)
//or (box, mask) in zip(boxes1, result!)
for (box, mask) in zip(boxes1, result!) {
let combinedRow = box + mask
combinedMask.append(combinedRow)
}
## Step 2:  Parsing the combined output:
We have two options:
### Option 1: With box + masks:
swift
let boxesMask: [ParsedRow] = combinedMask.enumerated().map { parseRowMask(index: $0.offset, row: $0.element) }
At this point, we can pinpoint the index where the model has generated its most accurate prediction. In this particular context, this index is designated as 'i,' and its specific value is 8249.

Our next step involves the task of locating the corresponding mask linked to this particular index.
swift
let maskImage = YOLOVisionML.convertToUIImage(mask: boxesMask[8249].mask)
let newSize = CGSize(width: Int(round(NSDecimalNumber(decimal: boxesMask[8249].x2 - boxesMask[8249].x1).doubleValue)),
height: Int(round(NSDecimalNumber(decimal: boxesMask[8249].y2 - boxesMask[8249].y1).doubleValue)))
let resizedImage = resizeMask(image: maskImage!, targetSize: newSize)
let color = UIColor.green
let finalImage = overlayMask(baseImage: inputImage!, mask: maskImage!, color: color)
You’ll be able to see the masks as well as the binary form.

## Option 2: You just want the box:
swift
let resultNormal = YOLOVisionML.nonMaxSuppression(boxes: boxes, iouThreshold: 0.7)
Apply it only for the boxes.

###Explanation of the functions
swift
func parseRow(row: [Decimal]) -> [Decimal]
This function effectively filters and extracts each piece of data from every row.

Given that we've resized the image to a dimension of 640x640, the process involves reverting it back to its original size while considering both the width and height. Specifically, we calculate values such as `x1` using the formula `(xc - w/2) / 640 * img_width`.

Subsequently, the objective is to identify the object that corresponds to the maximum probability within this set of values. Additionally, we extract the associated class ID. In the current context, as we're focused on detecting sessions with a single class ID, this ID remains consistent throughout.

Notably, we've implemented a filtering mechanism that eliminates bounding boxes with a probability less than 4 (please note that the probability range here is not confined to [0,1]).

As a result of this process, the output takes the form of a list of Decimal values. This list may encompass multiple entries, contingent on the desired threshold for decision-making points.
swift
let result: [Decimal] = [x1, y1, x2, y2, Decimal(classId), maxProbability]
 ### NonMaxSupression
 In the realm of Machine Learning, a fundamental technique called non-maximum suppression is employed to effectively filter and prioritize the best bounding box predictions.
I'll provide an overview of its functioning.

Our next step involves the application of non-maximum suppression to the collection of probable bounding boxes we've obtained. It's important to emphasize that a specific IOU (Intersection over Union) threshold needs to be chosen for this process. This threshold is crucial in determining how overlapping bounding boxes are handled.

By deploying non-maximum suppression, we ensure that only the most relevant bounding boxes are retained, contributing to a more refined and accurate outcome.
These are the main functionalities of the non max in the pod

<img src="https://miro.medium.com/v2/resize:fit:1400/1*iVUDd4fYhL5evD1M5156DA.png" width = "60%" height="50%">
<br />
<img src="https://miro.medium.com/v2/resize:fit:1400/1*6d_D0ySg-kOvfrzIRwHIiA.png" width = "60%" height="40%">
swift
func intersection(box1: [Decimal], box2: [Decimal]) -> Decimal
func union(box1: [Decimal], box2: [Decimal]) -> Decimal
func iou(box1: [Decimal], box2: [Decimal]) -> Decimal
func nonMaxSuppression(boxes: [[Decimal]], iouThreshold: Decimal) -> [[Decimal]]
I won’t explain how the code specifically works, since it’s a lot of computation but follow the exact same concept of the non max suppression method.

As a result we get an even more accurate result of bbox like one or two.

For visualizing the box on the image, we can use this function
swift
func drawRectanglesOnImage(image: UIImage, boxes: [[Decimal]])
### Option 2: You want the bounding box and the masks to be processed at the same time.
It’s the same process with few modifications.

We create a struct to store the data of each row but with box and mask data this time.
Struct:
swift
struct ParsedRow {
let x1: Decimal
let y1: Decimal
let x2: Decimal
let y2: Decimal
let classId: Decimal
let maxProbability: Decimal
let mask: [[UInt8]]
let index: Int
}
func parseRowMask(index: Int, row: [Decimal]) -> ParsedRow
func nonMaxSuppressionMask(boxes: [ParsedRow], iouThreshold: Decimal) -> [ParsedRow]
Consider utilizing a specialized function that's designed to output masks and parse rows. In essence, this approach transcends the conventional practice of solely returning a set of box probabilities, as represented by [x1, y1, x2, y2, Decimal(classId), maxProbability]. Instead, we're enhancing each row with its corresponding masks. In terms of recommendation, I propose opting for row filtering (option 1), which facilitates the seamless application of masks to the precise row, streamlining the process and eliminating the need for individual mask application.

Now, let's delve into the nuances of mask creation and processing:

Let's explore the methods for creating and manipulating masks.

### Binary Mask
We must refresh our understanding of masks in Machine Learning. Masks consist of binary values, specifically 0 or 1, denoting a binary choice – a representation of 'yes' or 'no.' In Swift, a mask is represented as a [[UInt8]].
Behind the scenes, several operations are executed to generate these masks. The procedure entails the utilization of a specific function:

Prior to this, when dealing with the output dimensions of (3, 160, 160), it's noticeable that after isolating the box's x, y, h, and w, the remaining values are indicative of the probability that a given pixel belongs to the object. If the probability is low, the pixel is attributed to the background and is set to black. Conversely, if the probability is higher, the pixel is designated as white. However, these raw values are an output from the neural network and require conversion into probabilities. To accomplish this, we apply the sigmoid function.
In essence, the sigmoid function facilitates the conversion of the neural network's raw output into interpretable probabilities.

<img src="https://miro.medium.com/v2/resize:fit:970/1*Xu7B5y9gp0iL5ooBj7LtWw.png" width="40%" height="10%">

For a clearer overiview this is the algorithm that we commonly use for a binary (or bit) mask in machine learning:
scss
binary_mask(x, y) = 1, if image(x, y) >= threshold
0, otherwise
Here is the function used :swift
func createMask(from matrix: [[Decimal]]) -> [[UInt8]]
If you want to visualize the mask you can check it out with this function: swift
func createMask(from matrix: [[Decimal]]) -> [[UInt8]]
We must also scale this mask to the size of the bounding box of this object we’ll use this function:
swift
func resizeMask(image: UIImage, targetSize: CGSize) -> UIImage
Finally after calling the box drawer you can add the masks on top of the newly created image thanks to :swift
func overlayMask(baseImage: UIImage, mask: UIImage, color: UIColor) -> UIImage?
### Additional
I've also added some additional functionalities like:
swift
func MLMultiArrayToCGImage(output: MLMultiArray) throws -> CGImage?
```
This converts an MLMultiArray into a CGI Image.
References
YOLOVisionML Logo:
Source: UltralyticsApple Create ML Framework Icon:
Source: Apple DeveloperExample Image:Source: Fotolia
Example 3: Icarus
Images 4, 5, 6, 7: miro.medium
For more info on YOLO output processig check https://dev.to/andreygermanov/how-to-create-yolov8-based-object-detection-web-service-using-python-julia-nodejs-javascript-go-and-rust-4o8e