UIFlow - A navigation and data interaction framework for iOS projects


TL; DR
UIFlow is a framework to let the Coordinator handle the navigation between UIViewControllers.
You can use your ViewControllers (or subclass the UIFlowViewController class) and create Coordinators to handle everything.
There is also a Instantiable protocol that will instantiate your ViewController from a storyboard or xib file with the same name.
Now, if you are really interested in how this can make your life easier, please read this documentation fully, it will take only a few minutes, but you can also download the code and see it in action with the given Demo project.
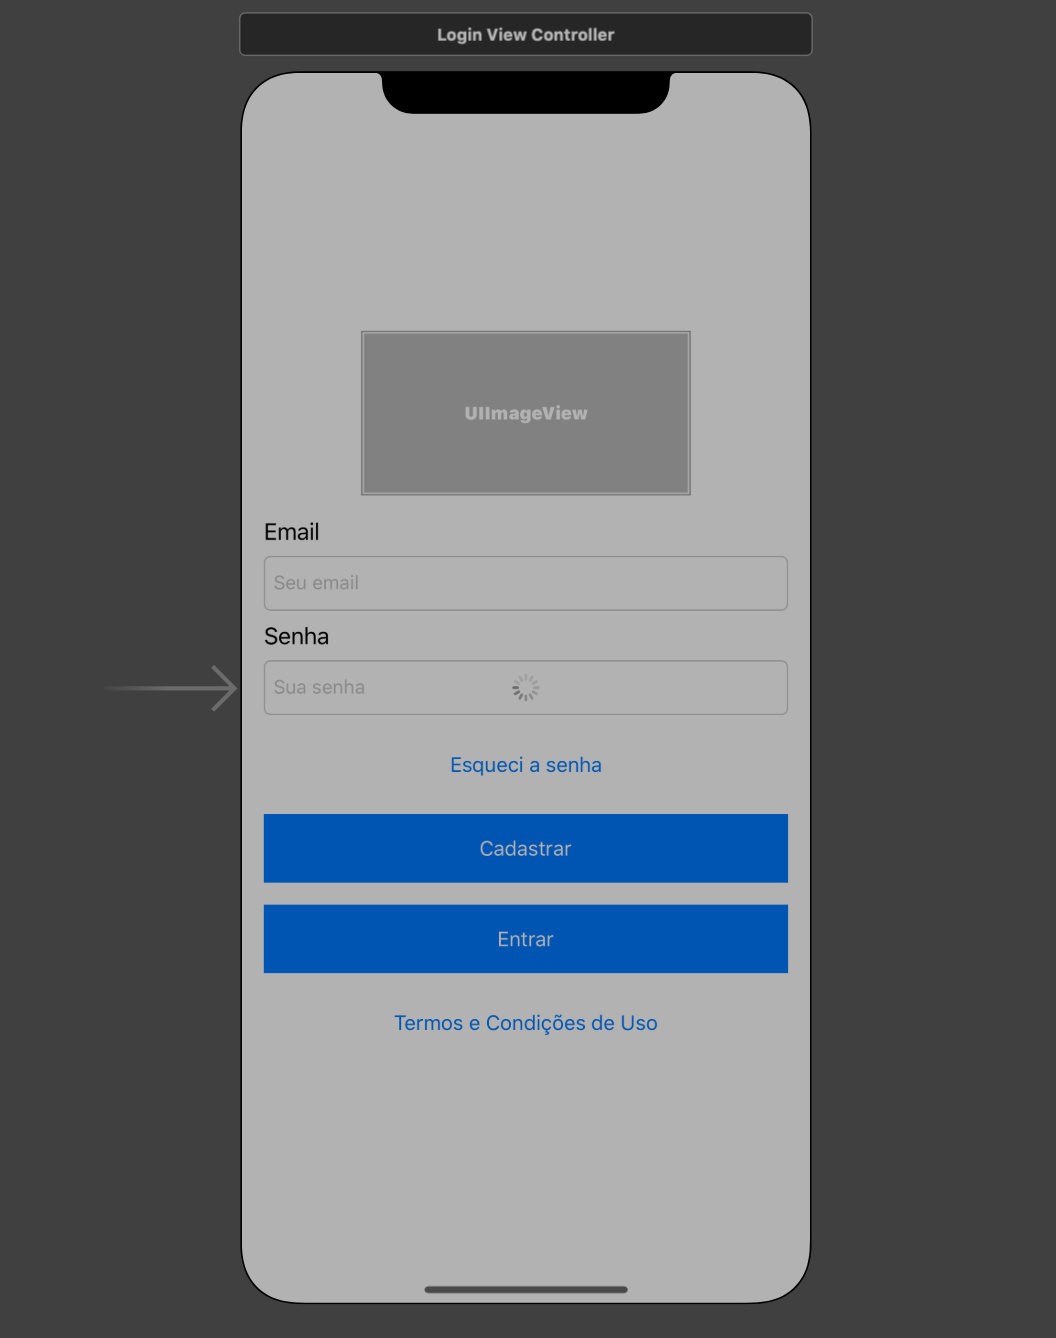
In the end, your ViewController doesn´t need to know anything about navigation and may look like this:
import Combine
import UIFlow

class LoginViewController: UIFlowViewController {

    // MARK: - Dependencies

    var viewModel: LoginViewModel!

    // MARK: - VC Actions

    var finishedLogin: (() -> Void)?
    var goToUserRegistration: (() -> Void)?

    // MARK: - IB Outlets

    @IBOutlet private weak var emailTextField: UITextField!
    @IBOutlet private weak var passwordTextField: UITextField!

    // MARK: - Life Cycle

	override func viewDidLoad() {
        super.viewDidLoad()
        observe(viewModel.$state) { [weak self] state in
            guard let self = self else { return }
            switch state {
            case .loggedIn: self.finishedLogin?()
            case .loginError: self.showError()
            }
        }
    }

    // MARK: - IB Actions

    @IBAction func userRegistrationButtonTouchUpInside(_ sender: Any) {
        goToUserRegistration?()
    }

    @IBAction func loginButtonTouchUpInside(_ sender: Any) {
        viewModel.login(email: emailTextField.text, password: passwordTextField.text)
    }
}
Thanks!
What is it?
There are many design patterns, architectures and ideas out there about how an iOS app should be structured. Well, this is another one, but this is not a breaktrough disruptive framework that will blow your mind, this is a combination of ideas that worked pretty well for my needs.
After working many years in many different app kinds and sizes, I saw that I could use a simple structure to handle most of them, but it should follow some principles:
- Easy to understand
- Easy to use
- Separate Model interaction from User interaction
- Make all ViewControllers isolated and testable
- Possibility to reuse ViewControllers in different flows without adding custom code on them
- Make it scalable
Nice list, right? Following these concepts, I came up with UIFlow and I hope it could help in your projects.
Oh, you might be asking "What about SwiftUI?". That's a huge step in iOS development, but there are so many projects out there using UIKit that it is almost impossible to move to SwiftUI and older iOS versions would not be able to use it, so UIFlow could be a good option.
Setup
CocoaPods
If you are using CocoaPods, add this to your Podfile and run pod install.
target 'Your target name' do
    pod 'UIFlow', '~> 2.1'
end
Manual Installation
If you want to add it manually to your project, without a package manager, just copy all files from the Classes folder to your project.
How does it work?
Ok, let's start with the basics. UIFlow is so simple that it has only these protocols/models:
- Instantiable
- Coordinator
- UIFlowViewController
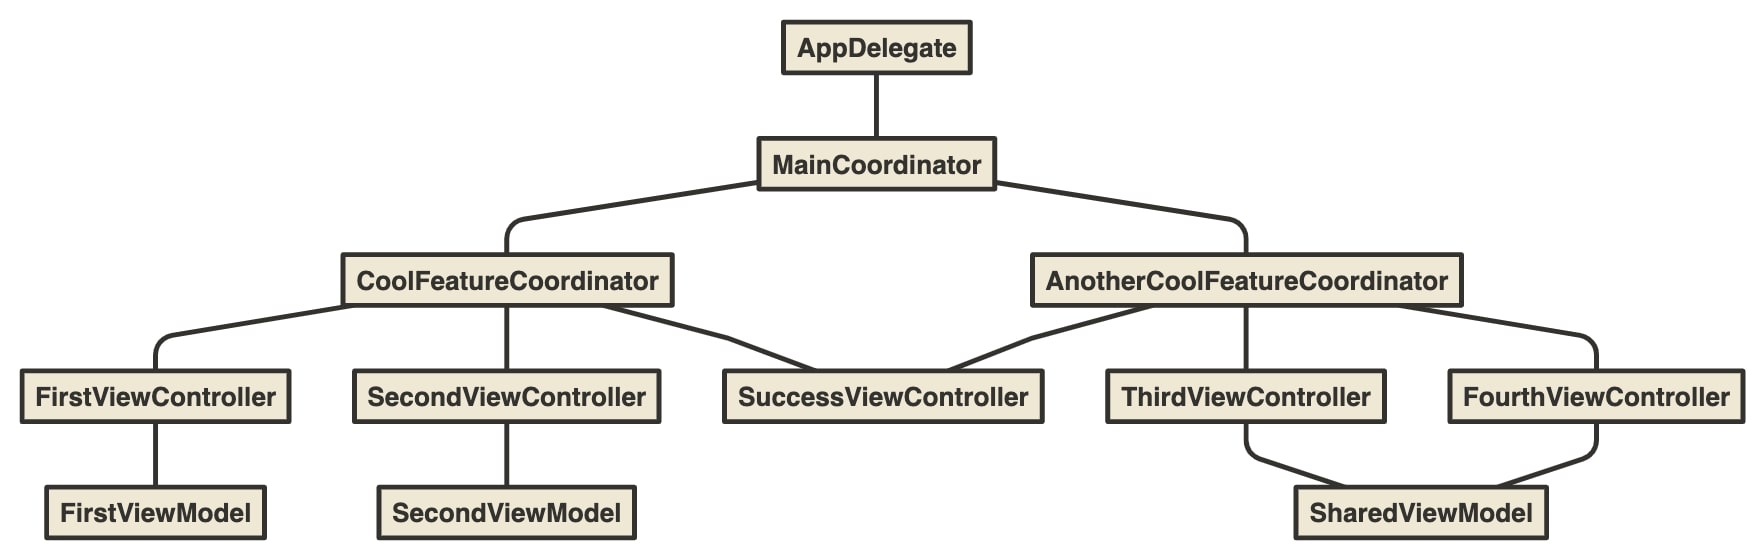
Really, that's it? Yes! In general, this is how a simple app looks like:

See? Now let's talk about each part of it.
Concepts
Instantiable
I saw some protocols out there to instantiate ViewControllers from storyboards or xibs with the same file name, so I put it all together in a unique protocol. Here you can see how easy it is to use, let's say that we have created this LoginViewController and set it as the initial view controller:
- LoginViewController.storyboard
- LoginViewController.swift
This is how you use it in a Coordinator:
func navigateToLogin(animated: Bool) {
    guard let scene = LoginViewController.instantiate() else { return }
    move(to: scene, animated: animated)
}
So simple!
Coordinator
You might already saw many different implementations of the Coordinator pattern. This is very similar to those out there, but the big difference is that it has only one child running at a time while usually you see many children for the coordinator. I will explain about the child behaviour soon, but first let's explain how the Coordinator works.
View Controllers should not know from where the user came from and where the user will go. This is almost like the idea of Dependency Injection, because the ViewController will only do what it was meant to do and tell the Coordinator what is the intention of the user.
For instance:
On a LoginViewController, there will be some inputs with validation and the login service. When the login is completed successfully, where should the user go? To the menu? To some specific area that only logged users can see? Well, it doesn't matter!
The LoginViewController will only tell the Coordinator that the login was successful and leave the navigation to the Coordinator. With that, an AccessCoordinator, for instance, could simple navigate to the menu and a PremiumCoordinator could navigate to a secret area.
See what's happening? The LoginViewController doesn't care about where it should go, just need to do what it was meant to do.
Let's see it in action:
import UIFlow

class AppCoordinator: Coordinator {

    // MARK: - Properties

    var navigation: UINavigationController
    weak var startViewController: UIViewController?
    weak var topViewController: UIViewController?
    var parent: Coordinator?
    var child: Coordinator?

    var firstTime = true
    var loggedIn = false

    // MARK: - Initialization

    init(navigation: UINavigationController) {
        self.navigation = navigation
    }

    // MARK: - Coordinator

    func start(animated: Bool) {
        if firstTime {
            navigateToOnboarding(animated: animated)
        } else if loggedIn {
            navigateToMenu(animated: animated)
        } else {
            navigateToLogin(animated: animated)
        }
    }

    // MARK: - Login

    func navigateToLogin(animated: Bool) {
        guard let scene = LoginViewController.instantiate() else { return }
        scene.goToUserRegistration = { [weak self] in
            self?.navigateToUserRegistration(animated: true)
        }
        scene.finishedLogin = { [weak self] in
            self?.loggedIn = true
            self?.start(animated: true)
        }
        move(to: scene, animated: animated)
    }

    ...
}
...
Child Coordinator
A child Coordinator is a different flow that will be executed and when it finishes, it will go back to the parent flow. You can think of it as the different features of the app that involves many scenes. The only thing is that the Coordinator will execute only one child at a time, but a child could have its own child and so on.
What is the benefit of have only one child at a time instead of many children running in parallel? Simple, most of the time you will only be seeing one flow and it will go back to the parent when finished. Because of that, in UIFlow you run only one child at a time.
When you start the child's flow, the parent's flow will hold the reference of the last ViewController that is being presented and when the child finishes, the parent flow will go back in the navigation stack to that ViewController.
This is an example of what can you do in your project:

So how can you go to a child flow? Like this:
func goToItems(_ sender: MenuViewController) {
    let itemsCoordinator = ItemsCoordinator(navigation: navigation)
    start(child: itemsCoordinator, animated: true)
}
Easy enough. Did finish your business in the flow? You can go back like this:
func closeItemsList(_ sender: ItemsListViewController) {
    finish(animated: true)
}
And that's all! It will go back to the parent's flow.
TabBarCoordinator
Sometimes you need a TabBar in your apps, so to work with this kind of navigation, I have created the TabBarCoordinator. As expected, it is very simple:
import UIFlow

class MenuCoordinator: TabBarCoordinator {

    // MARK: - Coordinator Properties

    var navigation: UINavigationController
    weak var startViewController: UIViewController?
    weak var topViewController: UIViewController?
    var parent: Coordinator?
    var child: Coordinator?

    // MARK: - TabBarCoordinator Properties

    let tabBar: UITabBarController
    var items: [Coordinator]

    // MARK: - Initialization

    init(navigation: UINavigationController,
         tabBar: UITabBarController = UITabBarController()) {

        self.navigation = navigation
        self.tabBar = tabBar
        items = []
    }
}
And it is also very easy to use, you just need to add the tab bar items with one of these methods:
let tabBarItem = UITabBarItem(title: "Item 1",
                              image: nil,
                              selectedImage: nil)
coordinator.addItem(tabBarItem: tabBarItem,
                    coordinator: TestCoordinator(navigation: UINavigationController()))

coordinator.addItem(title: "Item 2",
                    image: nil,
                    selectedImage: nil,
                    coordinator: AnotherCoordinator())
Finally, if you need to remove one of the items, just do it like this:
coordinator.removeItem(at: 0)UIFlowViewController
The UIFlowViewController it's a very simple UIViewController that implements the basics of the Combine framework for model observation using the observe() method. So if you want to benefit from it, you could simple use it like this:
import UIFlow

class NewItemViewController: UIFlowViewController {

    // MARK: - Dependencies

    var viewModel: NewItemViewModel!

    // MARK: - IB Outlets

    @IBOutlet weak var itemNameTextField: UITextField!

    // MARK: - VC Actions

    var newItemCompleted: (() -> Void)?
    var newItemCanceled: (() -> Void)?

     // MARK: - Life Cycle

    override func viewDidLoad() {
        super.viewDidLoad()
        observe(viewModel.$state) { [weak self] value in
            guard let self = self else { return }
            if value == .itemAdded {
                self.itemNameTextField.text = nil
                self.showAlert(title: "Nice!", message: "Item added!")
            }
        }
    }

    // MARK: - Alerts

    func showAlert(title: String, message: String) {
        let alert = UIAlertController(title: title, message: message, preferredStyle: .alert)
        alert.addAction(UIAlertAction(title: "OK", style: .default, handler: nil))
        present(alert, animated: true, completion: nil)
    }

    // MARK: - IB Outlets

    @IBAction func addItemButtonTouchUpInside(_ sender: Any) {
        guard let itemName = itemNameTextField.text, !itemName.isEmpty else { return }
        viewModel.addItem(name: itemName)
    }

    @IBAction func cancelButtonTouchUpInside(_ sender: Any) {
        if viewModel.state == .itemAdded {
            newItemCompleted?()
        } else {
            newItemCanceled?()
        }
    }
}
See how simple the NewItemViewController is and how it doesn't care about the data itself and the navigation? This is what I was trying to achieve! The NewItemViewController only takes care of the user interaction and let the ViewModel and the Coordinator do their job.
Removing observers
The UIFlowViewController will remove all observers on deinit but if there is another strong reference to the view controller, then deinit is not called, but you can easily remove all observers by calling removeObservers():
@IBAction func backButtonTapped(sender: UIButton) {
    removeObservers()
    backAction()
}
Thanks 👍
The creation of this framework was possible thanks to these awesome people:
- Gray Company: https://www.graycompany.com.br/
- Swift by Sundell: https://www.swiftbysundell.com/
- Hacking with Swift: https://www.hackingwithswift.com/
- Ricardo Rauber: http://ricardorauber.com/
Feedback is welcome
If you notice any issue, got stuck or just want to chat feel free to create an issue. We will be happy to help you.
License
UIFlow is released under the MIT License.