          _ _     _ _   _ _ _ _ _   _ _     _ _    _ _   _ _ _ _ _ _ __
         /  /    /  /  /  _ _ _ /  /  /   ╱  ╱    /__/  /_ _ _   _ _ _/
        /  /    /  /  /  /        /  /  ╱  ╱     _ _         /  /
       /  /    /  /  /  /_ _ _   /  / ╱  ╱      /  /        /  /
      /  /    /  /  /  _ _ _ /  /  / \  \      /  /        /  /
     /  /_ __/  /  /  /        /  /   \  \    /  /        /  /
     \ _ _ _ _ /  /__/        /__/     \__\  /__/        /__/
效果
要求
-
iOS 8.0 or later
-
Xcode 11.0 or later
1、表单UFFormView
UFFormView *formView = [UFFormView makeFormView:^(UFFormViewMaker * _Nonnull make) {
        // TODO:设置表单样式
    }];
或
UFFormView *formView = [[UFFormView alloc] init];
// TODO:设置表单样式
2、表单样式
1、什么是样式?
样式就是设置UI控件的字体、颜色、对齐方式等一列属性。包括:文本样式UFTextStyle、标题样式UFRowTitleStyle、手机验证码按钮样式UFMobileCodeStyle、单选按钮样式UFRadioGroupStyle、表单组样式UFSectionStyle等。
2、如何创建表单样式?
1、文本样式
UFTextStyle *textStyle = [UFTextStyle makeTextStyle:^(UFRowTextStyleMaker * _Nonnull make) {
        make
        .color([UIColor redColor])            // 设置文本颜色
        .font([UIFont systemFontOfSize:14])   // 设置文本字体
        .textAlignment(NSTextAlignmentLeft);  // 设置文本对齐方式
    }];
或
UFTextStyle *textStyle = [[UFTextStyle alloc] init];
textStyle.color = [UIColor redColor];           // 设置文本颜色
textStyle.font = [UIFont systemFontOfSize:14];  // 设置文本字体
textStyle.textAlignment = NSTextAlignmentLeft; // 设置文本对齐方式 2、标题样式
UFRowTitleStyle *titleStyle = [UFRowTitleStyle makeTitleStyle:^(UFRowTitleStyleMaker * _Nonnull make) {
        make
        .width(90)                           // 设置标题宽度
        .color([UIColor redColor])           // 设置标题颜色
        .font([UIFont systemFontOfSize:14])  // 设置标题字体
        .textAlignment(NSTextAlignmentLeft); // 设置标题对齐方式
    }];
或
UFRowTitleStyle *titleStyle = [[UFTextStyle alloc] init];
titleStyle.width = 90;                           // 设置标题宽度
titleStyle.color = [UIColor redColor];           // 设置标题颜色
titleStyle.font = [UIFont systemFontOfSize:14];  // 设置标题字体
titleStyle.textAlignment = NSTextAlignmentLeft; // 设置标题对齐方式 3、手机验证码样式
UFMobileCodeStyle *codeStyle = [UFMobileCodeStyle makeMobileCodeStyle:^(UFMobileCodeStyleMaker * _Nonnull make) {
        make
        .cornerRadius(10)                           // 设置按钮圆角
        .backgroundColor([UIColor redColor])        // 设置按钮背景色
        .separatorColor([UIColor lightGrayColor])   // 设置输入框与按钮之间分割线的颜色
        .color([UIColor whiteColor])                // 设置按钮标题颜色
        .font([UIFont systemFontOfSize:14])         // 设置按钮标题字体
        .textAlignment(NSTextAlignmentLeft);        // 设置按钮标题对齐方式
    }];
或
UFMobileCodeStyle *codeStyle = [[UFMobileCodeStyle alloc] init];
codeStyle.cornerRadius = 10;                         // 设置按钮圆角
codeStyle.backgroundColor = [UIColor redColor];      // 设置按钮背景色
codeStyle.separatorColor = [UIColor lightGrayColor]  // 设置输入框与按钮之间分割线的颜色
codeStyle.color = [UIColor whiteColor];              // 设置按钮标题颜色
codeStyle.font = [UIFont systemFontOfSize:14];       // 设置按钮标题字体
codeStyle.textAlignment = NSTextAlignmentLeft; // 设置按钮标题对齐方式 4、单选按钮样式
UFRadioGroupStyle *radioGroupStyle = [UFRadioGroupStyle makeRadioGroupStyle:^(UFRowRadioGroupStyleMaker * _Nonnull make) {
        make
        .image([UIImage imageNamed:@"radio_checked"])              // 未选中图片
        .selectedImage([UIImage imageNamed:@"radio_unchecked"]);   // 选中图片
    }];
或
UFRadioGroupStyle *radioGroupStyle = [[UFRadioGroupStyle alloc] init];
radioGroupStyle.image = [UIImage imageNamed:@"radio_checked"];             // 未选中图片
radioGroupStyle.selectedImage = [UIImage imageNamed:@"radio_unchecked"];   // 选中图片
3、统一添加表单样式
1、添加左侧标题样式
[UFFormView makeFormView:^(UFFormViewMaker * _Nonnull make) {
        make
        .titleStyle([UFRowTitleStyle makeTitleStyle:^(UFRowTitleStyleMaker * _Nonnull make) {
	// TODO:设置标题样式(参考如何创建标题样式)
        }]);
    }];
或
UFRowTitleStyle *titleStyle = [[UFRowTitleStyle alloc] init];
// TODO:设置标题样式(参考如何创建标题样式)
formView.titleStyle = titleStyle;
2、设置右侧值样式
UFFormView *formView = [UFFormView makeFormView:^(UFFormViewMaker * _Nonnull make) {
            make
            .valueStyle([UFTextStyle makeTextStyle:^(UFRowTextStyleMaker * _Nonnull make) {
                // TODO:设置值样式(参考如何创建文本样式)
            }]);
     }];
或
UFTextStyle *valueStyle = [[UFTextStyle alloc] init];
// TODO:设置值样式(参考如何创建文本样式)
formView.valueStyle = valueStyle;
4、统一设置行高
UFFormView *formView = [UFFormView makeFormView:^(UFFormViewMaker * _Nonnull make) {
       make
       .rowHeight(50);
   }];
或
formView.rowHeight = 50;3、分组UFSection
1、创建分组
UFSection *section = [UFSection makeSection:^(UFSectionMaker * _Nonnull make) {

    }];
或
UFSection *section = [[UFSection alloc] init];2、设置分组样式
1、统一设置组内的表单样式
UFSection *section = [UFSection makeSection:^(UFSectionMaker * _Nonnull make) {
      make
       // 设置标题样式
      .titleStyle([UFRowTitleStyle makeTitleStyle:^(UFRowTitleStyleMaker * _Nonnull make) {				           				// TODO:设置标题样式(参考如何创建标题样式)
         }])
       // 设置值样式
       .valueStyle([UFTextStyle makeTextStyle:^(UFRowTextStyleMaker * _Nonnull make) {
          // TODO:设置值样式(参考如何创建文本样式)
       }]);
    }];
或
UFSection *section = [[UFSection alloc] init];

// 设置标题样式
UFRowTitleStyle *titleStyle = [[UFRowTitleStyle alloc] init];
// TODO:设置标题样式(参考如何创建标题样式)
section.titleStyle = titleStyle;

// 设置值样式
UFTextStyle *valueStyle = [[UFTextStyle alloc] init];
// TODO:设置值样式(参考如何创建文本样式)
section.valueStyle = valueStyle; 2、设置组头、脚样式
[UFSection makeSection:^(UFSectionMaker * _Nonnull make) {
      make
        // 设置头样式
      .headerStyle([UFSectionStyle makeSectionStyle:^(UFSectionStyleMaker * _Nonnull make) {
       make
       .height(30)                         // 设置头高度
       .text(@"页眉")                      // 设置头描述信息
       .color([UIColor lightGrayColor])    // 设置头描述信息颜色
       .font([UIFont systemFontOfSize:12]) // 设置头描述信息字体
       .numberOfLines(0);                  // 设置头描述信息多行
        }])

        // 设置脚样式
      .footerStyle([UFSectionStyle makeSectionStyle:^(UFSectionStyleMaker * _Nonnull make) {
        make
       .height(30)                         // 设置脚高度
       .text(@"页脚")                      // 设置脚描述信息
       .color([UIColor lightGrayColor])    // 设置脚描述信息颜色
       .font([UIFont systemFontOfSize:12]) // 设置脚描述信息字体
       .numberOfLines(0);                  // 设置脚描述信息多行
      }]);
     }];
或
UFSection *section = [[UFSection alloc] init];

// 设置头样式
UFSectionStyle *headerStyle = [[UFSectionStyle alloc] init];
headerStyle.height = 30;                            // 设置头高度
headerStyle.text = @"页眉";                         // 设置头描述信息
headerStyle.color = [UIColor lightGrayColor];       // 设置头描述信息颜色
headerStyle.font = [UIFont systemFontOfSize:12];    // 设置头描述信息字体
headerStyle.numberOfLines = 0;                      // 设置头描述信息多行
section.headerStyle = headerStyle;

// 设置脚样式
UFSectionStyle *footerStyle = [[UFSectionStyle alloc] init];
footerStyle.height = 30;                            // 设置脚高度
footerStyle.text = @"页脚";                         // 设置脚描述信息
footerStyle.color = [UIColor lightGrayColor];       // 设置脚描述信息颜色
footerStyle.font = [UIFont systemFontOfSize:12];    // 设置脚描述信息字体
footerStyle.numberOfLines = 0;                      // 设置脚描述信息多行
section.footerStyle = footerStyle;
3、添加组到表单
UFFormView *formView = [UFFormView makeFormView:^(UFFormViewMaker * _Nonnull make) {
       	 make
        .addSection([UFSection makeSection:^(UFSectionMaker * _Nonnull make) {
            // TODO:设置组样式
        };
    }];
或
[formView addSection:section]; 4、行UFRow
1、子类
UFRow                                // 文本
UFSubtitleRow                        // 子标题
UFTextFieldRow                       // 单行输入
UFDatePickerRow                      // 日期选择器
UFPickerViewRow                      // 单项选择器
UFMultiplePickerViewRow              // 多项选择器
UFAreaPickerRow                      // 三级地址选择器
UFCustomPickerViewRow                // 自定义选择器
UFTextViewRow                        // 多行输入
UFMobileCodeRow                      // 手机验证码
UFAvatarRow                          // 头像
UFRadioGroupRow                      // 单选
UFSwitchRow                          // 开关
UFPlateNumberRow                     // 车牌号码
2、如何创建行?(常规写法不再赘述)
(1)UFRow

UFRow *row = [UFRow makeRow:^(UFRowMaker * _Nonnull make) {
        make
        .height(50)                                  // 设置行高
        .image([UIImage imageNamed:@"icon"])         // 设置图标
        .title(@"姓名")                               // 设置标题
        .titleStyle([UFRowTitleStyle makeTitleStyle:^(UFRowTitleStyleMaker * _Nonnull make) {
            make
            .width(100)                              // 设置标题宽度,为了对齐表单
            .color([UIColor blackColor])             // 设置标题颜色
            .font([UIFont systemFontOfSize:15])      // 设置标题字体
            .textAlignment(NSTextAlignmentLeft);     // 设置标题对齐方式
        }])                                          // 设置标题样式
        .value(@"陈张利")                             // 设置默认值
        .valueStyle([UFTextStyle makeTextStyle:^(UFRowTextStyleMaker * _Nonnull make) {
            make
            .color([UIColor blackColor])             // 设置值颜色
            .font([UIFont systemFontOfSize:15])      // 设置值字体
            .textAlignment(NSTextAlignmentRight);    // 设置值对齐方式
        }])                                          // 设置值样式
        .valueDidChanged(^(__kindof UFRow * _Nonnull row, NSString * _Nonnull value) {
            // 监听值得变化
        })
        .accessoryType(UFRowAccessoryDisclosureIndicator) // 设置行后的附件样式,如箭头、对号
        .accessoryImage([UIImage imageNamed:@"arrow"])    // 自定义行后的附件图片,如箭头、对号
        .rowDidSelected(^(__kindof UFRow * _Nonnull row) {
            // 点击行事件
        })
        .name(@"name");                                   // 行的名称,可看做时字段的key,唯一值
}];注:为使行的右端对齐,你可使用UFRowAccessorySpace进行占位。
(2)UFSubtitleRow

UFSubtitleRow *subtitleRow = [UFSubtitleRow makeSubtitleRow:^(UFSubtitleRowMaker * _Nonnull make) {
       make
       .subtitle(@"推荐支付宝用户使用")                      // 设置子标题
       .subtitleStyle([UFRowTitleStyle makeTitleStyle:^(UFRowTitleStyleMaker * _Nonnull make) {
           make
           .width(140)                                    // 设置子标题宽度
           .font([UIFont systemFontOfSize:12])            // 设置子标题字体
           .color([UIColor lightGrayColor]);              // 设置子标题颜色
       }])                                                // 设置子标题样式
       .accessoryImage([UIImage imageNamed:@"checked"])   // 自定义行后的附件图片
       .height(80)                                        // 设置行高
       .image([UIImage imageNamed:@"alipay"])             // 设置图标
       .title(@"支付宝")                                  // 设置标题
       .name(@"pay");

       // 其他属性不再赘述,参考UFRow设置

   }];
(3)UFAvatarRow

UFAvatarRow *avatarRow = [UFAvatarRow makeAvatarRow:^(UFAvatarRowMaker * _Nonnull make) {
        make
        .cornerRadius(30)                                   // 设置头像圆角,圆角大小决定行高
        .avatarImage([UIImage imageNamed:@"touxiang"])      // 设置默认头像,网络图像不设置或加载失败时,可作为占位头像
        .avatarDidSelected(^(__kindof UFAvatarRow * _Nonnull row, UIImageView * _Nonnull avatarView) {
            // 点击头像事件
        })
        .title(@"头像")
        .value(@"http://img0.imgtn.bdimg.com/it/u=2572957358,1108684168&fm=26&gp=0.jpg") // 设置网络图片
        .accessoryType(UFRowAccessorySpace)
        .name(@"avatar");

        // 其他属性不再赘述,参考UFRow设置
}];注:UFKit提供了UIViewControlle的选择图片的方法
[self ufk_pickerImageForResult:^(UIImage * _Nonnull image) {

}];
(4)UFRadioGroupRow

 UFRadioGroupRow *radioGroupRow  = [UFRadioGroupRow makeRadioGroupRow:^(UFRadioGroupRowMaker * _Nonnull make) {
        make
        .itemArray(@[@"男",@"女"])      // 设置选项
        .editable(YES)                 // 是否允许编辑
        .radioGroupStyle([UFRadioGroupStyle makeRadioGroupStyle:^(UFRowRadioGroupStyleMaker * _Nonnull make) {
            make
            .image([UIImage imageNamed:@"rg_unchecked"])          // 设置默认未选中图片
            .selectedImage([UIImage imageNamed:@"rg_checked"]);   // 设置选中图片
        }])
        .title(@"性别")
        .value(@"男")
        .accessoryType(UFRowAccessorySpace)
        .name(@"gender");

   	// 其他属性不再赘述,参考UFRow设置
    }];
(5)UFTextFieldRow

UFTextFieldRow *textFieldRow = [UFTextFieldRow makeTextFieldRow:^(UFTextFieldRowMaker * _Nonnull make) {
        make
        .limitType(UFInputLimitTypeMobile)    // 设置输入限制
        .editable(YES)                        // 是否允许编辑
        .maxLength(11)                        // 设置最大输入长度,设置limitType后该属性可能会不起作用
        .keyboardType(UIKeyboardTypeDefault)  // 设置键盘样式,设置limitType后该属性可能会不起作用
        .secureTextEntry(NO)                  // 是否安全输入
        .canPerformAction(YES)                // 是否允许粘贴复制
        .placeholder(@"请输入")                // 占位字符,不设置时自动会添加请输入title
        .barTintColor([UIColor blackColor])   // 键盘上方取消/确定的颜色
        .title(@"联系方式")
        .accessoryType(UFRowAccessorySpace)
        .name(@"mobile");

  	// 其他属性不再赘述,参考UFRow设置
    }];
注: UFKit提供了以下输入限制样式,以便限制输入框内输入的内容。
typedef NS_ENUM(NSUInteger, UFInputLimitType) {
    UFInputLimitTypeNone = 0,        // 无限制
    UFInputLimitTypeMobile,          // 手机号码
    UFInputLimitTypeEmail,           // 邮箱
    UFInputLimitTypeIdCard,          // 身份证号
    UFInputLimitTypeNumbers,         // 数字
    UFInputLimitTypeLetters,         // 字母
    UFInputLimitTypeCapitalLetters,  // 大写字母
    UFInputLimitTypeAlphanumeric,    // 字母和数字
    UFInputLimitTypeFloat,           // 浮点数
    UFInputLimitTypeMoney,           // 金额(2位小数)
};
(5)UFMobileCodeRow

UFMobileCodeRow *mobileCodeRow = [UFMobileCodeRow makeCodeRow:^(UFCodeRowMaker * _Nonnull make) {
            make
            .codeStyle([UFMobileCodeStyle makeMobileCodeStyle:^(UFMobileCodeStyleMaker * _Nonnull make) {
                make
                .backgroundColor([UIColor whiteColor])     // 设置按钮背景色
                .cornerRadius(5)                           // 设置按钮圆角
                .separatorColor([UIColor lightGrayColor]); // 设置输入框与按钮之间分割线的颜色
                // 其他属性不再赘述,参考UFRowTextStyleMaker设置
            }])
            .codeDidClicked(^(__kindof UFMobileCodeRow * _Nonnull row, UIButton * _Nonnull button) {
               //点击获取验证码事件
            })
            .maxLength(4)
            .limitType(UFInputLimitTypeNumbers)
            .title(@"验证码")
            .accessoryType(UFRowAccessorySpace)
            .name(@"code");

            // 其他属性不再赘述,参考UFTextFieldRow设置
}];注:UFKit提供了UIButton的倒计时方法
[button ufk_countDown:60]; // 60s倒计时(6)UFPickerViewRow

 UFPickerViewRow *pickerViewRow = [UFPickerViewRow makePickerViewRow:^(UFPickerViewRowMaker * _Nonnull make) {
            make
            .itemArray(@[@"总经办",@"行政部",@"人力资源部",@"财务部",@"产品部",@"技术部",@"运营部"]) // 设置选项
            .title(@"部门")
            .value(@"技术部")
            .accessoryType(UFRowAccessoryDisclosureIndicator)
            .name(@"org");

            // 其他属性不再赘述,参考UFTextFieldRow设置
        }];
(7)UFAreaPickerRow
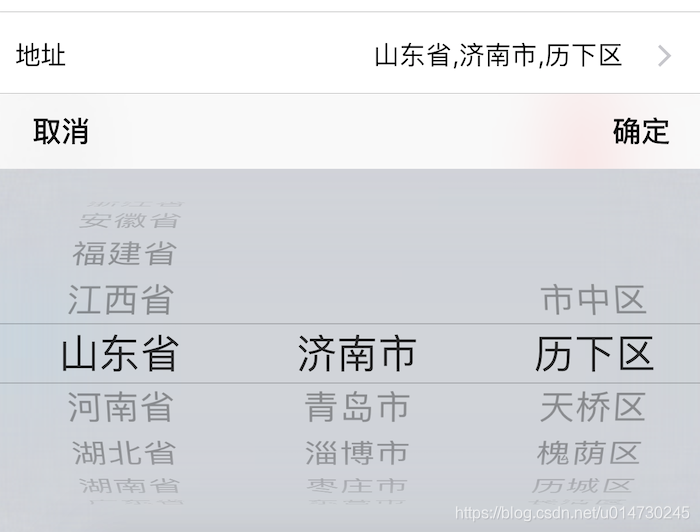
UFAreaPickerRow *areaPickerRow = [UFAreaPickerRow makeAreaPickerRow:^(UFAreaPickerRowMaker * _Nonnull make) {
            make
            .areaSeparator(@",")     // 省市区之间的分割字符
            .title(@"地址")
            .accessoryType(UFRowAccessoryDisclosureIndicator)
            .name(@"address");

            // 其他属性不再赘述,参考UFPickerViewRow设置
        }];
(8)UFCustomPickerViewRow

UFCustomPickerViewRow *customPickerRow = [UFCustomPickerViewRow makeCustomPickerViewRow:^(UFCustomPickerViewRowMaker * _Nonnull make) {
              make.
              delegate(weakSelf)   // 设置代理
              .valueDidSelected(^(__kindof UFCustomPickerViewRow * _Nonnull row, UITextField * _Nonnull textField) {
                  // 选择结束后的确定事件
              })
              .title(@"选择器")
              .name(@"custom")
              .accessoryType(UFRowAccessoryDisclosureIndicator);;
}]; UFCustomPickerViewRowDelegate
// 列数
- (NSInteger)numberOfComponentsInPickerViewRow:(UFCustomPickerViewRow *)pickerViewRow;
// 每列的行数
- (NSInteger)pickerViewRow:(UFCustomPickerViewRow *)pickerViewRow numberOfRowsInComponent:(NSInteger)component;
// 行标题
- (NSString *)pickerViewRow:(UFCustomPickerViewRow *)pickerViewRow titleForRow:(NSInteger)row forComponent:(NSInteger)component;
// 选中行
- (void)pickerViewRow:(UFCustomPickerViewRow *)pickerViewRow didSelectRow:(NSInteger)row inComponent:(NSInteger)component;
(9)UFMultiplePickerViewRow

UFMultiplePickerViewRow *multiplePickerViewRow = [UFMultiplePickerViewRow makeMultiplePickerViewRow:^(UFMultiplePickerViewRowMaker * _Nonnull make) {
        make
        .itemArray(@[@"看电影",@"旅游",@"看书",@"打游戏",@"篮球",@"足球",@"其他"])  // 设置选项
        .title(@"爱好")
        .value(@"打游戏,其他")
        .accessoryType(UFRowAccessoryDisclosureIndicator)
        .name(@"hobby");

        // 其他属性不再赘述,参考UFTextFieldRow设置
    }];
(10)UFDatePickerRow
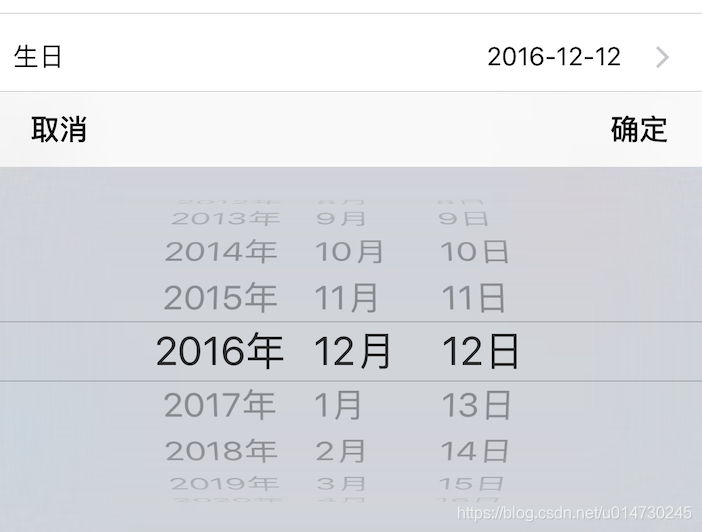
UFDatePickerRow *datePickerRow = [UFDatePickerRow makeDatePickerRow:^(UFDatePickerRowMaker * _Nonnull make) {
            make
            .minimumDate(最小时间)                    // 最小时间
            .maximumDate(最大时间)                    // 最大时间
            .datePickerMode(UIDatePickerModeDate)    // 时间选择样式
            .dateFormat(@"yyyy-MM-dd")               // 时间格式
            .title(@"生日")
            .value(@"2016-12-12")
            .accessoryType(UFRowAccessoryDisclosureIndicator)
            .name(@"birthday");

            // 其他属性不再赘述,参考UFTextFieldRow设置
        }];
(11)UFPlateNumberRow

 UFPlateNumberRow *plateNumberRow = [UFPlateNumberRow makePlateNumberRow:^(UFPlateNumberRowMaker * _Nonnull make) {
            make
            .title(@"车牌号")
            .value(@"鲁A12345")
            .accessoryType(UFRowAccessorySpace)
            .name(@"plate");

            // 其他属性不再赘述,参考UFTextFieldRow设置
        }];
(12)UFTextViewRow

UFTextViewRow *textViewRow = [UFTextViewRow makeTextViewRow:^(UFTextViewRowMaker * _Nonnull make) {
            make
            .title(@"个人简介")
            .value(@"苹果公司是美国一家高科技公司。由史蒂夫·乔布斯、斯蒂夫·沃兹尼亚克和罗·韦恩等人于1976年4月1日创立,总部位于加利福尼亚州的库比蒂诺")
            .accessoryType(UFRowAccessorySpace)
            .name(@"introduction");
        }];
(13)UFSwitchRow

UFSwitchRow *switchRow = [UFSwitchRow makeSwitchRow:^(UFSwitchRowMaker * _Nonnull make) {
          make
          .tintColor([UIColor redColor])     // 设置开关颜色
          .title(@"免打扰")
          .value(SWITCH_ON)
          .accessoryType(UFRowAccessorySpace)
          .valueDidChanged(^(__kindof UFRow * _Nonnull row, NSString * _Nonnull value) {
              // 开关事件
          })
          .name(@"allow");
}];注:UFKit提供了 SWITCH_ON (开)和 SWITCH_OFF (关)的常量定义
3、如何自定义行
1、继承UFRow创建其子类
2、继承UFRowCell创建其子类
3、注册Row和cell到formView
UFFormView *formView = [UFFormView makeFormView:^(UFFormViewMaker * _Nonnull make) {
            make
            .registerRow([CustomRow class], [CustomRowCell class]);
            }];
4、如何查找行?
// 根据名称查找
UFRow *row = [formView findRowByName:@"name"];

// 根据位置查找,如第1组第4行
UFRow *row = [formView findRowInRange:UFMakeRange(0, 3)];
5、添加行到组
UFSection *section = [UFSection makeSection:^(UFSectionMaker * _Nonnull make) {
        make
        .addRow(/*你定义的行*/);
}];
UFSection *section = [UFSection makeSection:^(UFSectionMaker * _Nonnull make) {
make
.addRowWithBlock(^__kindof UFRow * _Nonnull{
// 你定义的行
UFRow *row = [[UFRow alloc] init];
return row;
});
}];5、提交
1、添加提交按钮


UFActionButton *submitButton = [UFActionButton makeActionButton:^(UFActionButtonMaker * _Nonnull make) {
            make
            .titleForState(@"提交", UIControlStateNormal)
            .titleColorForState([UIColor whiteColor], UIControlStateNormal)
            .cornerRadius(22)
            .backgroundColor([UIColor redColor])
            .actionButtonClick(^(UFActionButton * _Nonnull button) {
                // 点击提交事件
            });
        }];
[UFFormView makeFormView:^(UFFormViewMaker * _Nonnull make) {
make
.addSubmitButton(submitButton)
.addCancelButton(cancelButton);
}];2、获取表单数据
[formView toDictionary];
6、依赖
'Masonry', '~> 1.1.0'
'SDWebImage', '~> 5.0.6'
'IQKeyboardManager', '~> 6.3.0'
7、安装
pod 'UFKit'
8、联系方式
QQ:893419255(请注明UFKit)
版本记录:
-
1.1.17
支持国际化(简体中文、繁体中文、英文)
-
1.2.0
支持自适应高度、暗黑模式