SwiftyPlistManager 1.0.2
| TestsTested | ✗ |
| LangLanguage | SwiftSwift |
| License | MIT |
| ReleasedLast Release | Oct 2017 |
| SwiftSwift Version | 4 |
| SPMSupports SPM | ✗ |
Maintained by Alex Nagy.
SwiftyPlistManager 1.0.2
- By
- Alex Nagy
SwiftyPlistManager is a lightweight plist data management framework for iOS 10.3+
Step by step tutorial
I have written a blog post on rebeloper.com with even more info on the usage of SwiftyPlistManager and handy images.
Screenshots

Setup
SwiftyPlistManager needs template plist files to use them as the starting point of your data saving and loading. Basically on the first launch of the app it will copy it into it's Document directory and after that you'll be interacting with this copied version of the plist.
Just drag and drop (or create) your plist file(s) into your project. Optionaly you could edit the values to reflect your desired datastructure.
Starting SwiftyPlistManager
IMPORTANT: You always have to "start" SwiftyPlistManager on every launch of your app. Let's assume you have an empty Data.plist file added to your project and you want to log Add the next line of code to your application(_:didFinishLaunchingWithOptions:) function in Appdelegate.swift
SwiftyPlistManager.shared.start(plistNames: ["Data"], logging: true)Set logging to true if you want to log what's going on under the hood. Optionaly set it to false before release or when you are fed up with too much text in the console.
The plistNames parameter takes in an array of Strings. You may start SwiftyPlistManager with as many plist file names as you'd like.
SwiftyPlistManager.shared.start(plistNames: ["Data", "OtherData"], logging: true)Usage
Add new value
Before you can interact with any key-value pair you need to add it to your data structure. All types that are supported in plist files are suported. SwiftyPlistManager uses completion handlers so you can know when the operation has completed.
SwiftyPlistManager.shared.addNew("helloNewValue", key: "newKey", toPlistWithName: "Data") { (err) in
if err == nil {
print("Value successfully added into plist.")
}
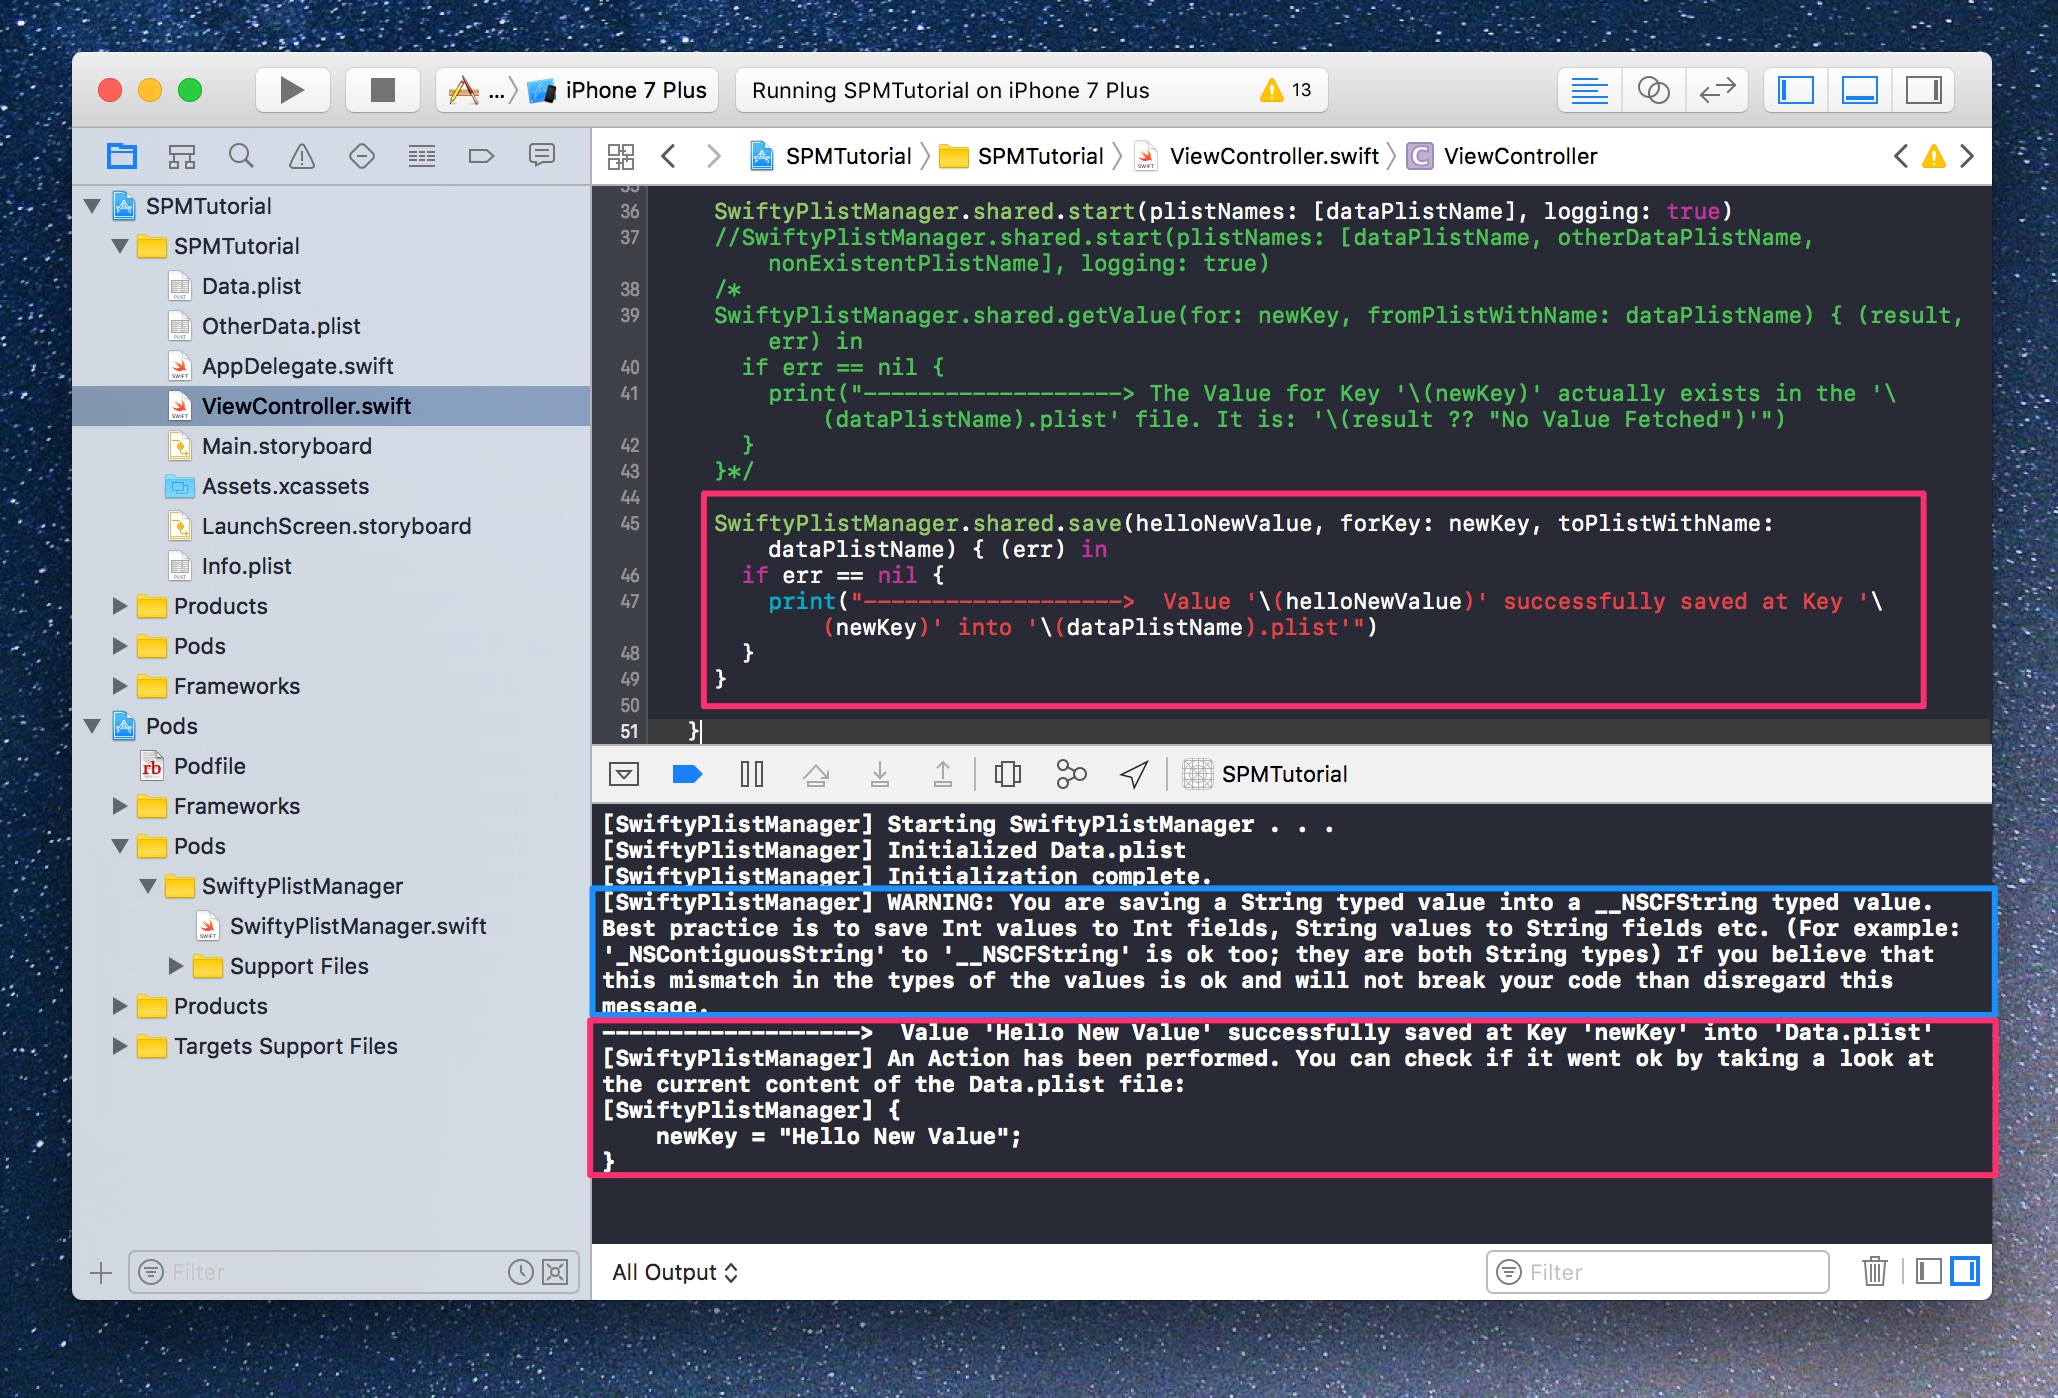
}Save value
Next you want to edit your value. You just need to save a new value.
SwiftyPlistManager.shared.save("helloNewValue", forKey: "newKey", toPlistWithName: "Data") { (err) in
  if err == nil {
    print("Value successfully saved into plist.")
  }
}
Get value
If you want to get back the value in a completion handler you'll get back your result as an Any? object.
SwiftyPlistManager.shared.getValue(for: "newKey", fromPlistWithName: "Data") { (result, err) in
  if err == nil {
    print("The Value is: '\(result ?? "No Value Fetched")'")
  }
}
Fetch value
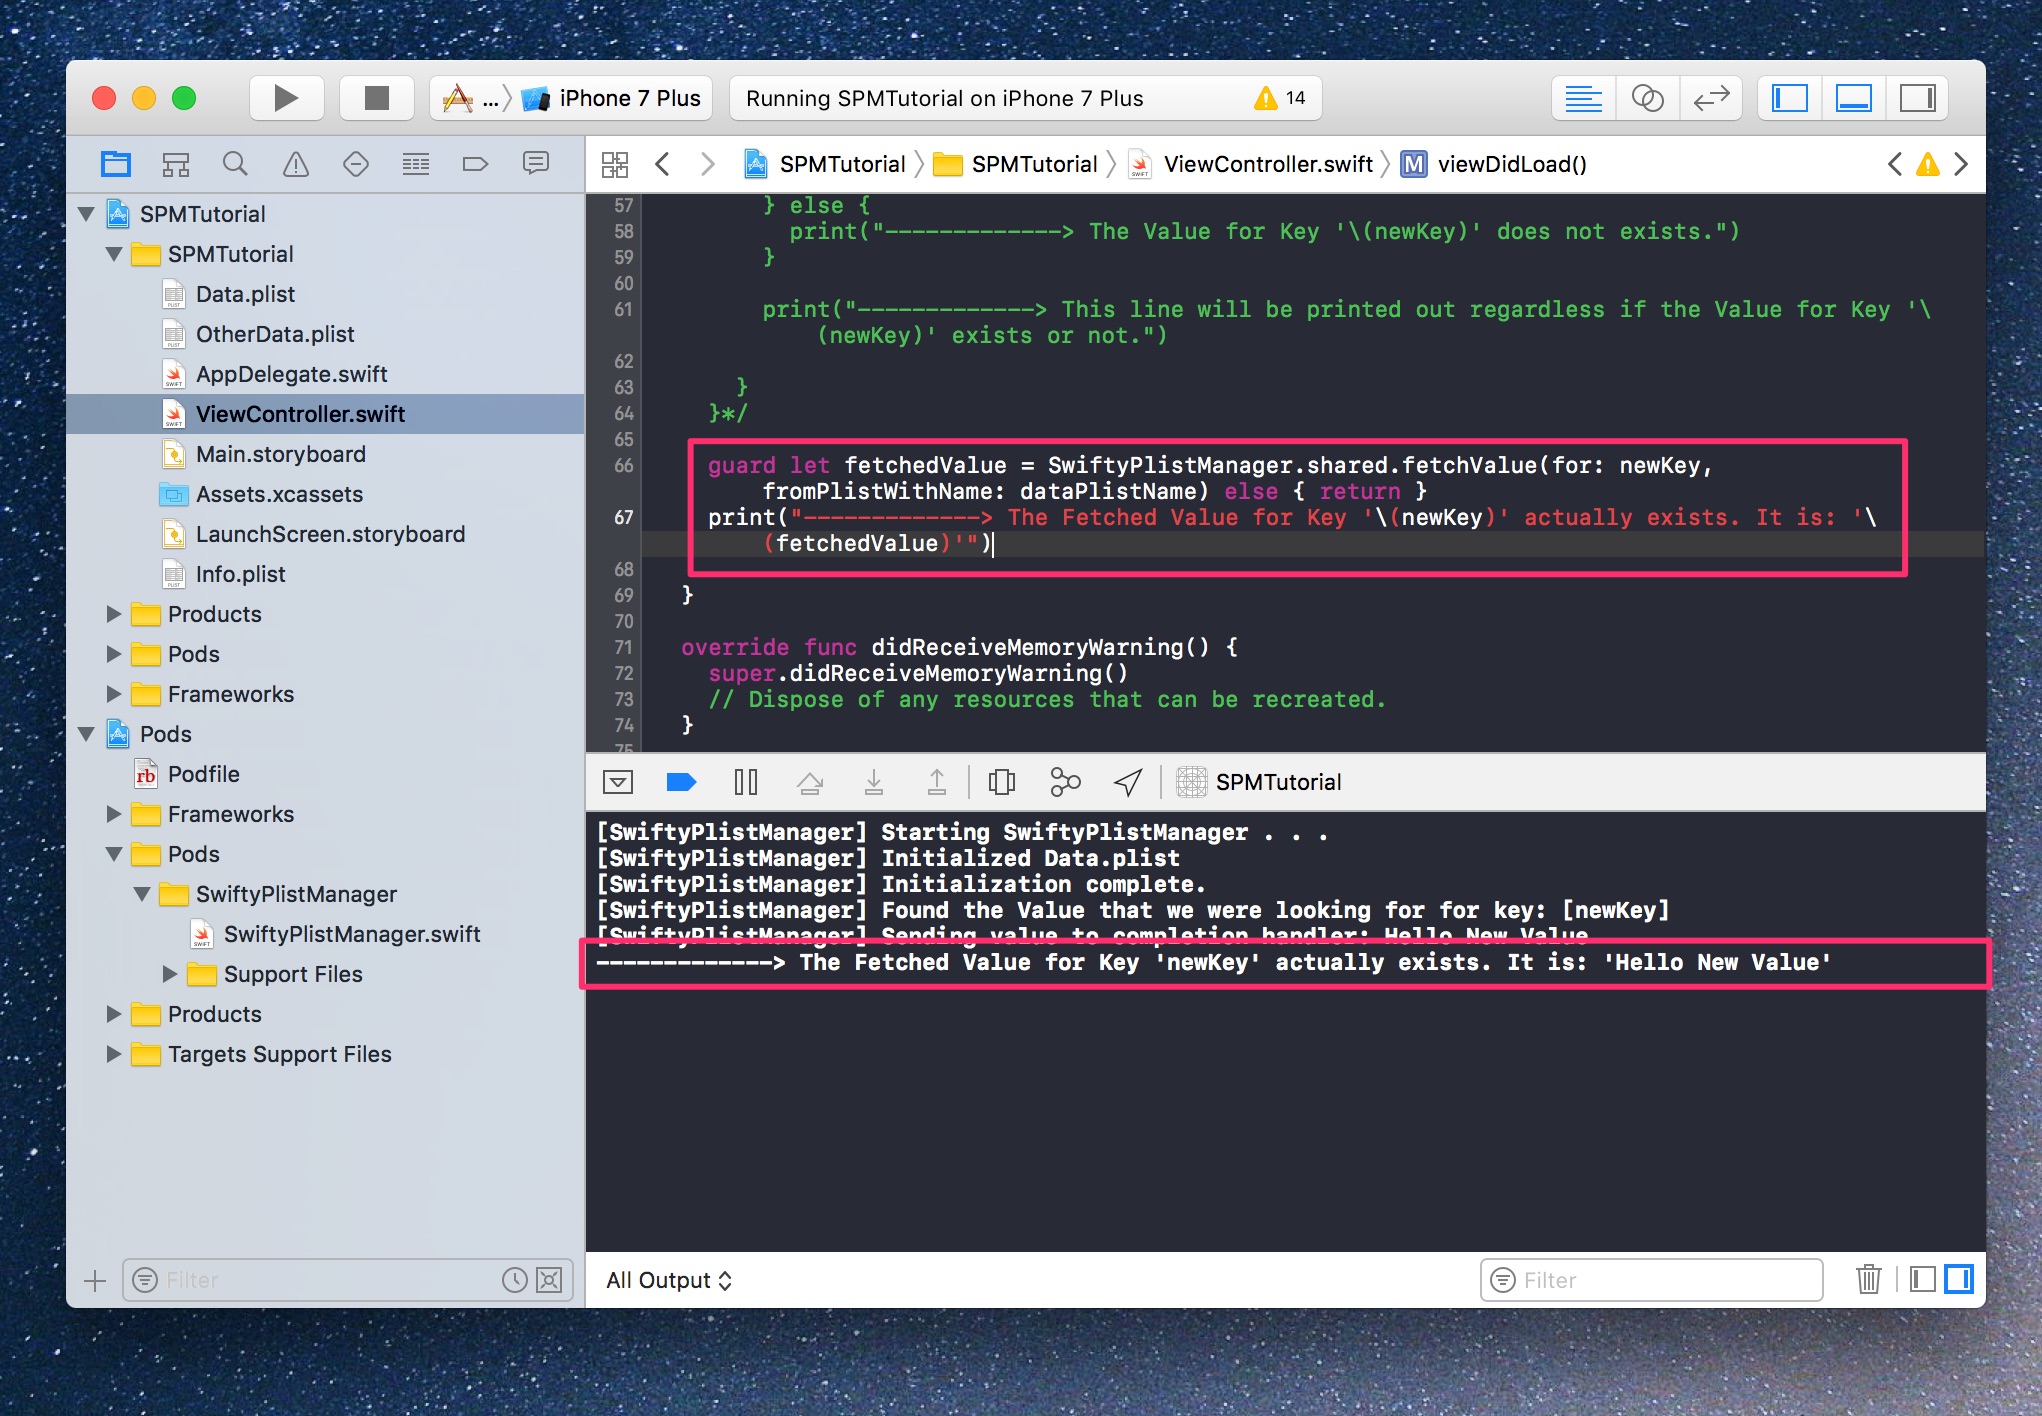
Most of the times you want to cast yor result into a constant right away and not wait for the completion handler to finish. You can use the following call to do just that. For this example we'll unwrap it with a guard-let statement.
guard let fetchedValue = SwiftyPlistManager.shared.fetchValue(for: "newKey", fromPlistWithName: "Data") else { return }Remove key-value pair
Once in a while you might want to remove a value-key pair.
SwiftyPlistManager.shared.removeValueKeyPair(for: "newKey", fromPlistWithName: "Data") { (err) in
  if err == nil {
    print("Key-Value pair successfully removed from plist")
  }
}
Remove all key-value pairs
Or you might want to delete all the data from your plist file.
SwiftyPlistManager.shared.removeAllKeyValuePairs(fromPlistWithName: "Data") { (err) in
  if err == nil {
    print("Successfully removed all Key-Value pairs from plist")
  }
}
Note: this will not remove the plist from disk. It will just empty it from all the key-value pairs.
Error handling
Let's talk about error-handling. When performing calls with SwiftyPlistManager you get access to possible errors in the completion handlers.
public enum SwiftyPlistManagerError: Error {
  case fileNotWritten
  case fileDoesNotExist
  case fileUnavailable
  case fileAlreadyEmpty
  case keyValuePairAlreadyExists
  case keyValuePairDoesNotExist
}
Installation
Manualy
Clode or download the repo. Find the SwiftyPlistManager.swift file. Drag and drop it into your project and you're set up.
Swift 3.1
| Language | Branch | Pod version | Xcode version |
|---|---|---|---|
| Swift 3.1 | master | >= 1.0.1 | Xcode 8.3 or greater |
| Swift 4 | master | >= 1.0.1 | Xcode 9 or greater |
Change Log
See the Releases Page
Known caveats
- You can manipulate the plist file only on the root-keys. Nested key-value pairs (like elemnts in a dictionary) cannot be accessed directly. You'll need to get the whole dictionary from the plist, make your changes, than finally save your changed dictionry back into the plist.
- The actual saving takes place under the hood in the Document directory. Because of this your changes will not be reflected in the plist file you added into your project.
Sample Code
The project includes a demo app for iOS with a sample ViewController.swift showing how to use SwiftyPlistManager.
License
Copyright (c) 2017 Alex Nagy
Permission is hereby granted, free of charge, to any person obtaining a copy
of this software and associated documentation files (the "Software"), to deal
in the Software without restriction, including without limitation the rights
to use, copy, modify, merge, publish, distribute, sublicense, and/or sell
copies of the Software, and to permit persons to whom the Software is
furnished to do so, subject to the following conditions:
The above copyright notice and this permission notice shall be included in all
copies or substantial portions of the Software.
THE SOFTWARE IS PROVIDED "AS IS", WITHOUT WARRANTY OF ANY KIND, EXPRESS OR
IMPLIED, INCLUDING BUT NOT LIMITED TO THE WARRANTIES OF MERCHANTABILITY,
FITNESS FOR A PARTICULAR PURPOSE AND NONINFRINGEMENT. IN NO EVENT SHALL THE
AUTHORS OR COPYRIGHT HOLDERS BE LIABLE FOR ANY CLAIM, DAMAGES OR OTHER
LIABILITY, WHETHER IN AN ACTION OF CONTRACT, TORT OR OTHERWISE, ARISING FROM,
OUT OF OR IN CONNECTION WITH THE SOFTWARE OR THE USE OR OTHER DEALINGS IN THE
SOFTWARE.