SwiftValidator 3.0.3
| TestsTested | ✓ |
| LangLanguage | SwiftSwift |
| License | MIT |
| ReleasedLast Release | Feb 2016 |
| SPMSupports SPM | ✗ |
Maintained by Jeff Potter.
SwiftValidator 3.0.3
- By
- Jeff Potter
- jpotts18
SwiftValidator
Swift Validator is a rule-based validation library for Swift.

Core Concepts
-
UITextField+[Rule]+ (and optional errorUILabel) go intoValidator -
UITextField+ValidationErrorcome out ofValidator -
Validatorevaluates[Rule]sequentially and stops evaluating when aRulefails.
Installation
# Podfile
source 'https://github.com/CocoaPods/Specs.git'
platform :ios, "8.1"

use_frameworks!
pod 'SwiftValidator', '3.0.1'
Install into your project:
$ pod installOpen your project in Xcode from the .xcworkspace file (not the usual project file):
$ open MyProject.xcworkspaceIf you are using Carthage you will need to add this to your Cartfile
github "jpotts18/SwiftValidator"Usage
You can now import SwiftValidator framework into your files.
Initialize the Validator by setting a delegate to a View Controller or other object.
// ViewController.swift
let validator = Validator()
Register the fields that you want to validate
override func viewDidLoad() {
super.viewDidLoad()
// Validation Rules are evaluated from left to right.
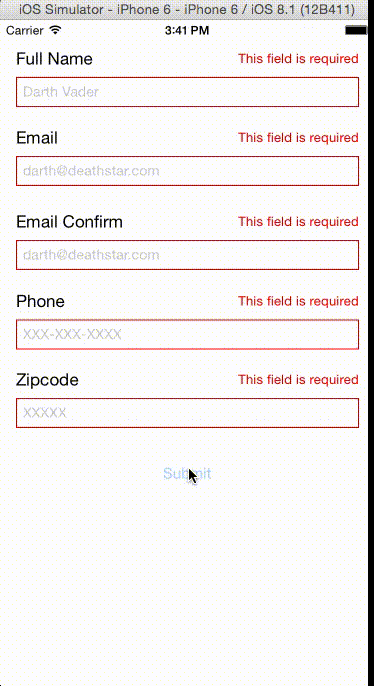
validator.registerField(fullNameTextField, rules: [RequiredRule(), FullNameRule()])
// You can pass in error labels with your rules
// You can pass in custom error messages to regex rules (such as ZipCodeRule and EmailRule)
validator.registerField(emailTextField, errorLabel: emailErrorLabel, rules: [RequiredRule(), EmailRule(message: "Invalid email")])
// You can validate against other fields using ConfirmRule
validator.registerField(emailConfirmTextField, errorLabel: emailConfirmErrorLabel, rules: [ConfirmationRule(confirmField: emailTextField)])
// You can now pass in regex and length parameters through overloaded contructors
validator.registerField(phoneNumberTextField, errorLabel: phoneNumberErrorLabel, rules: [RequiredRule(), MinLengthRule(length: 9)])
validator.registerField(zipcodeTextField, errorLabel: zipcodeErrorLabel, rules: [RequiredRule(), ZipCodeRule(regex = "\\d{5}")])
// You can unregister a text field if you no longer want to validate it
validator.unregisterField(fullNameTextField)
}Validate Fields on button tap or however you would like to trigger it.
@IBAction func signupTapped(sender: AnyObject) {
    validator.validate(delegate:self)
}
Implement the Validation Delegate in your View controller
// ValidationDelegate methods

func validationSuccessful() {
    // submit the form
}

func validationFailed(errors:[UITextField:ValidationError]) {
    // turn the fields to red
    for (field, error) in validator.errors {
        field.layer.borderColor = UIColor.redColor().CGColor
        field.layer.borderWidth = 1.0
        error.errorLabel?.text = error.errorMessage // works if you added labels
        error.errorLabel?.hidden = false
    }
}
Single Field Validation
You may use single field validation in some cases. This could be useful in situations such as controlling responders:
// Don't forget to use UITextFieldDelegate
// and delegate yourTextField to self in viewDidLoad()
func textFieldShouldReturn(textField: UITextField) -> Bool {
    validator.validateField(textField){ error in
        if error == nil {
            // Field validation was successful
        } else {
            // Validation error occurred
        }
    }
    return true
}
Custom Validation
We will create a SSNRule class to show how to create your own Validation. A United States Social Security Number (or SSN) is a field that consists of XXX-XX-XXXX.
Create a class that inherits from RegexRule
class SSNVRule: RegexRule {

    static let regex = "^\\d{3}-\\d{2}-\\d{4}$"

    convenience init(message : String = "Not a valid SSN"){
    self.init(regex: SSNVRule.regex, message : message)
    }
}
Credits
Swift Validator is written and maintained by Jeff Potter @jpotts18.
Contributing
- Fork it
- Create your feature branch
git checkout -b my-new-feature - Commit your changes
git commit -am 'Add some feature' - Push to the branch
git push origin my-new-feature - Create a new Pull Request