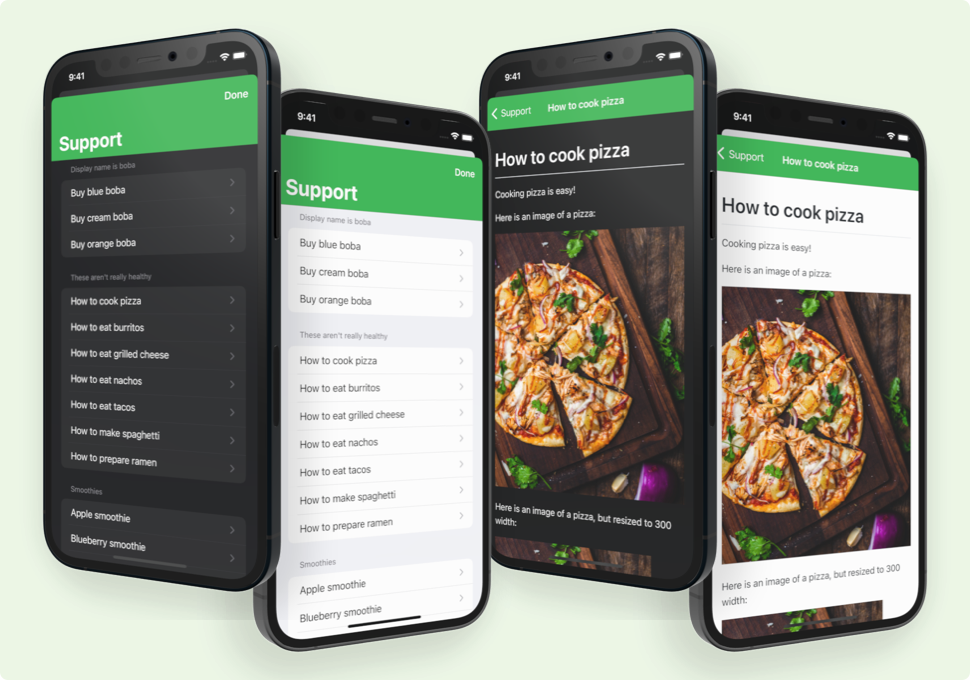
Generate help centers for your iOS apps, with Markdown!
All you need to do is write your documents on GitHub, and install the library in your app. SupportDocs' custom GitHub Action and GitHub Pages will take care of the rest.
✅ Update 11/20/20: SupportDocs is now available! Thanks for checking it out! 😄
Table of Contents

How It Works
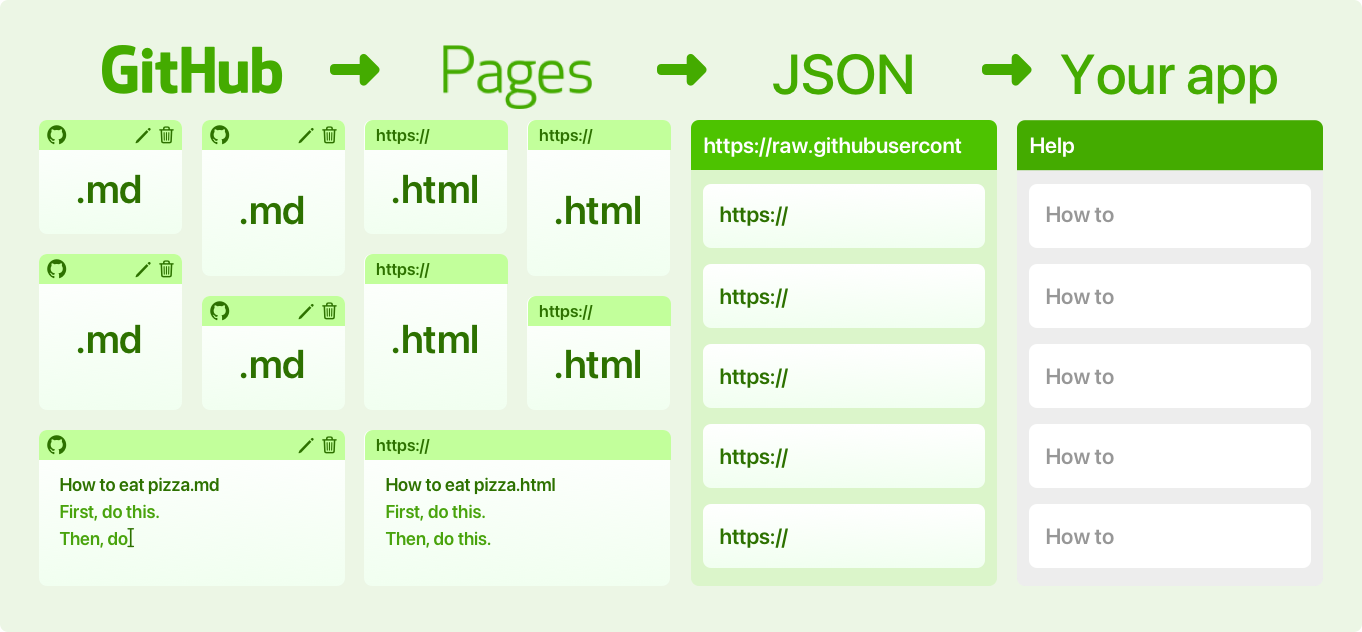
- Write documents in Markdown, on GitHub
- GitHub Pages will convert them into HTML and host it for free
- A custom GitHub Action will generate a JSON data source for you
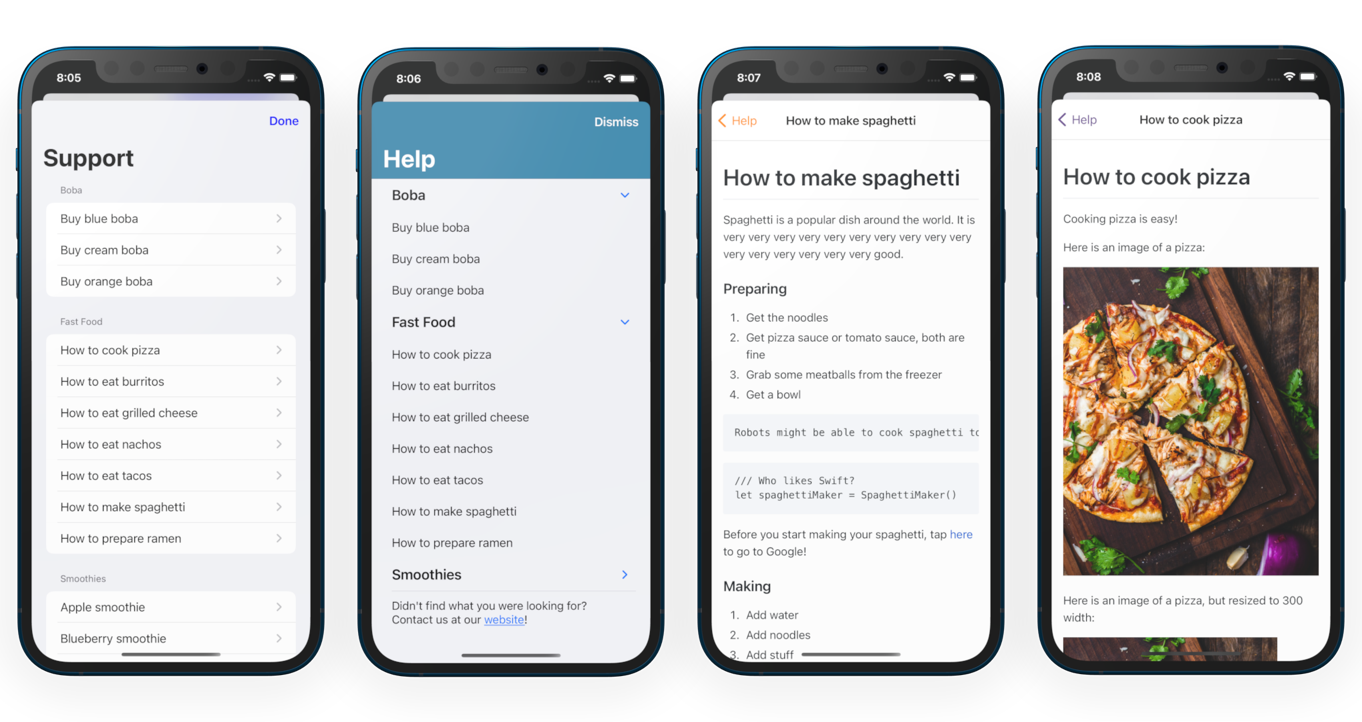
- The SupportDocs library will download the JSON and display it to your users!
The SupportDocs library is written in SwiftUI, so it's only for iOS 13 and above.
Installation
Installing SupportDocs takes two steps:
- Set up the GitHub repository where you write and host your documents
- Install the library inside your app
Set Up the GitHub Repository
This will be where you write your documents. GitHub Pages will translate your Markdown into HTML, and a custom GitHub Action will automatically compile the web pages into a JSON file.
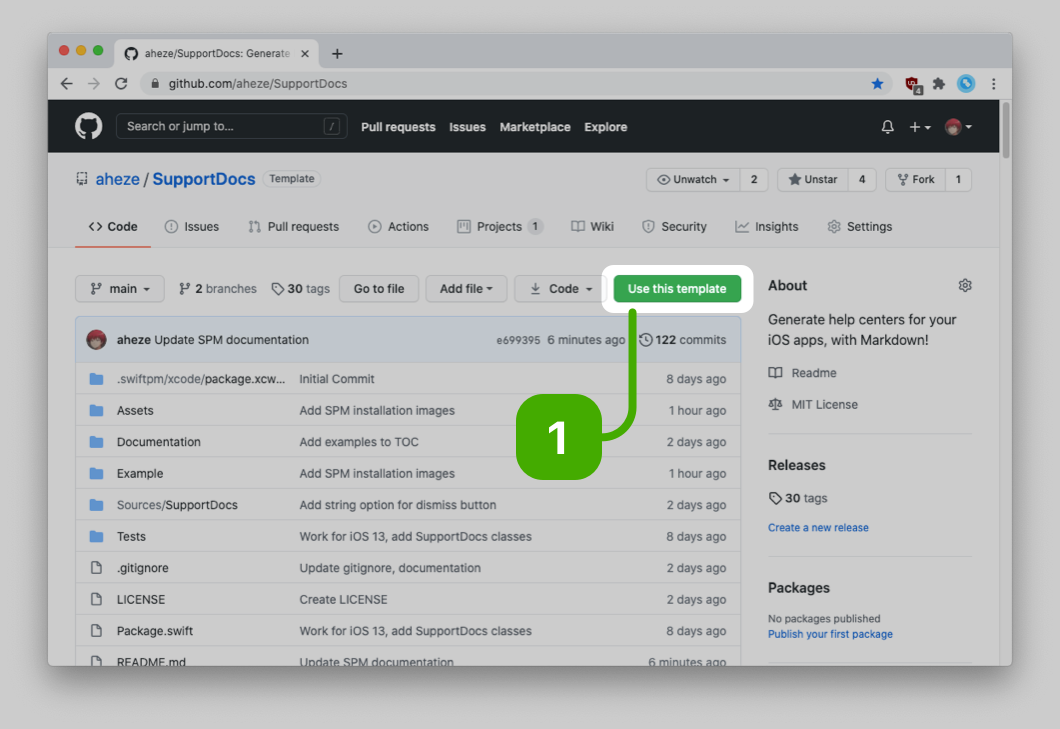
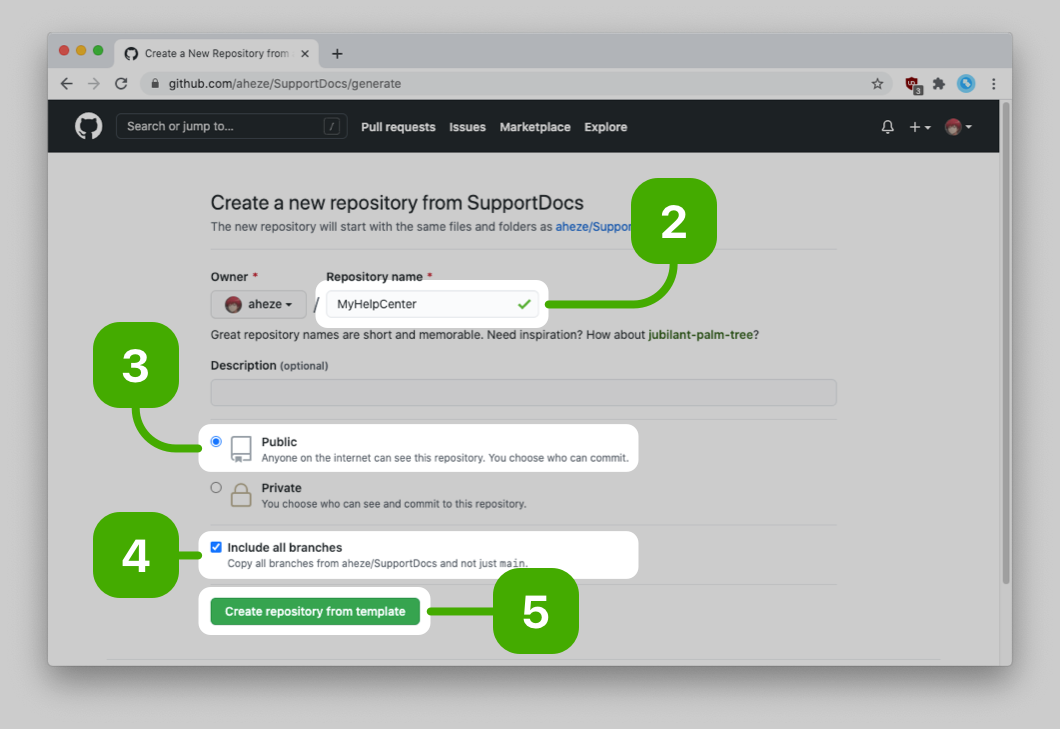
- Scroll up to the top of this page and click Use this template
- Enter a repository name -- this can be whatever you want
- Make sure it's set to
Public(If you are using the free version of GitHub, GitHub Pages only works for public repos) - Make sure to check Include all branches. This is really important.
- Click Create repository from template
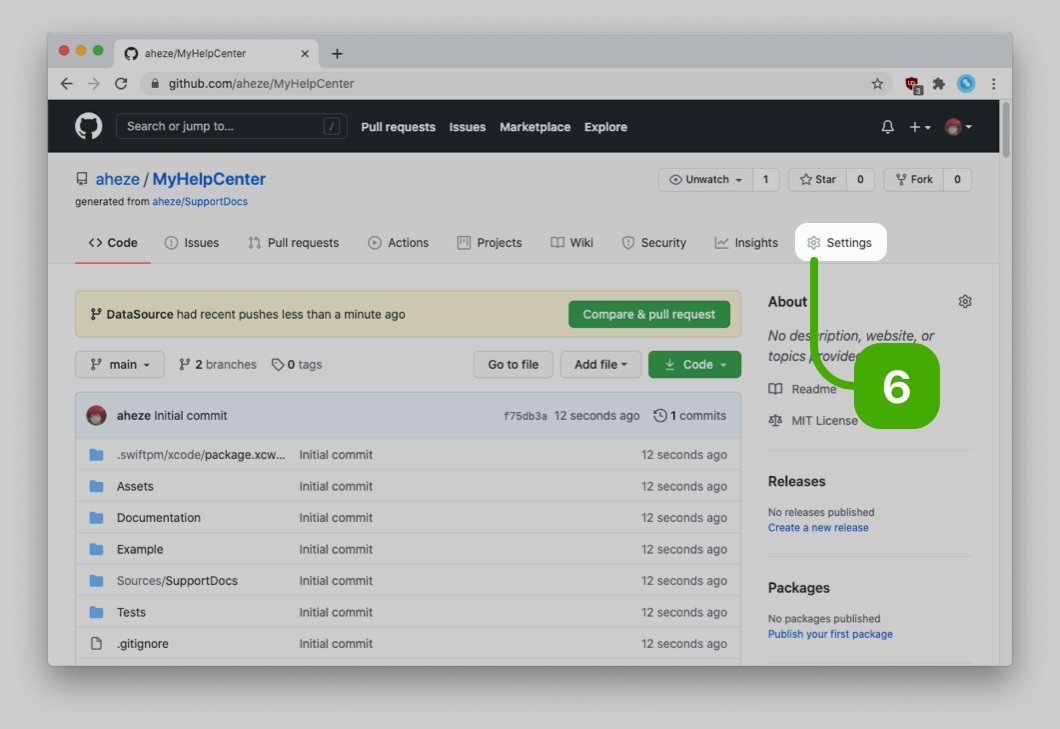
- In your brand new repository, click the Settings tab
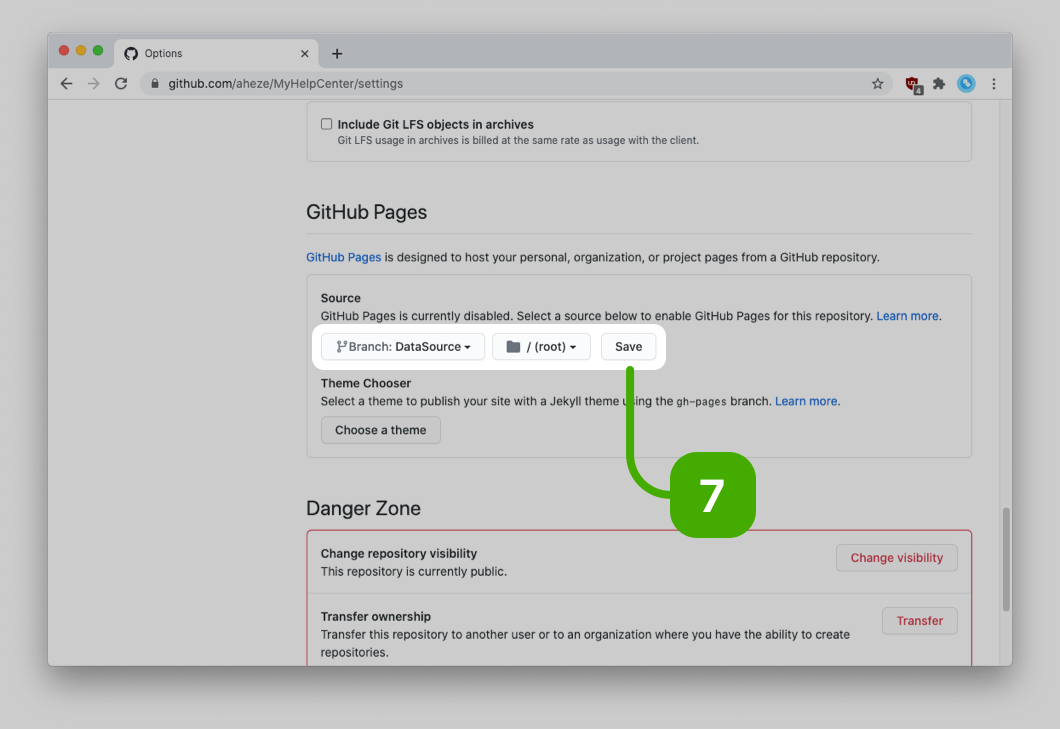
- Scroll down to the GitHub Pages section, and select
DataSourcebranch and / (root) folder. Then click Save. - That's it for the GitHub repository! Now time to install the library in your app.
 |
 |
|---|---|
 |
 |
Install the Library
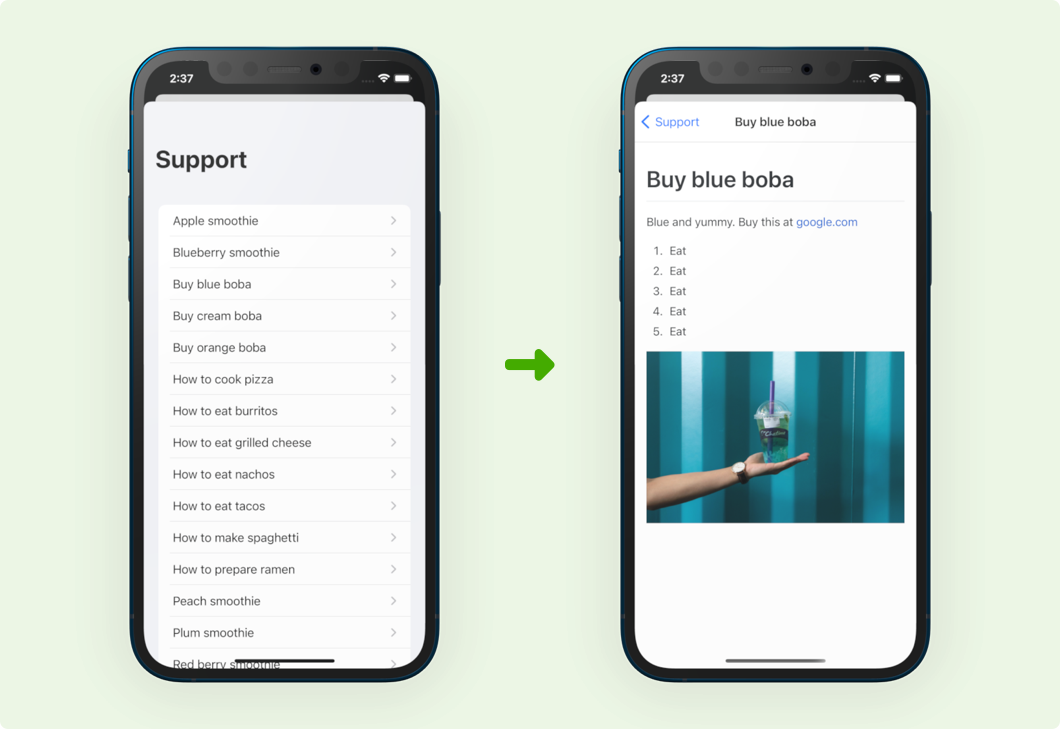
This is the actual interface that your users will see. You can install using CocoaPods or Swift Package Manager, whichever one you prefer.
CocoaPods
CocoaPods is a dependency manager for Cocoa projects. For usage and installation instructions, visit their website. To install SupportDocs into your Xcode project using CocoaPods, add it in your Podfile:
pod 'SupportDocs'Swift Package Manager
The Swift Package Manager is built into Xcode, which makes it really easy to use.
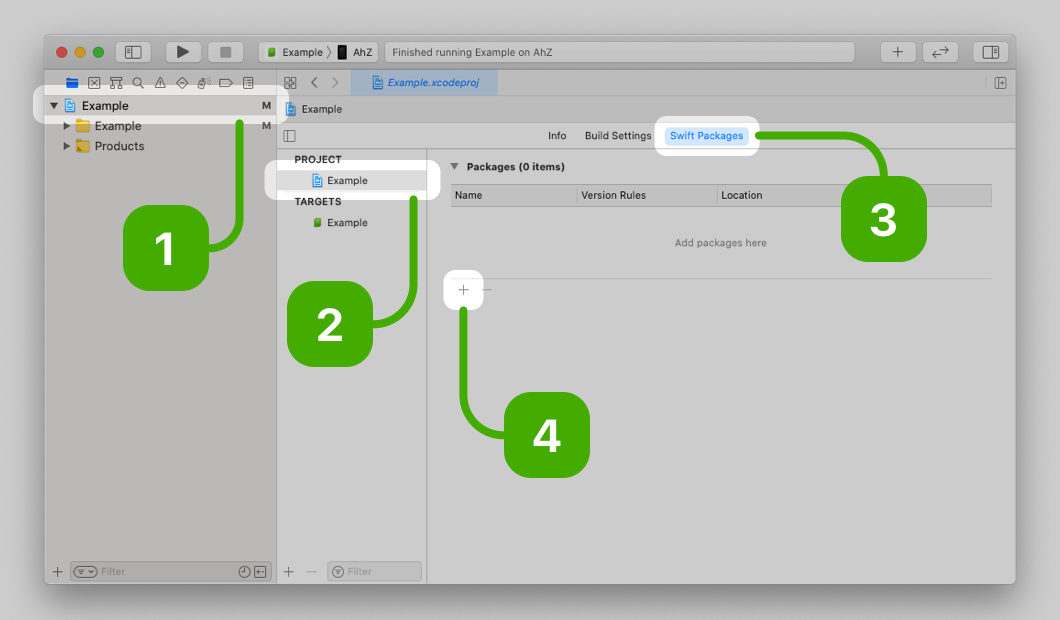
- Go to your project settings
- Click your project
- Switch to the Swift Packages tab
- Click the + button
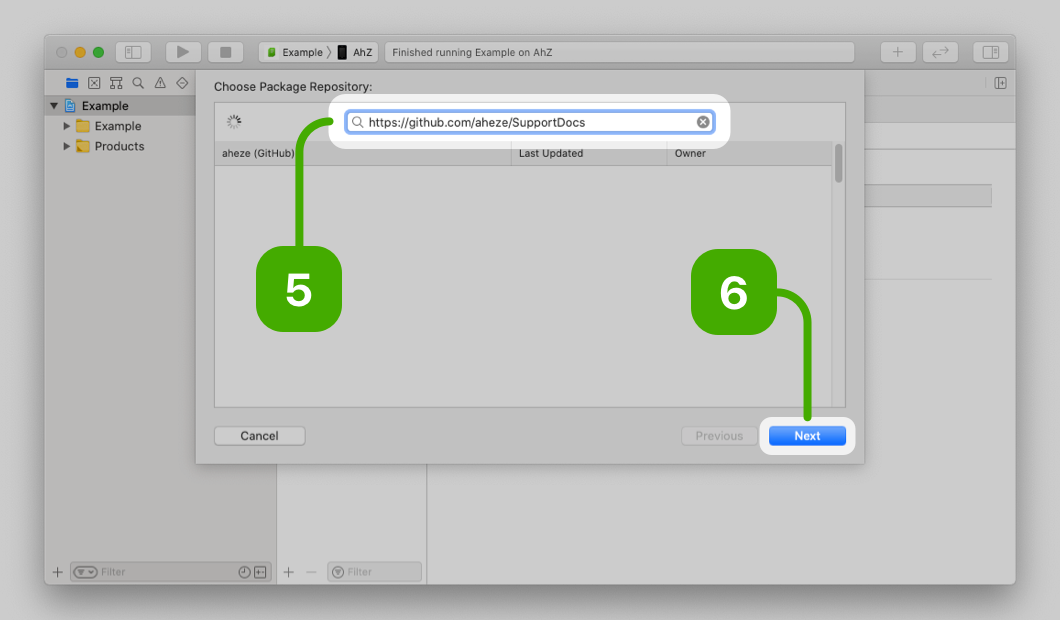
- Enter
https://github.com/aheze/SupportDocsin the text field - Click Next
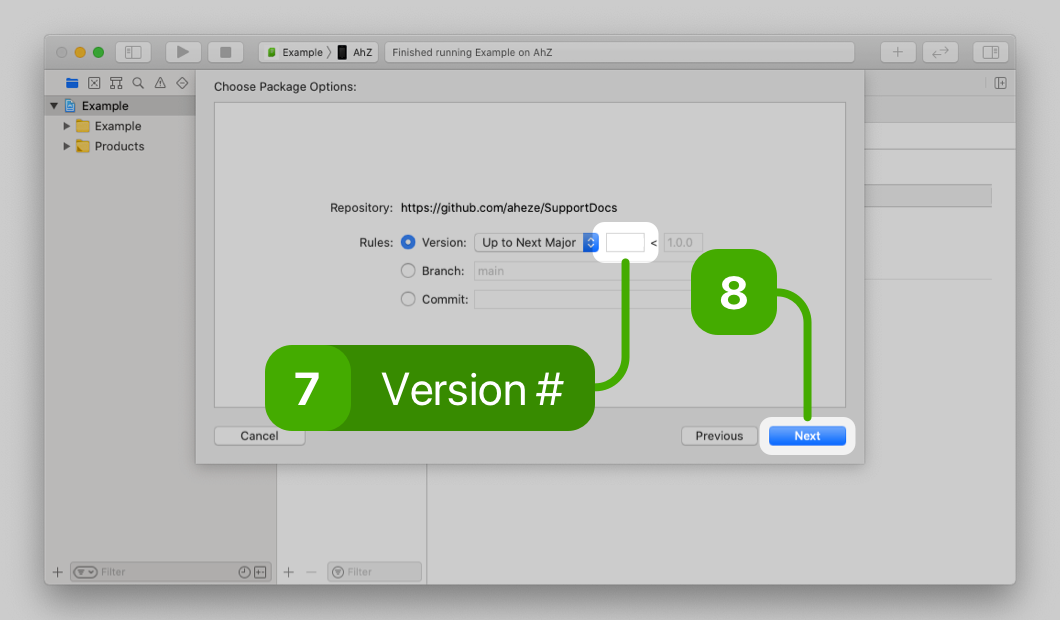
- Enter the latest version,
1.0.0, in the text field. Leave Up to Next Major selected. - Click Next
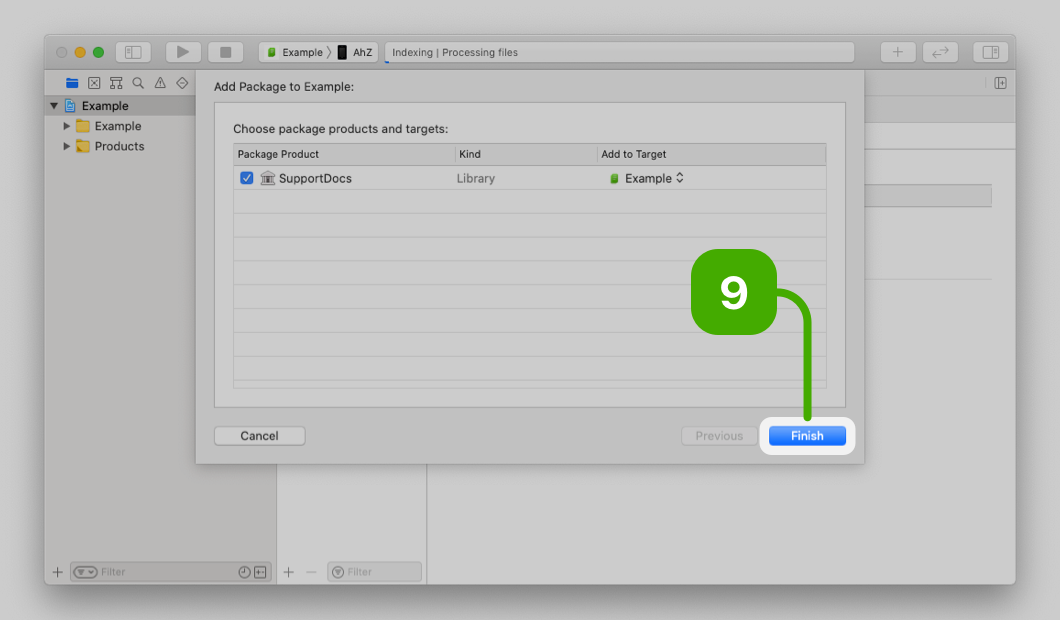
- Click Finish, and you're done!
 |
 |
|---|---|
 |
 |
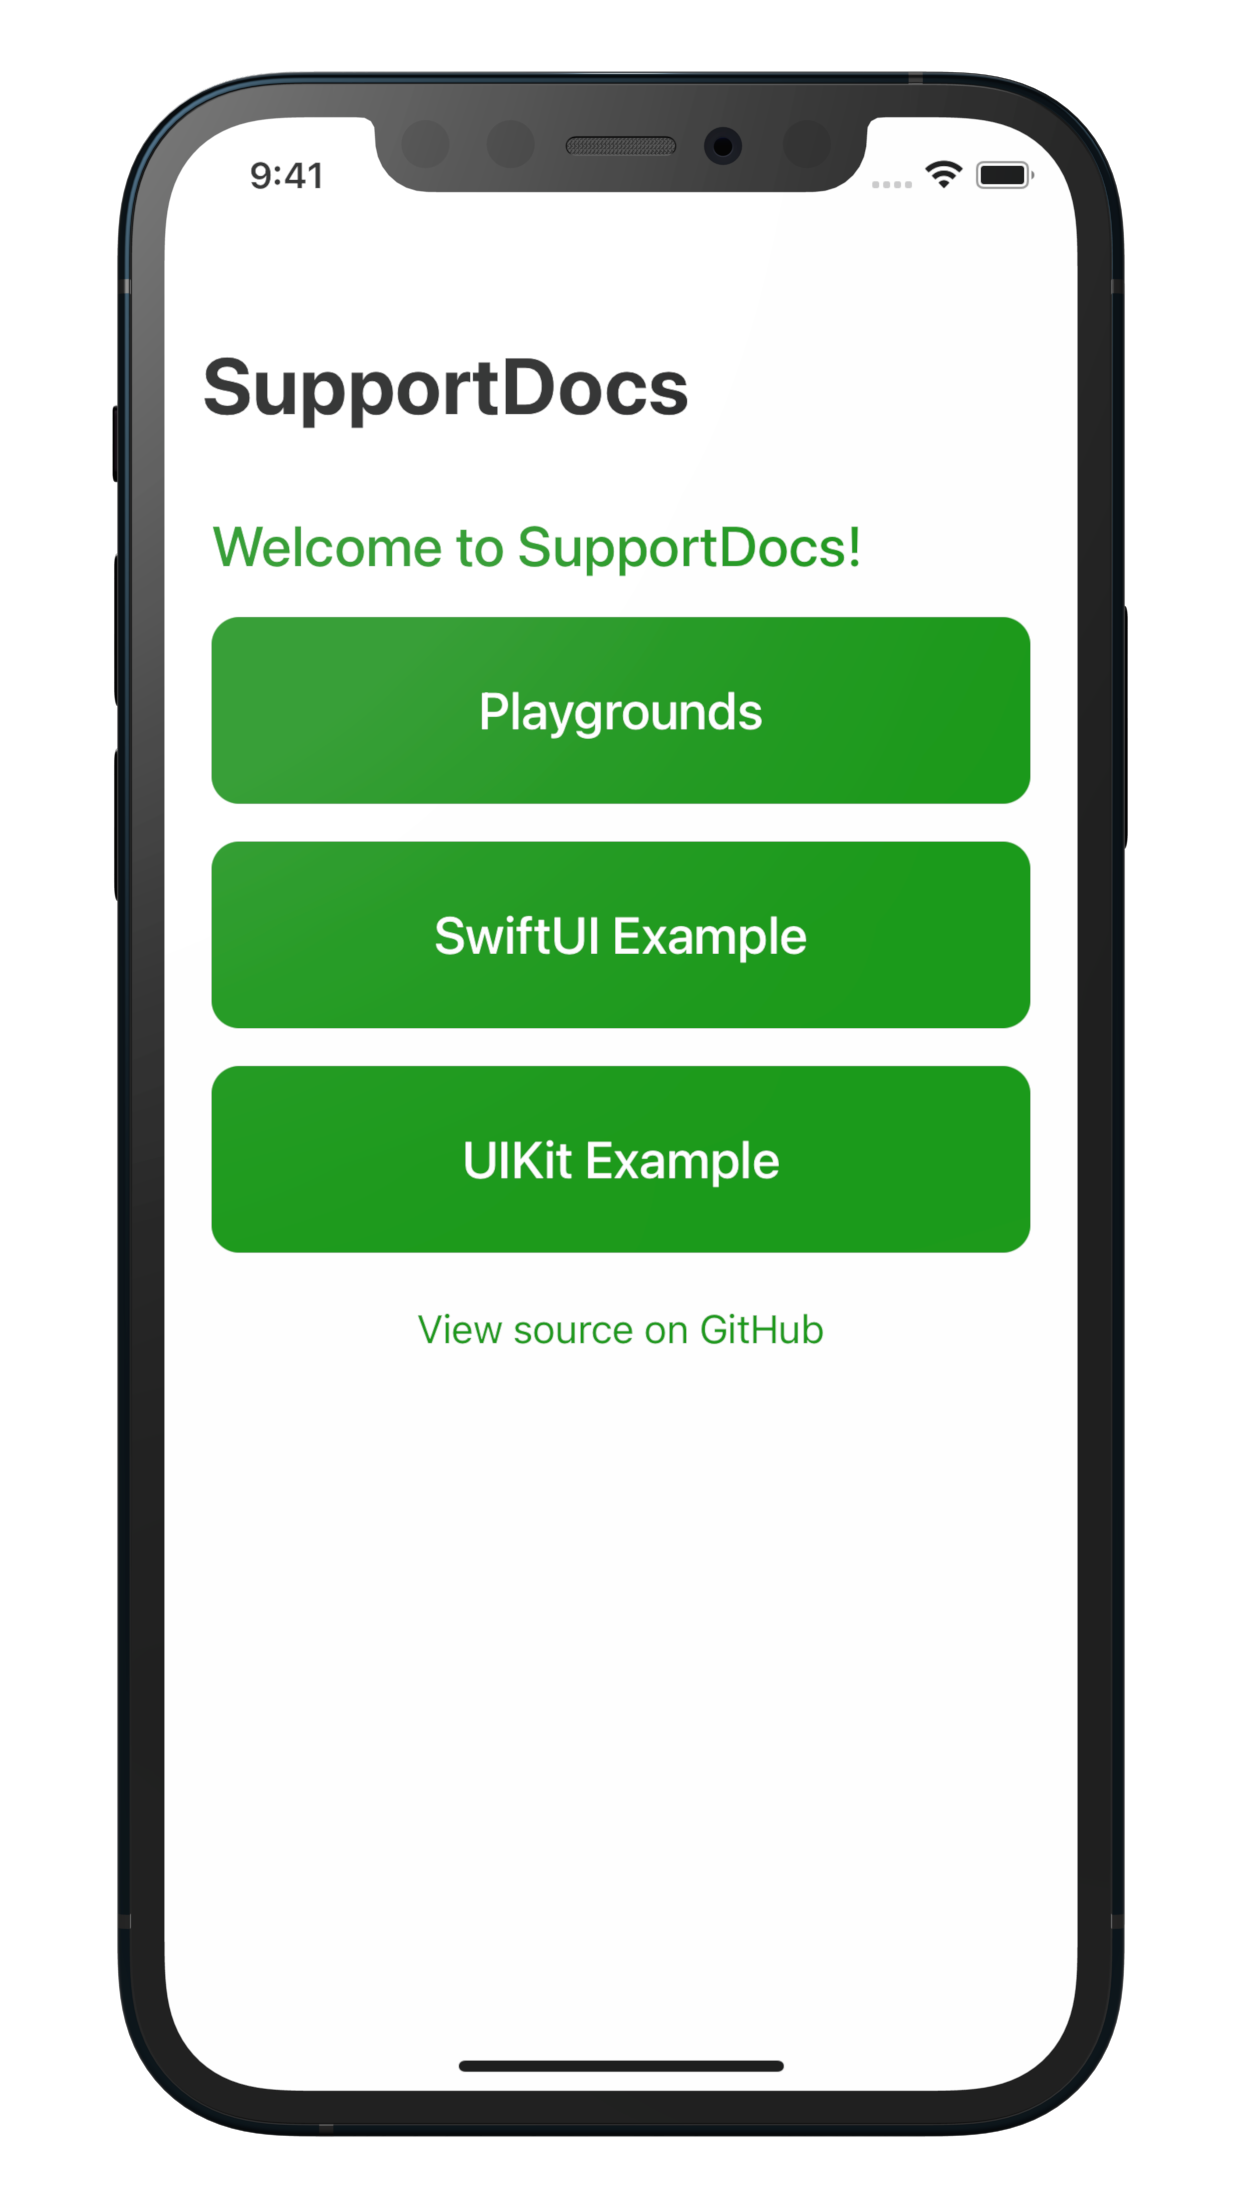
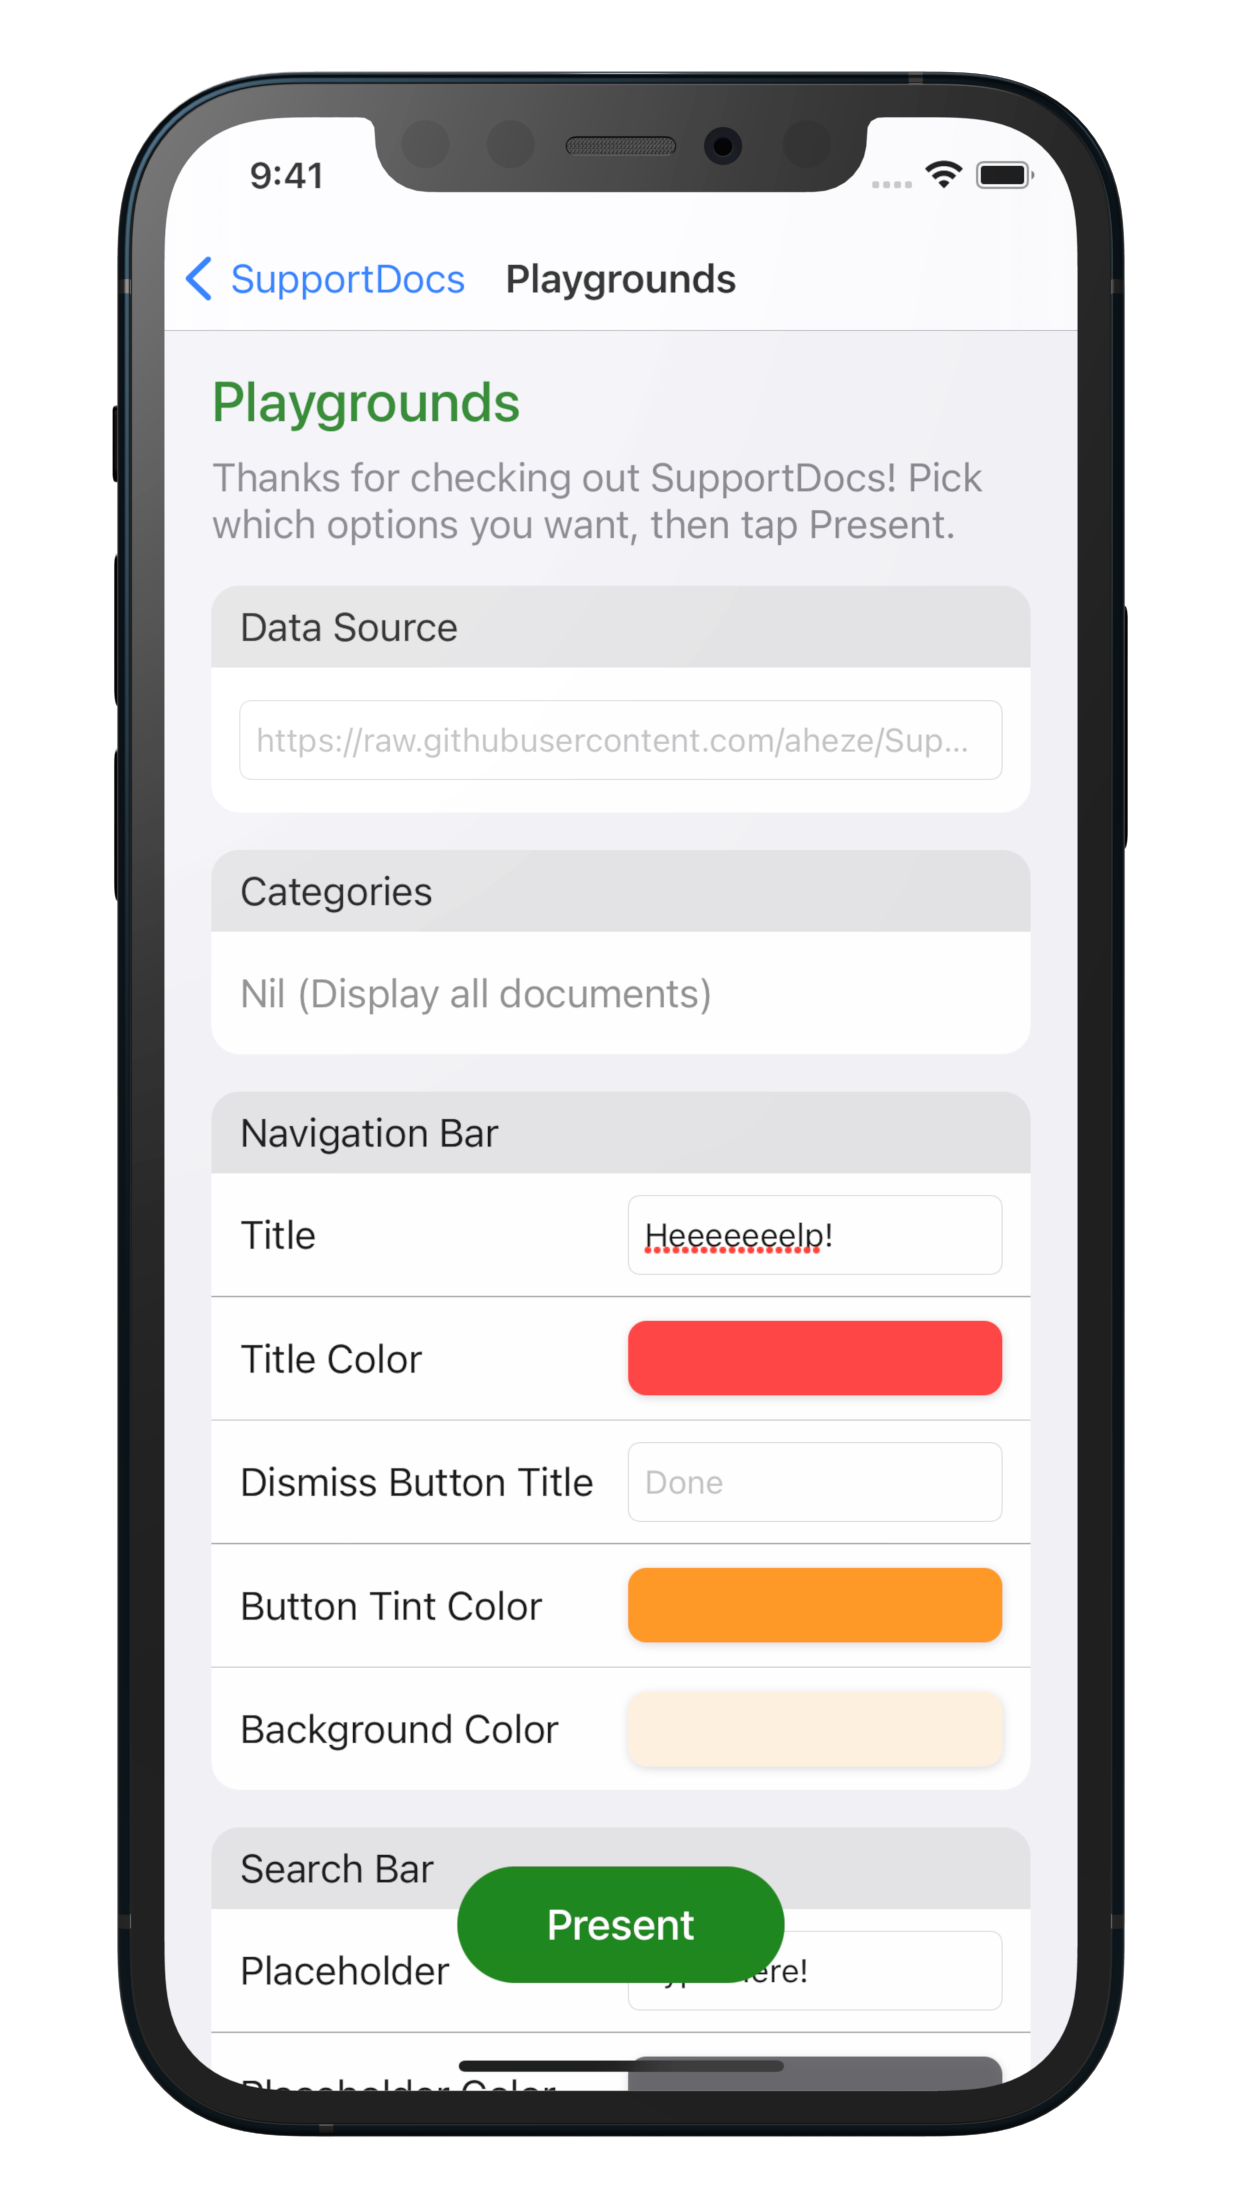
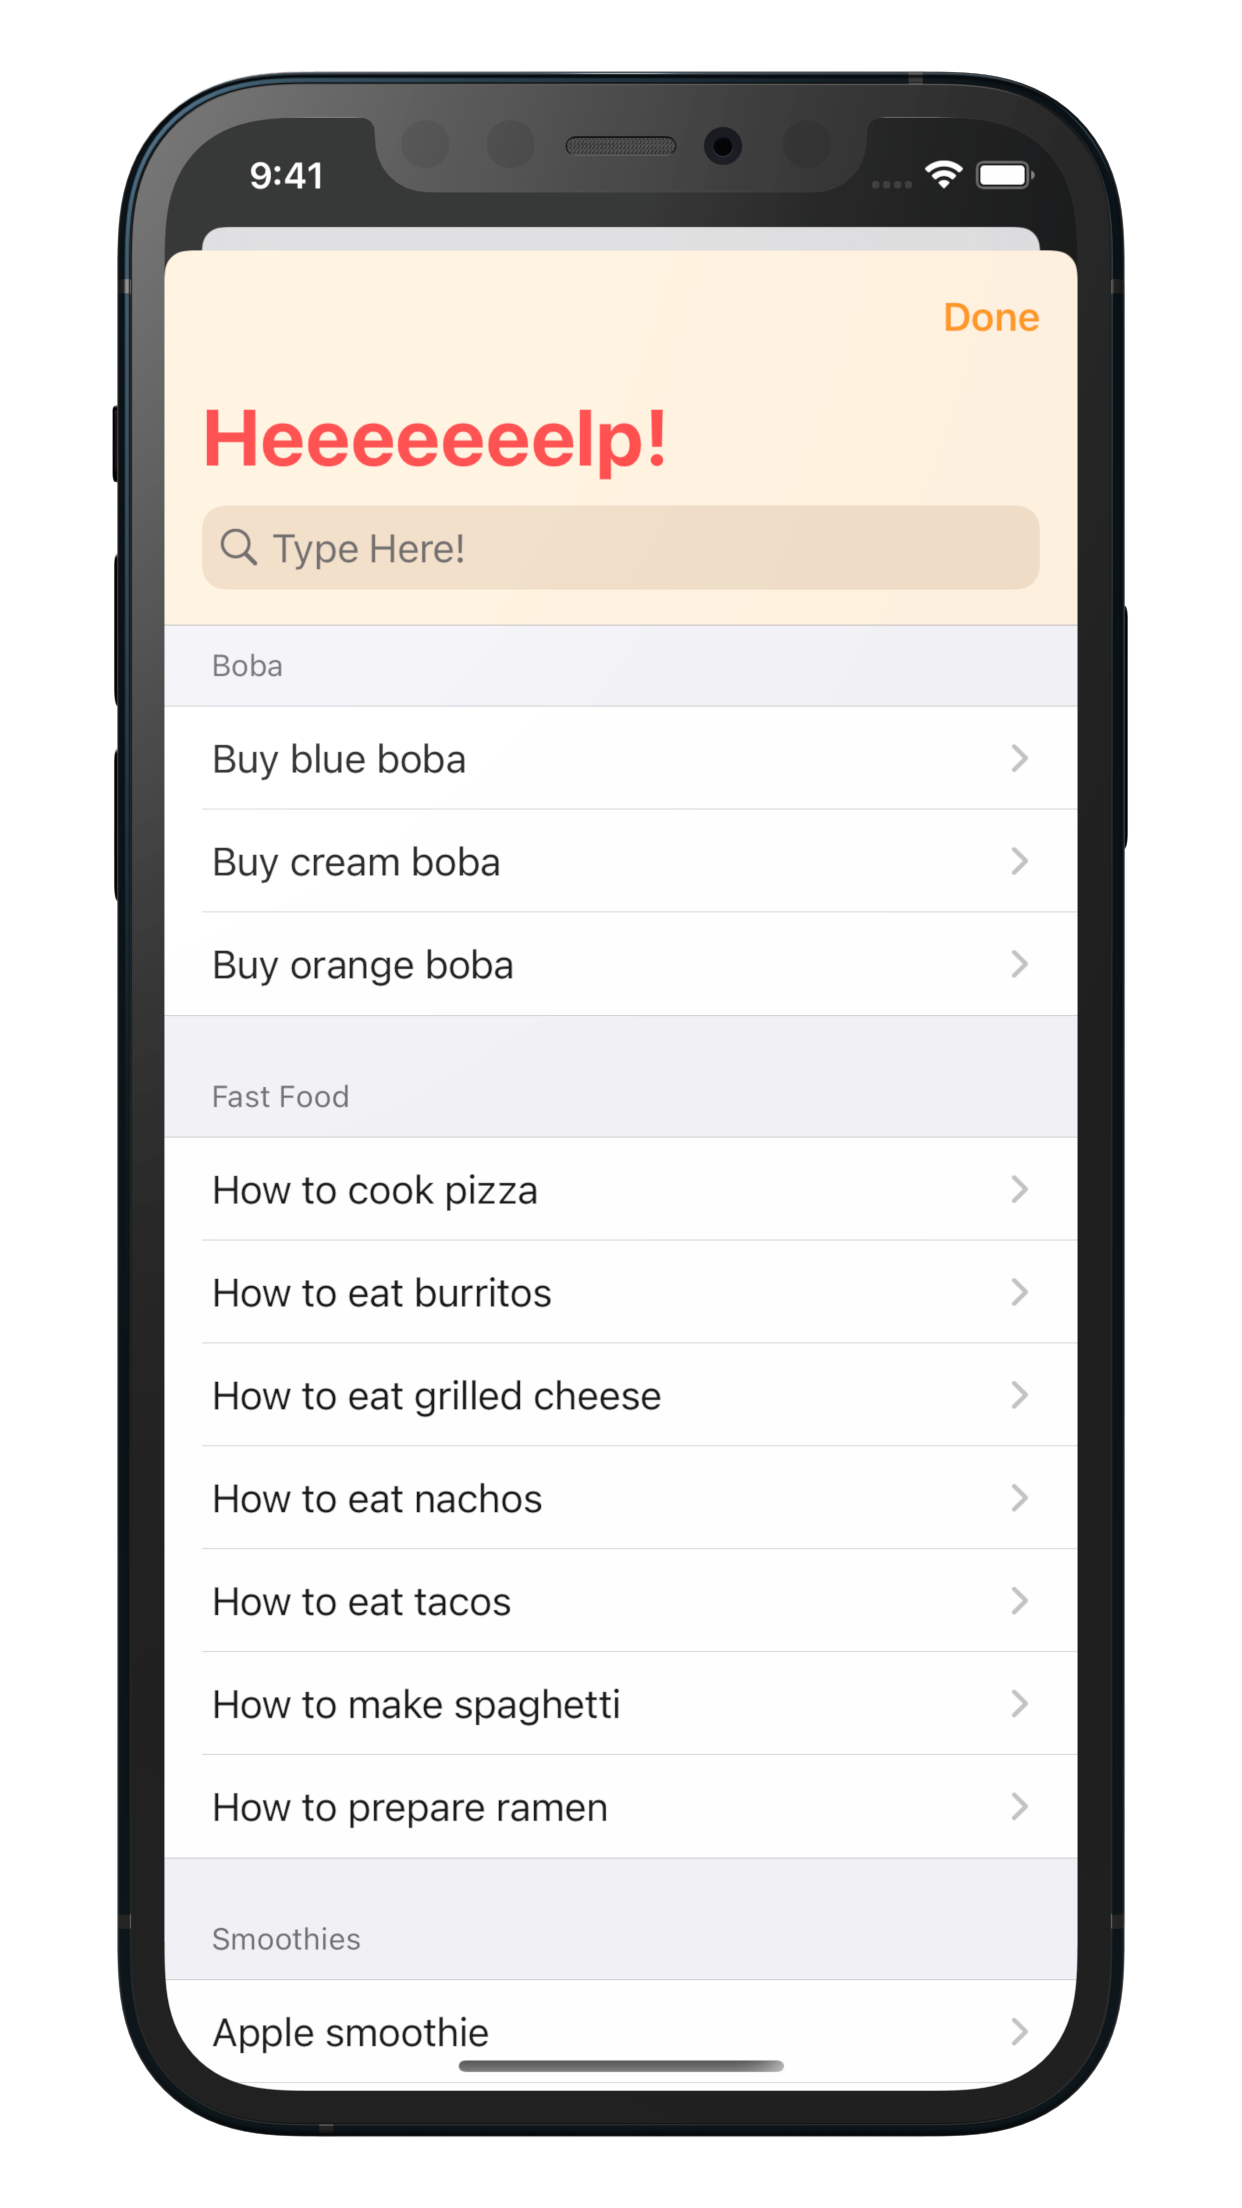
Example Project
Check out the example project in the Example folder! It contains a playground where you can play around with how SupportDocs is displayed.
 |
 |
 |
|---|
Usage
SupportDocs is pretty simple to use, with two parts: the GitHub repository and the library in your app.
The GitHub repository is where you add and edit your documents using Markdown. This is online, so you can edit at any time and always show the latest information to your users. All your documents are compiled into a single JSON file, the URL of which you'll pass into the library. The library is what's displayed to your users, in your app. All it needs is the URL of the JSON file, and you can either use SwiftUI or UIKit to embed it.
Show Extended Documentation
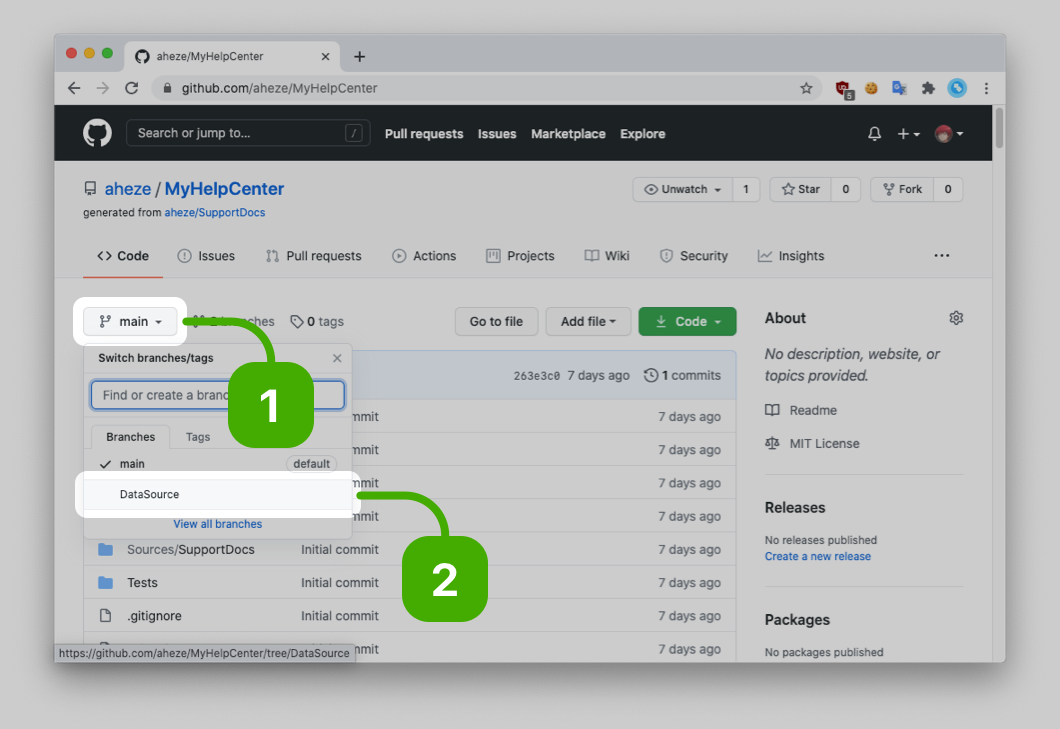
Using the GitHub Repository
In you brand new repository that you set up earlier, switch to the DataSource branch. The example documents are inside the Sample-Boba, Sample-FastFood, and Sample-Smoothies folders -- take a look around. Here's a guide:
Show guide
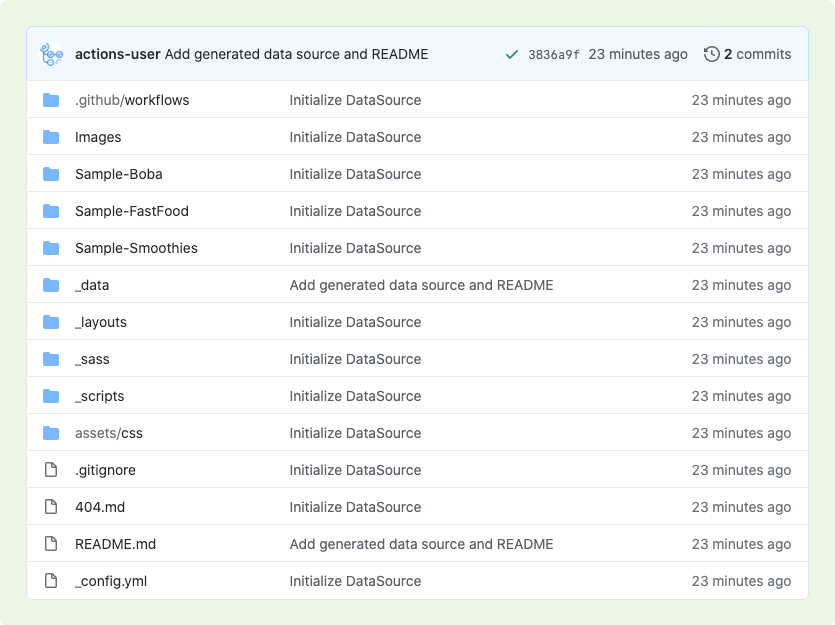
.github/workflowsis for the GitHub Action, for compiling your documents into JSONImagescontains the images used in the example documentsSample-Bobacontains all documents tagged with bobaSample-FastFoodcontains all documents tagged with fastFoodSample-Smoothiescontains all documents tagged with smoothies_datacontains the generated data source URL_layoutsis for GitHub Pages to convert your Markdown into HTML_sassis where you can customize the look of the HTML, including light and dark mode colors_scriptscontains the script used by the GitHub Action, as well as the README template. This template is what you should edit if you want to change the README at all -- if you change it directly, your changes will be overriden.assets/cssapplies the_sass.gitignoreis for git to ignore unnecessary files404.mdis the 404 document that will be displayed if your URLs are wrong. You can also pass this intooptions.other.error404in case your data source URL fails.README.mdis for your reference. It contains a link to the data source URL, and a table of contents that shows all your documents. Do not edit this file directly -- instead, edit the file in_scripts/README.md._config.ymlsets the default theme, "Primer," for GitHub Pages. We recommend that you don't change this, as we customized dark mode specifically for the "Primer" theme -- you'll need to configureassets/css/main.scssif you use your own theme.
Documents can be placed in the root directory or a subfolder. However, we recommmend that you use folders to organize your documents. In the example,
- Documents tagged with
bobaare in theSample-Bobafolder - Documents tagged with
fastFoodare in theSample-FastFoodfolder - Documents tagged with
smoothiesare in theSample-Smoothiesfolder
Adding and Editing Documents
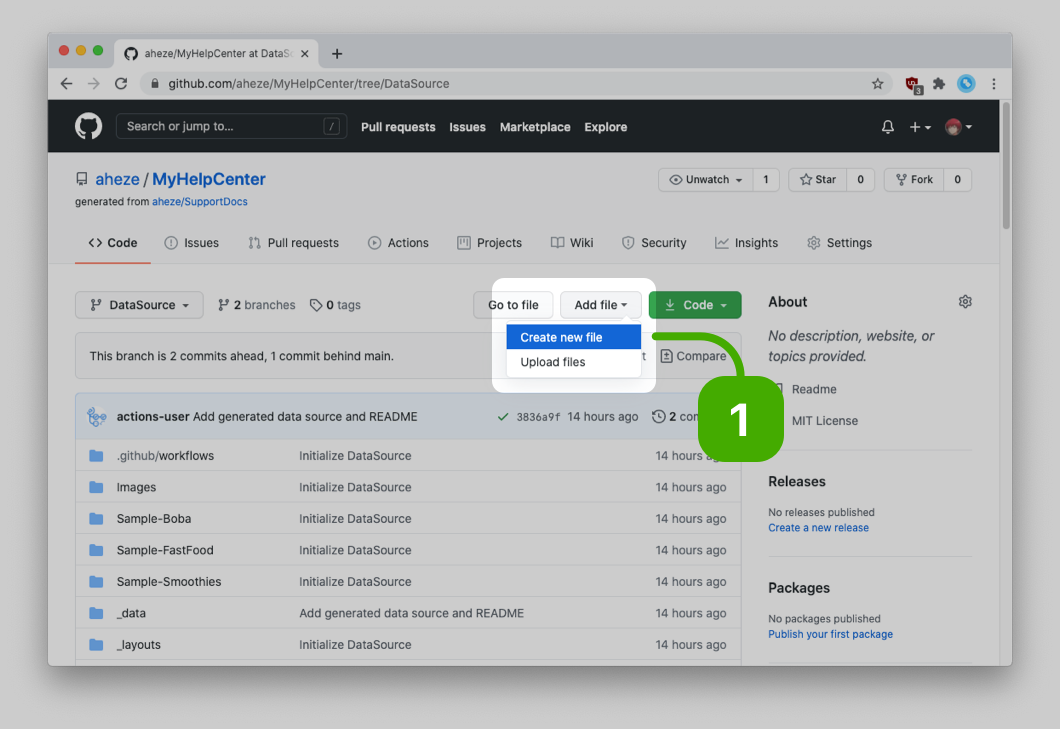
- To add a document, click the Create new file button.
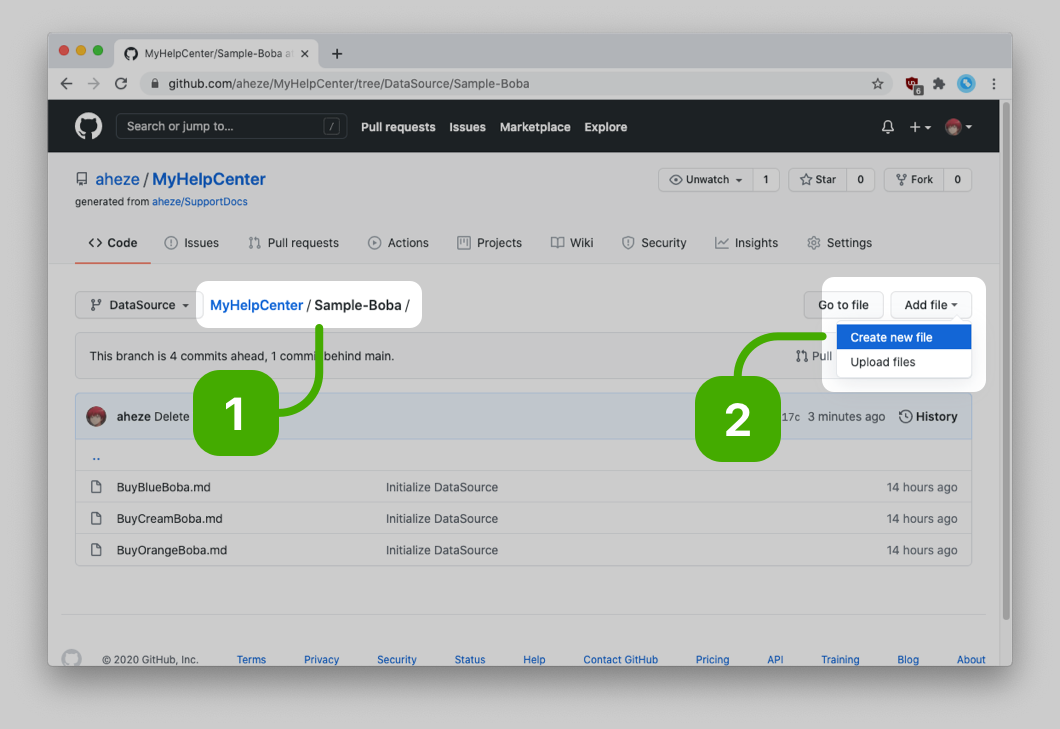
- If you want to add it to a folder, navigate to the folder first and then click the Create new file button.
- If you want to create a new folder, click Create new file -- then, in the filename, first put the folder name, then a slash (
/), followed by the filename (Example:fastFood/Burgers.md). Read more here.
- If you want to create a new folder, click Create new file -- then, in the filename, first put the folder name, then a slash (
| Add a Document | Add a Document in the Sample-Boba Subfolder |
|---|---|
 |
 |
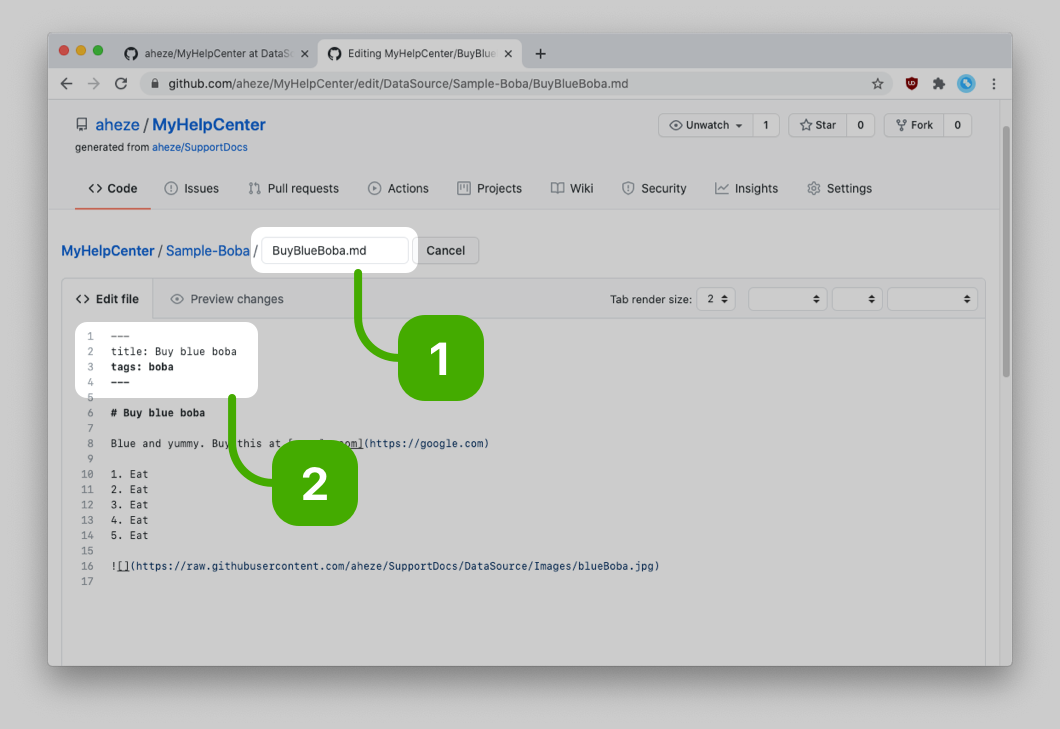
Then, to make the document eligible for SupportDocs, you must fulfill these criteria:
- The document extension must end in
.md - At the top of the document (this is called the front matter), you need to fill in the
title. We strongly suggest you add tags too.
---
title: Buy blue boba
tags: boba
---
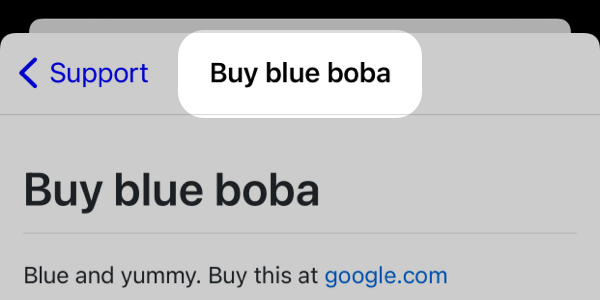
The title is what will be displayed in each row of the list, in the SupportDocs library. Once you select a row, it's also what's shown as the title of the navigation bar.
 |
 |
|---|
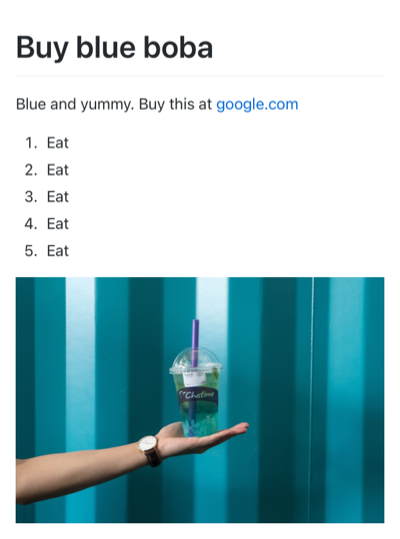
Everything after the --- of the front matter is your document's content. You use Markdown to write your documents.
| Markdown | Result |
---
title: Buy blue boba
tags: boba
---
# Buy blue boba
Blue and yummy. Buy this at [google.com](https://google.com)
1. Eat
2. Eat
3. Eat
4. Eat
5. Eat

|
|
Tagging Documents
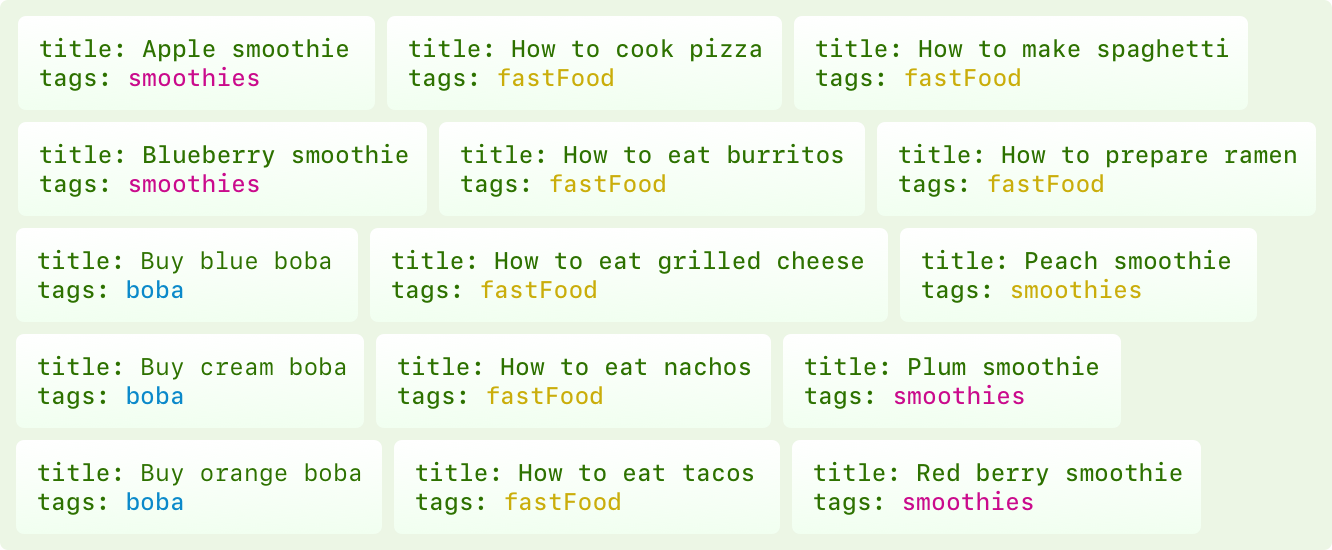
With tags, you get a lot of control over what to display in the library. To add tags, just fill in the tags, underneath the title. For example, check out this example document in the DataSource branch.
---
title: Buy blue boba
tags: boba
---This document has the tag boba. As you might assume, there are other documents in the DataSource branch also tagged with boba.
Here is a graphic which shows the documents, titles, and tags in the DataSource branch.
Once your documents have tags, you can choose to show which documents to show and which ones to hide, in the library. This is covered in the Categories section of the library customization documentation.
Using the Library
The library is the view that you embed in your app, and what the user sees. But before you present it, you need to get the data source URL first! Go to your brand-new repo's DataSource branch, scroll down to the README, and copy the URL.
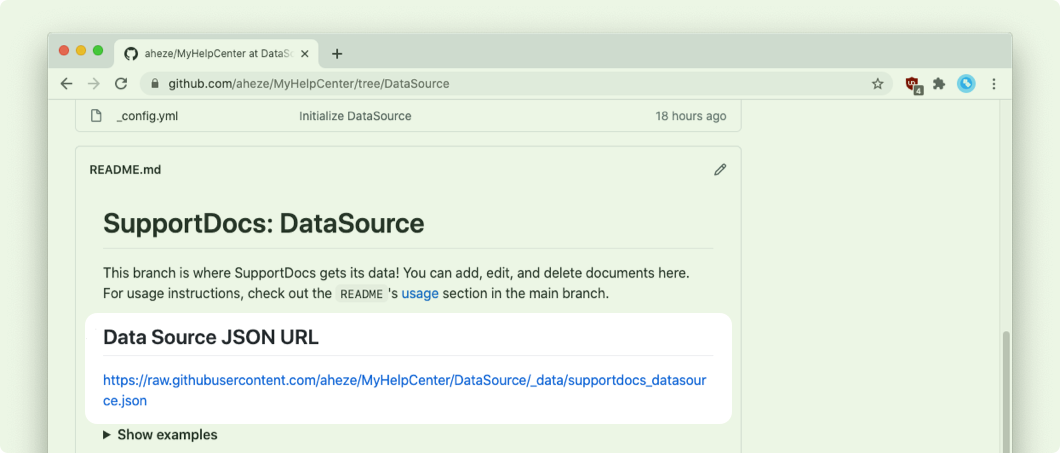
The custom GitHub Action generated this URL for you, so keep it safe!
Now you can present the view in your app. You can use SwiftUI or UIKit, and here's the least code that you need to write for it to work.
SwiftUI
import SwiftUI
import SupportDocs

struct SwiftUIExampleViewMinimalCode: View {
    let dataSource = URL(string: "https://raw.githubusercontent.com/aheze/MyHelpCenter/DataSource/_data/supportdocs_datasource.json")!
    @State var supportDocsPresented = false

    var body: some View {
        Button("Present SupportDocs from SwiftUI!") { supportDocsPresented = true }
        .sheet(isPresented: $supportDocsPresented, content: {
            SupportDocsView(dataSourceURL: dataSource, isPresented: $supportDocsPresented)
        })
    }
}
UIKit
import UIKit
import SupportDocs

class UIKitExampleControllerMinimalCode: UIViewController {

    /**
     Connect this inside the storyboard.

     This is just for demo purposes, so it's not connected yet.
     */
    @IBAction func presentButtonPressed(_ sender: Any) {

        let dataSource = URL(string: "https://raw.githubusercontent.com/aheze/MyHelpCenter/DataSource/_data/supportdocs_datasource.json")!

        let supportDocsViewController = SupportDocsViewController(dataSourceURL: dataSource)
        self.present(supportDocsViewController, animated: true, completion: nil)
    }
}
Result
Now that you have the library set up and working, you can hop on over to the library customization section and customize SupportDocs to your liking. Perhaps add a "Dismiss" button or only show documents with specific tags.
Customization
You get a lot of control over what to display.
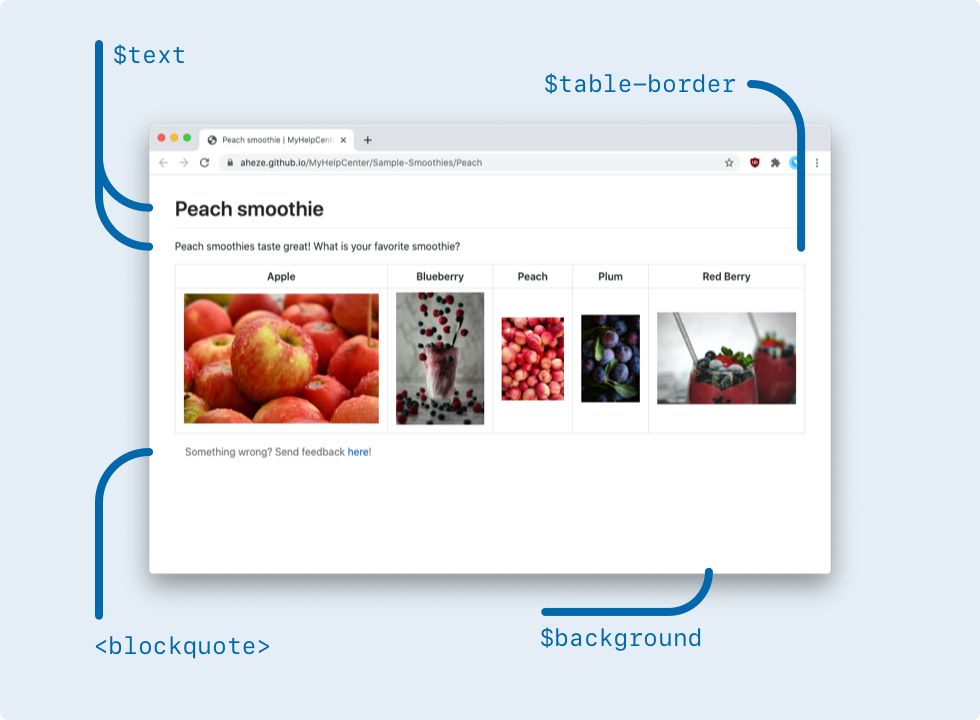
- Document Rendering: How your Markdown should be rendered. Customize colors and add your own HTML if you want!
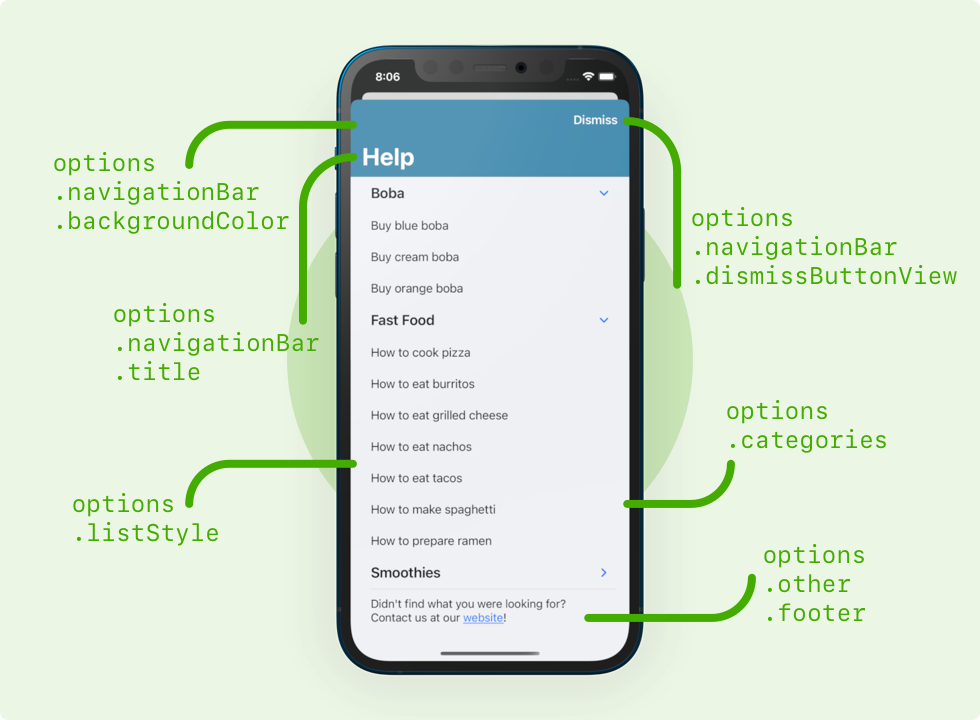
- Library: The basic navigation that's displayed to the user. Customize pretty much anything, from categories to the navigation bar color.
| Document Rendering | Library |
|---|---|
 |
 |
Authors
SupportDocs is a project maintained by A. Zheng and H. Kamran.
License
MIT License

Copyright (c) 2020 A. Zheng and H. Kamran

Permission is hereby granted, free of charge, to any person obtaining a copy
of this software and associated documentation files (the "Software"), to deal
in the Software without restriction, including without limitation the rights
to use, copy, modify, merge, publish, distribute, sublicense, and/or sell
copies of the Software, and to permit persons to whom the Software is
furnished to do so, subject to the following conditions:

The above copyright notice and this permission notice shall be included in all
copies or substantial portions of the Software.

THE SOFTWARE IS PROVIDED "AS IS", WITHOUT WARRANTY OF ANY KIND, EXPRESS OR
IMPLIED, INCLUDING BUT NOT LIMITED TO THE WARRANTIES OF MERCHANTABILITY,
FITNESS FOR A PARTICULAR PURPOSE AND NONINFRINGEMENT. IN NO EVENT SHALL THE
AUTHORS OR COPYRIGHT HOLDERS BE LIABLE FOR ANY CLAIM, DAMAGES OR OTHER
LIABILITY, WHETHER IN AN ACTION OF CONTRACT, TORT OR OTHERWISE, ARISING FROM,
OUT OF OR IN CONNECTION WITH THE SOFTWARE OR THE USE OR OTHER DEALINGS IN THE
SOFTWARE.
Notes
Example repo
You can find an example repository using SupportDocs here.
Searching
A search feature is coming soon! I'm just trying to figure out the animations, but it should be done by 12/10 at the latest.
Dark Mode
SupportDocs supports Dark Mode right out of the box! You don't need to do anything.