![]()
![]()
![]()
With the recent introduction of Combine and SwiftUI, we will face some transition periods in our code base. Our applications will use both Combine and a third-party reactive framework, or both UIKit and SwiftUI, which makes it potentially difficult to guarantee a consistent architecture over time.
Spin is a tool to build feedback loops within a Swift based application allowing you to use a unified syntax whatever the underlying reactive programming framework and whatever Apple UI technology you use (RxSwift, ReactiveSwift, Combine and UIKit, AppKit, SwiftUI).
Please dig into the Demo applications if you already feel comfortable with the feedback loop theory.
Summary:
- Change Log
- About State machines
- About Spin
- The multiple ways to build a Spin
- The multiple ways to create a Feedback
- Feedback lifecycle
- Feedbacks and scheduling
- Using Spin in a UIKit or AppKit based app
- Using Spin in a SwiftUI based app
- Using Spin with multiple Reactive Frameworks
- Demo applications
- Installation
- Acknowledgements
Change Log
Please read the CHANGELOG.md for information about evolutions and breaking changes.
About State Machines
What is a State Machine?
It's an abstract machine that can be in exactly one of a finite number of states at any given time. The state machine can change from one state to another in response to some external inputs. The change from one state to another is called a transition. A state machine is defined by a list of its states, its initial state, and the conditions for each transition
Guess what! An application IS a state machine.
We just have to find the right tool to implement it. This is where feedback loops come into play
A Feedback Loop is a system that is able to self-regulate by using the resulting value from its computations as the next input to itself, constantly adjusting this value according to given rules (Feedback Loops are used in domains like electronics to automatically adjust the level of a signal for instance).
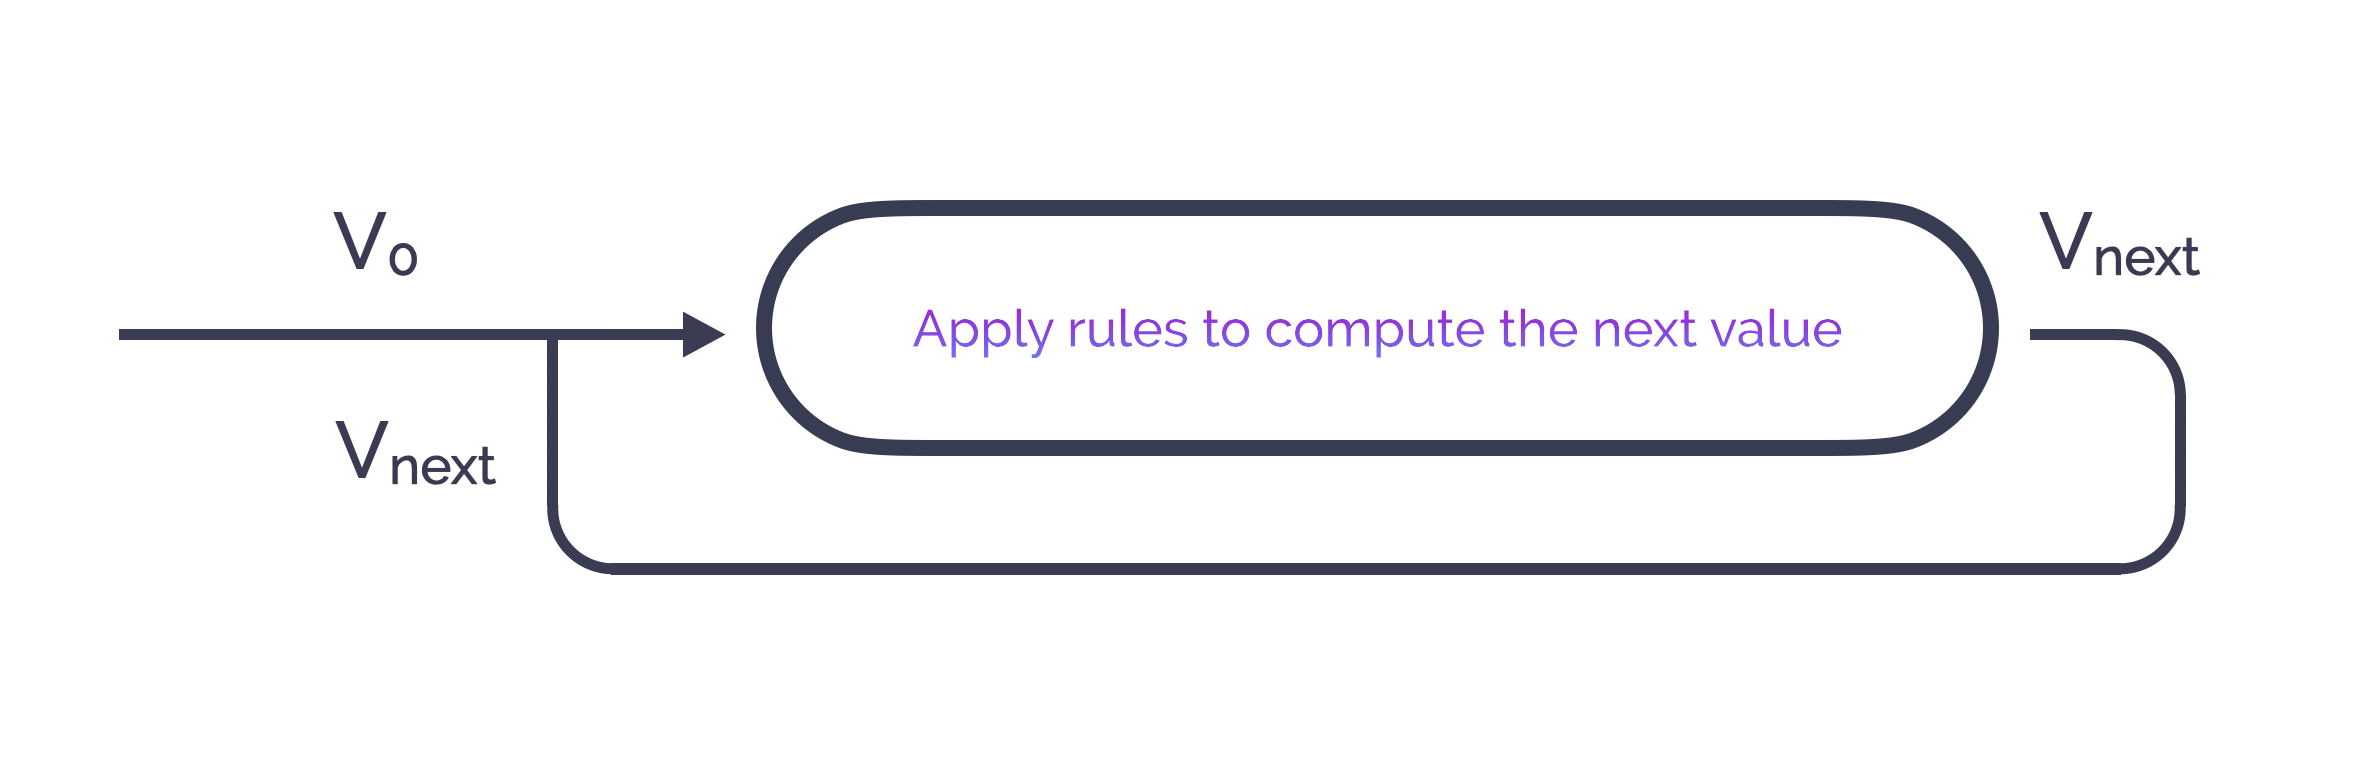
Stated this way might sound obscur and unrelated to software engineering, BUT “adjusting a value according to certain rules” is exactly what a program, and by extension an application, is made for! An application is the sum of all kinds of states that we want to regulate to provide a consistent behaviour following precise rules.
Feedback loops are perfect candidates to host and manage state machines inside an application.
About Spin
Spin is a tool whose only purpose is to help you build feedback loops called "Spins". A Spin is based on three components: an initial state, several feedbacks, and a reducer. To illustrate each one of them, we will rely on a basic example: a “feedback loop / Spin” that counts from 0 to 10.
- The initial state: this is the starting value of our counter, 0.
- A feedback: this is the rule we apply to the counter to accomplish our purpose. If 0 <= counter < 10 then we ask to increase the counter else we ask to stop it.
- A reducer: this is the state machine of our Spin. It describes all the possible transitions of our counter given its previous value and the request computed by the feedback. For instance: if the previous value was 0 and the request is to increase it, then the new value is 1, if the previous was 1 and the request is to increase it, then the new value is 2, and so on and so on. When the request from the feedback is to stop, then the previous value is returned as the new value.

Feedbacks are the only place where you can perform side effects (networking, local I/O, UI rendering, whatever you do that accesses or mutates a state outside the local scope of the loop). Conversely, a reducer is a pure function that can only produce a new value given a previous one and a transition request. Performing side effects in reducers is forbidden, as it would compromise its reproducibility.
In real life applications, you can obviously have several feedbacks per Spin in order to separate concerns. Each of the feedbacks will be applied sequentially on the input value.
The multiple ways to build a Spin
Spin offers two ways to build a feedback loop. Both are equivalent and picking one depends only on your preference.
Let’s try them by building a Spin that regulates two integer values to make them converge to their average value (like some kind of system that would adjust a left and a right channel volume on stereo speakers to make them converge to the same level).
The following example will rely on RxSwift, here are the ReactiveSwift and Combine counterparts; you will see how similar they are.
We will need a data type for our state:
struct Levels {
    let left: Int
    let right: Int
}
We will also need a data type to describe the transitions to perform on Levels:
enum Event {
    case increaseLeft
    case decreaseLeft
    case increaseRight
    case decreaseRight
}
Now we can write the two feedbacks that will have an effect on each level:
func leftEffect(inputLevels: Levels) -> Observable<Event> {
    // this is the stop condition to our Spin
    guard inputLevels.left != inputLevels.right else { return .empty() }

    // this is the regulation for the left level
    if inputLevels.left < inputLevels.right {
        return .just(.increaseLeft)
    }  else {
        return .just(.decreaseLeft)
    }
}

func rightEffect(inputLevels: Levels) -> Observable<Event> {
    // this is the stop condition to our Spin
    guard inputLevels.left != inputLevels.right else { return .empty() }

    // this is the regulation for the right level
    if inputLevels.right < inputLevels.left {
        return .just(.increaseRight)
    }  else {
        return .just(.decreaseRight)
    }
}
And finally to describe the state machine ruling the transitions, we need a reducer:
func levelsReducer(currentLevels: Levels, event: Event) -> Levels {

	guard currentLevels.left != currentLevels.right else { return currentLevels }

	switch event {
	    case .decreaseLeft:
	        return Levels(left: currentLevels.left-1, right: currentLevels.right)
	    case .increaseLeft:
	        return Levels(left: currentLevels.left+1, right: currentLevels.right)
	    case .decreaseRight:
	        return Levels(left: currentLevels.left, right: currentLevels.right-1)
	    case .increaseRight:
	        return Levels(left: currentLevels.left, right: currentLevels.right+1)
	}
}
The builder way
In that case, the “Spinner” class is your entry point.
let levelsSpin = Spinner
    .initialState(Levels(left: 10, right: 20))
    .feedback(Feedback(effect: leftEffect))
    .feedback(Feedback(effect: rightEffect))
    .reducer(Reducer(levelsReducer))
That’s it. The feedback loop is built. What now?
If you want to start it, then you have to subscribe to the underlying reactive stream. To that end, a new operator “.stream(from:)” has been added to Observable in order to connect things together and provide an Observable you can subscribe to:
Observable
    .stream(from: levelsSpin)
    .subscribe()
    .disposed(by: self.disposeBag)
There is a shortcut function to directly subscribe to the underlying stream:
Observable
    .start(spin: levelsSpin)
    .disposed(by: self.disposeBag)
For instance, the same Spin using Combine would be (considering the effects return AnyPublishers):
let levelsSpin = Spinner
    .initialState(Levels(left: 10, right: 20))
    .feedback(Feedback(effect: leftEffect))
    .feedback(Feedback(effect: rightEffect))
    .reducer(Reducer(levelsReducer))

AnyPublisher
    .stream(from: levelsSpin)
    .sink(receiveCompletion: { _ in }, receiveValue: { _ in })
    .store(in: &cancellables)

or

AnyPublisher
    .start(spin: levelsSpin)
    .store(in: &cancellables)
The declarative way
In this case we use a "DSL like" syntax thanks to Swift 5.1 function builder:
let levelsSpin = Spin(initialState: Levels(left: 10, right: 20),
                      reducer: Reducer(levelsReducer)) {
    Feedback(effect: leftEffect)
    Feedback(effect: rightEffect)
}
Again, with Combine, same syntax considering that effects return AnyPublishers:
let levelsSpin = Spin(initialState: Levels(left: 10, right: 20),
                      reducer: CombineReducer(levelsReducer)) {
    Feedback(effect: leftEffect)
    Feedback(effect: rightEffect)
}
The way to start the Spin remains unchanged.
The multiple ways to create a Feedback
As you saw, a “Feedback loop / Spin” is created from several feedbacks. A feedback is a wrapper structure around a side effect function. Basically, a side effect has this signature (Stream<State>) -> Stream<Event>, Stream being a reactive stream (Observable, SignalProducer or AnyPublisher).
As it might not always be easy to directly manipulate Streams, Spin comes with a bunch of helper constructors for feedbacks allowing to:
- directly receive a State instead of a Stream (like in the example with the
Levels) - filter the input State by providing a predicate:
RxFeedback(effect: leftEffect, filteredBy: { $0.left > 0 }) - extract a substate from the State by providing a lens or a keypath:
RxFeedback(effect: leftEffect, lensingOn: \.left)
Please refer to FeedbackDefinition+Default.swift for completeness.
Feedback lifecycle
There are typical cases where a side effect consist of an asynchronous operation (like a network call). What happens if the very same side effect is called repeatedly, not waiting for the previous ones to end? Are the operations stacked? Are they cancelled when a new one is performed?
Well, it depends
- .cancelOnNewState, to cancel the previous operation when a new state is to be handled
- .continueOnNewState, to let the previous operation naturally end when a new state is to be handled
Choose wisely the option that fits your needs. Not cancelling previous operations could lead to inconsistency in your state if the reducer is not protected against unordered events.
Feedbacks and scheduling
Reactive programming is often associated with asynchronous execution. Even though every reactive framework comes with its own GCD abstraction, it is always about stating which scheduler the side effect should be executed on.
Spin provides a way to specify this scheduler for each feedback you add to a loop while still being as declarative as possible:
Spinner
    .initialState(Levels(left: 10, right: 20))
    .feedback(Feedback(effect: leftEffect, on: SerialDispatchQueueScheduler(qos: .userInitiated)))
    .feedback(Feedback(effect: rightEffect, on: SerialDispatchQueueScheduler(qos: .userInitiated)))
    .reducer(Reducer(levelsReducer))
or
Spin(initialState: Levels(left: 10, right: 20), reducer: Reducer(levelsReducer)) {
    Feedback(effect: leftEffect)
        .execute(on: SerialDispatchQueueScheduler(qos: .userInitiated))
    Feedback(effect: rightEffect)
        .execute(on: SerialDispatchQueueScheduler(qos: .userInitiated))
}
Of course, it remains possible to handle the Schedulers by yourself inside the feedback functions.
Please note that reducers are executed on default schedulers to handle things like reentrancy or handling events in a serial way. This behaviour can be overridden by passing a custom scheduler to the Reducer you create.
Using Spin in a UIKit or AppKit based app
Although a feedback loop can exist by itself without any visualization, it makes more sense in our developer world to use it as a way to produce a State that we be rendered on screen and to handle events emitted by the users.
Fortunately, taking a State as an input for rendering and returning a stream of events from the user interactions looks A LOT like the definition of a feedback (State -> Stream<Event>), we know how to handle feedbacks
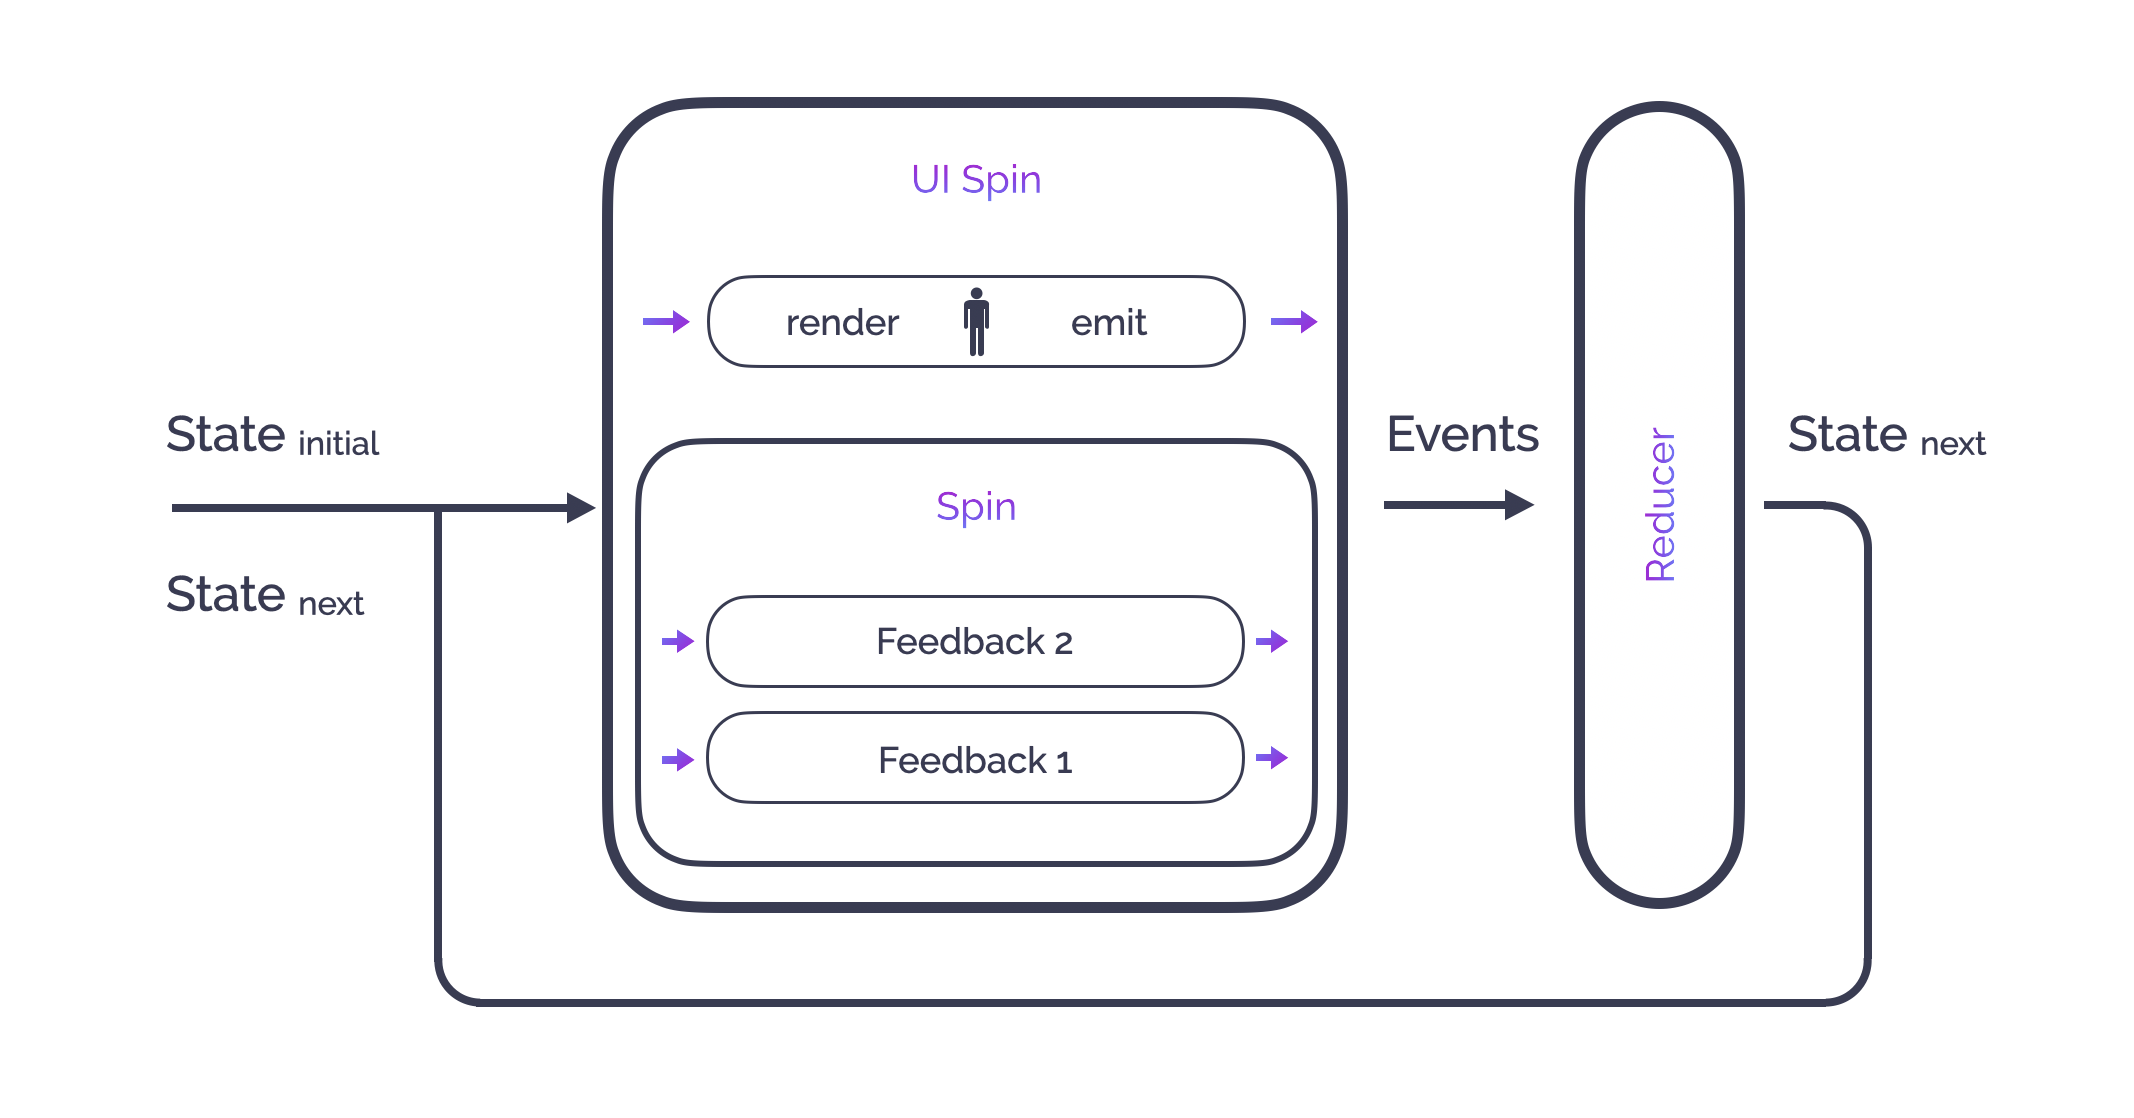
As the view is a function of a State, rendering it will change the states of the UI elements. It is a mutation exceeding the local scope of the loop: UI is indeed a side effect. We just need a proper way to incorporate it in the definition of a Spin.
Once a Spin is built, we can “decorate” it with a new feedback dedicated to the UI rendering/interactions. A special type of Spin exists to perform that decoration: UISpin.
As a global picture, we can illustrate a feedback loop in the context of a UI with this diagram:
In a ViewController, let’s say you have a rendering function like:
func render(state: State) {
    switch state {
    case .increasing(let value):
        self.counterLabel.text = "\(value)"
        self.counterLabel.textColor = .green
    case .decreasing(let value):
        self.counterLabel.text = "\(value)"
        self.counterLabel.textColor = .red
    }
}
We need to decorate the “business” Spin with a UISpin instance variable of the ViewController so their lifecycle is bound:
// previously defined or injected: counterSpin is the Spin that handles our counter business
self.uiSpin = UISpin(spin: counterSpin)

// self.uiSpin is now able to handle UI side effects

// we now want to attach the UI Spin to the rendering function of the ViewController:
self.uiSpin.render(on: self, using: { $0.render(state:) })
And once the view is ready (in “viewDidLoad” function for instance) let’s start the loop:
Observable
    .start(spin: self.uiSpin)
    .disposed(by: self.disposeBag)
or a shortest version:
self.uiSpin.start()
// the underlying reactive stream will be disposed once the uiSpin will be deinit
Sending events in the loop is very straightforward; simply use the emit function:
self.uiSpin.emit(Event.startCounter)Using Spin in a SwiftUI based app
Because SwiftUI relies on the idea of a binding between a State and a View and takes care of the rendering, the way to connect the SwiftUI Spin is slightly different, and even simpler.
In your view you have to annotate the SwiftUI Spin variable with “@ObservedObject” (a SwiftUISpin being an “ObservableObject”):
@ObservedObject
private var uiSpin: SwiftUISpin<State, Event> = {
    // previously defined or injected: counterSpin is the Spin that handles our counter business
    let spin = SwiftUISpin(spin: counterSpin)
    spin.start()
    return spin
}()
you can then use the “uiSpin.state” property inside the view to display data and uiSpin.emit() to send events:
Button(action: {
    self.uiSpin.emit(Event.startCounter)
}) {
    Text("\(self.uiSpin.state.isCounterPaused ? "Start": "Stop")")
}
A SwiftUISpin can also be used to produce SwiftUI bindings:
Toggle(isOn: self.uiSpin.binding(for: \.isPaused, event: .toggle) {
    Text("toggle")
}
\.isPaused is a keypath which designates a sub state of the state, and .toggle is the event to emit when the toggle is changed.
Using Spin with multiple Reactive Frameworks
As stated in the introduction, Spin aims to ease the cohabitation between several reactive frameworks inside your apps to allow a smoother transition. As a result, you may have to differentiate a RxSwift Feedback from a Combine Feedback since they share the same type name, which is Feedback. The same goes for Reducer, Spin, UISpin and SwiftUISpin.
The Spin frameworks (Spin_RxSwift, Spin_ReactiveSwift and Spin_Combine) come with typealiases to differentiate their inner types.
For instance RxFeedback is a typealias for Spin_RxSwift.Feedback, CombineFeedback is the one for Spin_Combine.Feedback.
By using those typealiases, it is safe to use all the Spin flavors inside the same source file.
All the Demo applications use the three reactive frameworks at the same time. But the advanced demo application is the most interesting one since it uses those frameworks in the same source files (for dependency injection) and take advantage of the provided typealiases.
Demo applications
In the Spinners organization, you can find 2 demo applications demonstrating the usage of Spin with RxSwift, ReactiveSwift, and Combine.
- A basic counter application: UIKit version and SwiftUI version
- A more advanced “network based” application using dependency injection and a coordinator pattern (UIKit): UIKit version and SwiftUI version
Warning: it seems that the StarWars API is no longer accessible. As a result, the "advanced" demos are not able to display data anymore. You can still read the code to see how Spin is used. A replacement API will be implemented shortly.
Installation
Swift Package Manager
Add this URL to your dependencies:
https://github.com/Spinners/Spin.Swift.git
Carthage
Add the following entry to your Cartfile:
github "Spinners/Spin.Swift" ~> 0.16
and then:
carthage update Spin.Swift
You should then be able to import SpinCommon (base implementation), SpinRxSwift, SpinReactiveSwift or SpinCombine
Acknowledgements
The advanced demo applications use Alamofire for their network stack, Swinject for dependency injection, Reusable for view instantiation (UIKit version) and RxFlow for the coordinator pattern (UIKit version).
The following repos were also a source of inspiration: