SelectableTextView 1.0.3
| TestsTested | ✗ |
| LangLanguage | SwiftSwift |
| License | MIT |
| ReleasedLast Release | Nov 2017 |
| SwiftSwift Version | 4.0 |
| SPMSupports SPM | ✗ |
Maintained by Jeff Hurray.
SelectableTextView 1.0.3
- By
- Jeff Hurray
- jeffhurray
 |
 |
 |
|
|
|

The Problem
UILabel and UITextView offer unsatisfying support for text selection.
Existing solutions like TTTAttributedLabel are great but offer a somewhat limited API for text selection.
Features
- Text Selection
- Text Expansion
- Customization
- Prewritten Selection Validators
- Interface Builder
- Scrolling
Installation
Add to project Manually
Clone the repo and manually add the Files in /SelectableTextView
Usage
import SelectableTextView

let textView = SelectableTextView()
textView.text = "Hello World!"
textView.truncationMode = .truncateTail
textView.alignment = .center
textView.numberOfLines = 1

let greetingValidator = MatchesTextValidator(text: "hello")
textView.registerValidator(_ validator: greetingValidator) { (validText, validator) in
	// Handle selection of "Hello"
}

let exclamationValidator = SuffixValidator(suffix: "!")
textView.registerValidator(_ validator: exclamationValidator) { (validText, validator) in
	// Handle selection of "World!"
}
Text Selection
To create selectable text, you have to create and register a validator. The validator must conform to the TextSelectionValidator protocol.
let hashtagValidator = PrefixValidator(prefix: "#")
textView.registerValidator(validator: hashtagValidator) { (validText, validator) in
	// Handle selection of hashtag
}
You can unregister a validator at any time.
textView.removeValidator(validator: hashtagValidator)Custom Validators
Here is a resource for creating custom validators using the TextSelectionValidator protocol.
There are other more specific protocols that make customization easier like ContainerTextSelectionValidator and CompositeTextSelectionValidator.
Prewritten Validators
There are a few prewritten validators supplied. These can be used as they are, as building blocks for other more complex validators, and as examples on how to build custom validators.
Text Validators
MatchesTextValidator(text: String, caseSensitive: Bool = false)

ContainsTextValidator(text: String, caseSensitive: Bool = false)

PrefixValidator(text: String, caseSensitive: Bool = false)

SuffixValidator(text: String, caseSensitive: Bool = false)

HashtagTextValidator()

AtSymbolTagTextValidator()

QuotationsTextValidator()

HandlebarsValidator(searchableText: String, replacementText: String)
Abstract Validators
ReverseValidator(validator: TextSelectionValidator)

ContainerValidator(validator: TextSelectionValidator, selectionAttributes: [String: Any]? = nil)

CompositeValidator(validators: [TextSelectionValidator], selectionAttributes: [String: Any]? = nil)
Link Validators
LinkValidator() // Validates any link (HTTP, HTTPS, file, etc...)

HTTPLinkValidator() // Validates HTTP and HTTPS links

UnsafeLinkValidator() // Validates HTTP links

HTTPSLinkValidator()

CustomLinkValidator(urlString: String!, replacementText: String? = nil)
Customization is possible using the LinkValidatorAttributes protocol. Example here.
Regex Validators
RegexValidator(pattern: String, options: NSRegularExpression.Options = .caseInsensitive)

EmailValidator()

PhoneNumberValidator()
Text Expansion

You can add a text expansion button with the following method:
public func addExpansionButton(collapsedState: (text: String, lines: Int), expandedState: (text: String, lines: Int), attributes: [String: Any]? = nil)You can remove the expansion button using the following method:
public func removeExpansionButton(numberOfLines: Int = 1)Example:
let attributes = [NSForegroundColorAttributeName: purple]
textView.addExpansionButton(collapsedState: ("More...", 2),
                             expandedState: ("Less", 0),
                                attributes: attributes)

...

textView.removeExpansionButton(numberOfLines: 2)
You can customize the background color of the expansion button using the SelectedBackgroundColorAttribute property HighlightedTextSelectionAttributes struct as an attribute key.
let attributes: [String: Any] = [HighlightedTextSelectionAttributes.SelectedBackgroundColorAttribute : UIColor.purple]Customization
text
- Sets the content of the text view
- Type:
String?
font
- Sets the font of the text view
- Type:
UIFont - Defaults to
UIFont.systemFont(ofSize: 17)
textColor
- Sets the default text color
- Type:
UIColor - Defaults to
UIColor.darkText
attributedText
- Overrides the
textandtextColorwith the attributed text - Type:
NSAttributedString? - Defaults to
nil
textAlignment
- Alignment of text in the text view
- Type:
TextAlignment - Supports 3 types:
.left,.right,.center - Defaults to
.left
lineBreakMode
- Determines how the text view handles new lines
- Type:
LineBreakMode - Supports 1 type:
.wordWrap -
- Defaults to
. wordWrap
- Defaults to
- See Goals
truncationMode
- Determines the bahavior of the last word in the last line of the text view
- Type:
TruncationMode - Supports 2 types:
.clipping,.truncateTail - Defaults to
.clipping - See Goals
numberOfLines
- Determines the number of lines in the text view
- Type:
Int - Defaults to
0 - 0 lines means unbounded, similar to
UILabel
lineSpacing
- Determines the spacing between lines
- Type:
CGFloat - Defaults to
0 - Supports negative values
textContainerInsets
- Sets the content inset of the text view
- Type:
UIEdgeInsets - Defaults to
UIEdgeInsets.zero
selectionAttributes
- Sets the default selection attributes for selectable text
- Type:
[String : AnyObject]? - Defaults:
color=tintColor,font=boldSystemFont(ofSize: font.pointSize + 2)
isExpanded
- Tracks the state of the expansion button
- Type:
Bool? - Defaults to
nil. Will only return a value if the expansion button is added - If the expansion button is added, this property will toggle the state
textContentSize
- Readonly, returns the size of the text content
- Type:
CGSize
isSelectionEnabled
- Determines if selection is enabled for the text view
- Type:
Bool - Defaults to
true
isScrollEnabled
- Determines if scrolling is enabled for the text view
- Type:
Bool - Defaults to
false
scrollDelegate
- Forwards scrolling events fron the text view
- Type:
SelectableTextViewDelegate?
delegate
- Delegates work for the text view
- Type:
SelectableTextViewScrollDelegate?
Supported Escape Characters
- New Line
\n - Tab
\t - Null Terminator
\0
If you want to have text next to to a selectabe portion of text but still validate the text correctly, use the null terminator.
let text = "The period next to the #Hashtag\0. Will not be highlighted if I use a hashtag validator."Miscelaneous
framesOfWordsMatchingValidator
You can get the relative frames of words within the text view with the method below. This is how I set up the stars effect in the first example gif.
public func framesOfWordsMatchingValidator(_ validator: TextSelectionValidator) -> [CGRect]Tab Length
You can adjust the number of spaces a tab character creates using TabTextModelConfig.numberOfSpaces. The default value is 4.
TabTextModelConfig.numberOfSpaces = 2Interface Builder
You can set most customization properties via interface builder. SelectableTextView is marked as @IBDesignable.
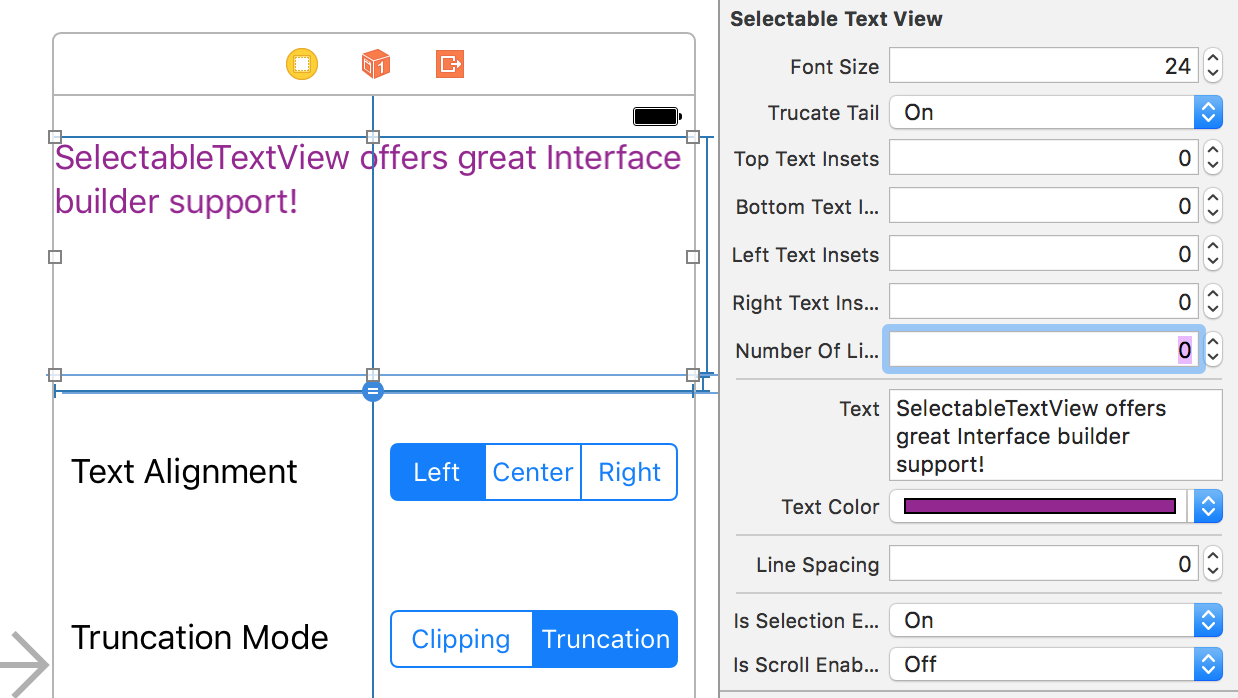
numberOfLines: Inttext: StringtextColor: UIColorlineSpacing: FloatisSelectionEnabled: BoolisScrollEnabled: BoolfontSize: FloattruncateTail: BooltopTextInsets: FloatbottomTextInsets: FloatleftTextInsets: FloatrightTextInsets: Float
Delegate
Default implementations are provided for all SelectableTextViewDelegate methods.
public protocol SelectableTextViewDelegate: class {

    /// Resolves conflict between multiple validates that return `true` from their `validate:` method
    //
    // i.e. PrefixTextValidator for `#` and `#my` will both return true for `#myCoolHashtag`,
    // but the actions they are registered for may differ
    //
    /// Default behavior is to choose the first validator in the composite validator's `validators` array
    func resolveValidationConflictsForSelectableTextView(textView: SelectableTextView, conflictingValidators: [TextSelectionValidator]) -> TextSelectionValidator

    /// Defaults to `false`
    func animateExpansionButtonForSelectableTextView(textView: SelectableTextView) -> Bool

    /// Defaults to `.truncateTail`
    func truncationModeForWordsThatDontFitForSelectableTextView(textView: SelectableTextView) -> TruncationMode

    /// Optional, Default empty implementation provideed
    func selectableTextViewContentHeightDidChange(textView: SelectableTextView, oldHeight: CGFloat, newHeight: CGFloat)
}
Scrolling
SelectableTextView supports scrolling and forwards scroll events through SelectableTextViewScrollDelegate.
public protocol SelectableTextViewScrollDelegate: class {

    func selectableTextViewDidScroll(_ scrollView: UIScrollView)
    func selectableTextViewWillBeginDragging(_ scrollView: UIScrollView)
    func selectableTextViewWillEndDragging(_ scrollView: UIScrollView, withVelocity velocity: CGPoint, targetContentOffset: UnsafeMutablePointer<CGPoint>)
    func selectableTextViewDidEndDragging(_ scrollView: UIScrollView, willDecelerate decelerate: Bool)
    func selectableTextViewWillBeginDecelerating(_ scrollView: UIScrollView)
    func selectableTextViewDidEndDecelerating(_ scrollView: UIScrollView)
    func selectableTextViewDidEndScrollingAnimation(_ scrollView: UIScrollView)
}
You can also scroll to specific words or the first word that passes a validator.
/// Scrolls to the first instance of the word
/// Attempts to match the text and display text of a word
public func scrollToWord(_ word: String, position: ScrollPosition, animated: Bool)

   /// Scrolls to the first instance of a word that passes the provided TextSelectionValidator
public func scrollToWordPassingValidator(_ validator: TextSelectionValidator, position: ScrollPosition, animated: Bool)
Goals
- Character wrapping
- More truncation styles:
.head,.center
Contact Info && Contributing
Feel free to email me at [email protected]. I'd love to hear your thoughts on this, or see examples where this has been used.