RetrofireSwift


What's this?
RetrofireSwift is a library inspired by Retrofit. Since Retrofit uses annotations and proxies which are not available in Swift, this library uses a slightly customized version of Sourcery (called SourceryForRetrofire) to generate Alamofire's SessionManager extensions based on the comments/annotations you write on your protocol. Just check the Usage section to understand it better :)
Example
To run the example project, clone the repo, and run pod install from the Example directory first.
Requirements
You will need cocoapods in your project, that's all.
Installation
Right now the only official way to install this library is by using CocoaPods; you can of course build the binary on your own from GitHub (which should always be aligned) but I won't be able to help you in case of any issue.
- Add the following line to your Podfile:
pod 'RetrofireSwift', '0.3.1' # Since this pod is not stable you need to specify its version- Run
pod install - Add a
New Run Script Phasein theBuild Phasetab of your target - Move your newly created script between
[CP] Check Pods Manifest.lockandCompile Sources (N items) - Below the
Shellbox add this script:$PODS_ROOT/RetrofireSwift/retrofire.sh - Create your protocol and its annotations (check the
Usagesection for more info) - Build your project
(cmd-b) - On the root of your project you will see a new file,
Generated/RetrofireSourcery.generated.swift - Drag and drop the
Generatedfolder in Xcode (as shown in the GIF below) - Uncheck
Copy items if needed(if it is checked), selectCreate groupsand pressFinish - You're ready to use your auto-generated code :)
PS: you need to do these steps only one time, then just build the project and everything will update on its own
Usage
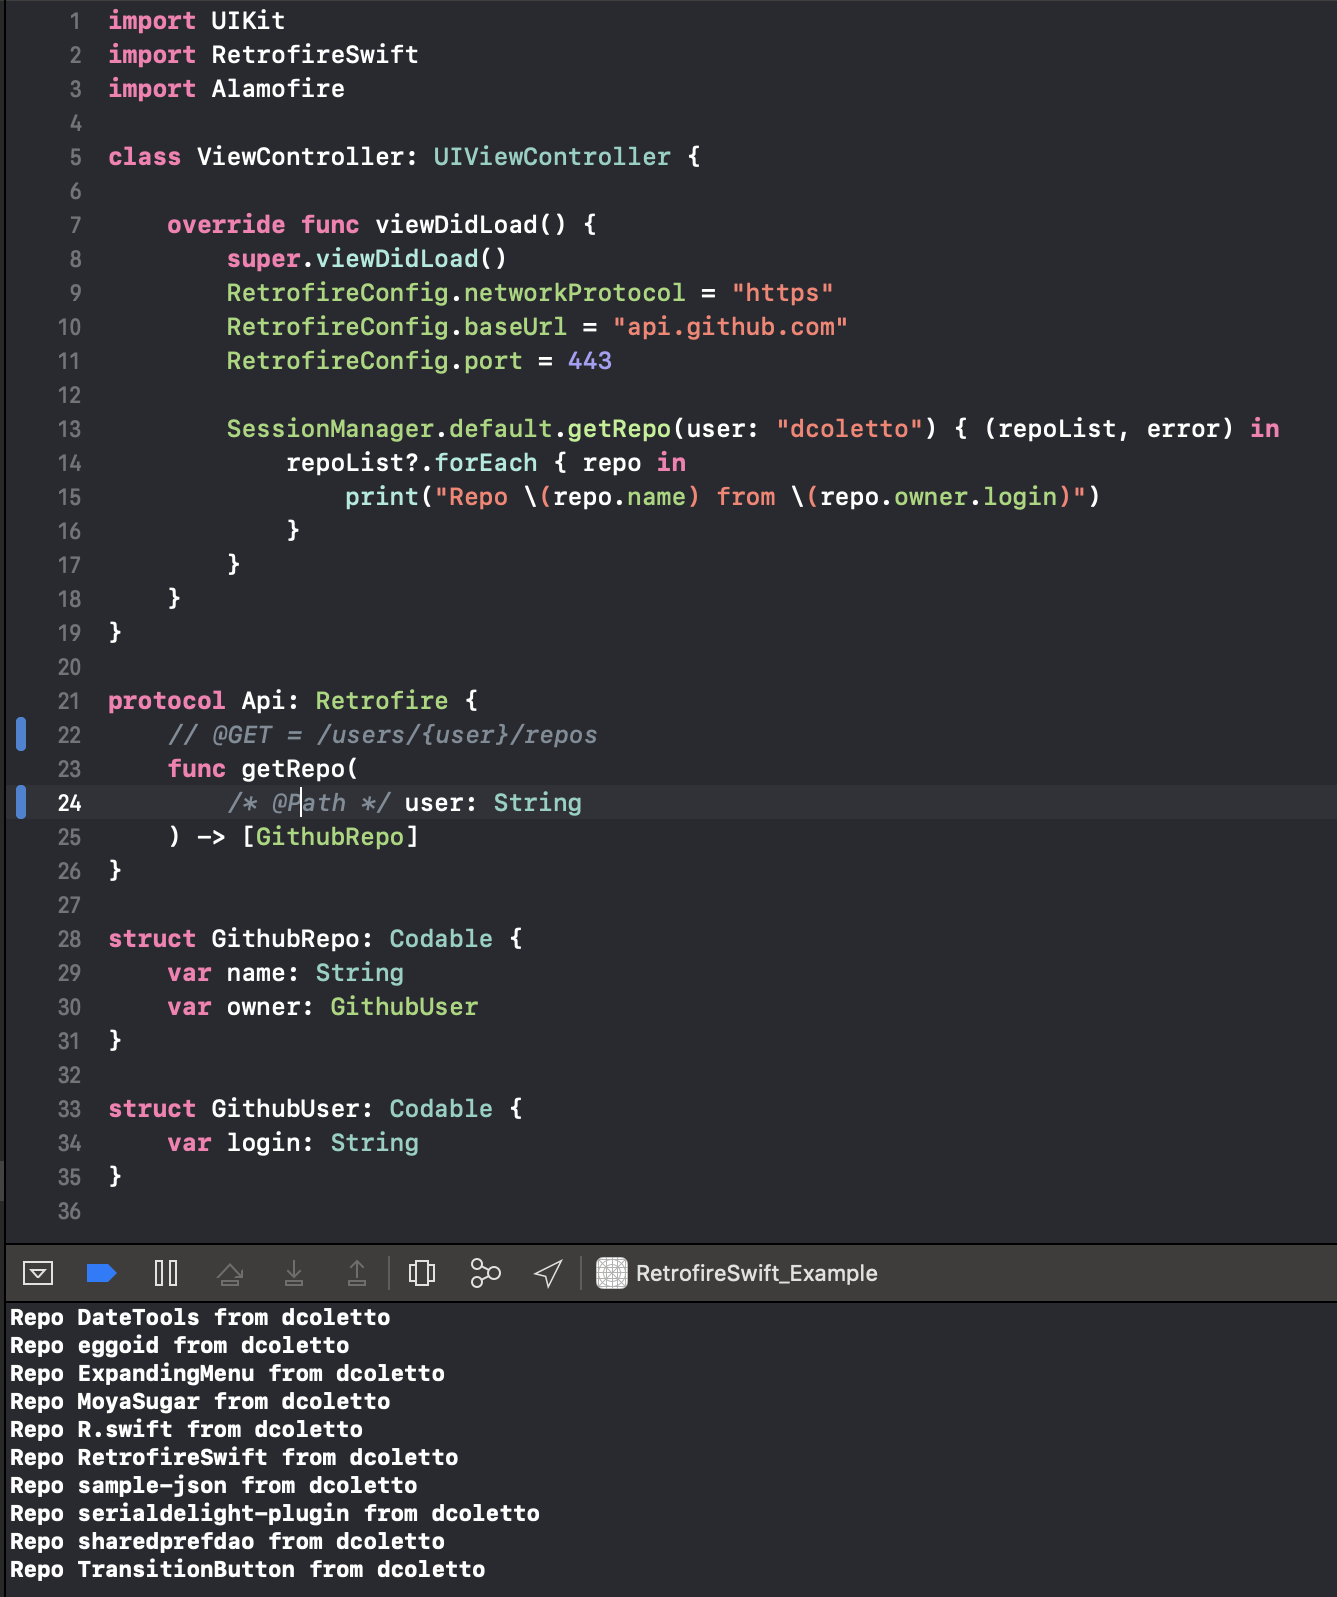
As an example we will get the list of repositories of a github user.
The URL that we need to request is https://api.github.com/users/dcoletto/repos, where dcoletto is the username.
The response is a JSON file, so we will need to create a struct/class which can hold our data.
Note: use the Codable protocol so Retrofire will automatically parse your JSON and instantiate your swift object:
struct GithubRepo: Codable {
    var name: String
    var owner: GithubUser
}

struct GithubUser: Codable {
    var login: String
}
As you can see from the example above, it is possible to nest struct/class that adopt the Codable protocol.
Now we need to set the protocol (https) the base URL, (api.github.com) and the port (https uses port 443):
func setupRetrofire(){
    RetrofireConfig.networkProtocol = "https"
    RetrofireConfig.baseUrl = "api.github.com"
    RetrofireConfig.port = 443
}
Last step, create a protocol which adopt the Retrofire protocol:
protocol Api: Retrofire {
    // @GET = /users/{user}/repos
    func getRepo(
        /* @Path */ user: String
    ) -> [GithubRepo]
}
As you can see you just need to define a function and add a comment with an annotation above it to define a simple http call.
Currently supported HTTP methods are:
@GET, @POST, @PATCH, @PUT, @DELETE
Then append your endpoint and the magic will happen at compile time!
Check sections below if you want to know how to use path, query or body parameters
If you check inside your Generated/RetrofireSourcery.generated.swift folder you will see that there's an extension method to SessionManager.
In this way you can decide if you want to use the default Alamofire's SessionManager or create your own implementation;
Here's a basic example using the default SessionManager:
SessionManager.default.getRepo(user: "dcoletto") { (repoList, error) in
    repoList?.forEach { repo in
        print("Repo \(repo.name) from \(repo.owner.login)")
    }
}
That's it, barely 11 lines of code to generate a network call (even counting closed brakets :P)
Adding @Path Parameter
In order to add a path parameter to your request you just need to add a parameter with the same name to your swift function, with a comment on the same line containing the @Path keyword. You can put the comment before or after the parameter:
Before:
/* @Path */ user: String
After:
user: String /* @Path */
Inline:
user: String // @Path
Remember to surround the variable in your endpoint with curly brakets:
// @GET = /users/{user}/repos
RetrofireSwift will replace all the occurrence of the word in the brakets with a variable with exactly the same name!
If you need to set a different name between your variable and the actual path parameter, you can simply specify the name after an equal sign: /* @Path = different_name */ user: String. In this way you can have an endpoint like /users/{different_name}/repos without changing the function signature
End result:
// @GET = /users/{user}/repos
func getRepo(
    /* @Path */ user: String
) -> [GithubRepo]

SessionManager.default.getRepo("dcoletto") {...}
The function above will call /users/dcoletto/repos
Adding @Query Parameter
In order to add a query parameter to your request you just need to add a parameter with the same name to your swift function, with a comment on the same line containing the @Query keyword. You can put the comment before or after the parameter:
Before:
/* @Query */ q: String
After:
q: String /* @Query */
Inline:
q: String // @Query
Endpoint doesn't need any modification, query parameters are added after the endpoint automatically
RetrofireSwift will add all the parameters with exactly the same name as your parameter!
If you need to set a different name between your variable and the actual path parameter, you can simply specify the name after an equal sign: /* @Query = q */ query: String. In this way you can call an endpoint like /search/repositories?q=test maintaining a meaningful name for your function's parameter
End result:
// @GET = /search/repositories
func searchRepo(
    /* @Query */ q: String
) -> RepoList

SessionManager.default.searchRepo("retrofire swift") {...}
The function above will call /search/repositories?q=retrofire%20swift
Adding @Body Parameter
In order to add a body to your request you just need to add a parameter to your swift function, with a comment on the same line containing the @Body keyword. You can put the comment before or after the parameter:
Before:
/* @Body */ body: CodableObject
After:
body: CodableObject /* @Query */
Inline:
body: CodableObject // @Query
Endpoint doesn't need any modification, query parameters are added after the endpoint automatically
RetrofireSwift will generate a JSON string from your object, so it needs to adopt the 'Codable' protocol:
    var title: String
    var body: String
    var userId: Int
}
End result:
// @POST = /posts
func postSample(
    /* @Body */ body: PostReq
) -> PostRes

let req = PostReq(title: "Sample", body: "Full body", userId: 1)
SessionManager.default.postSample(body: req) {...}
The function above will call /posts with a this json body: {"title": "Sample", "body": "Full body", "userId": 1}
Adding an @Header parameter
In order to add an header parameter to your request you just need to add a parameter to your swift function, with a comment on the same line containing the @Header keyword, an equal sign and the header name. You can put the comment before or after the parameter:
Before:
/* @Header = Authorization */ token: String
After:
token: String /* @Header = Authorization */
Inline:
token: String // @Header = Authorization
Adding more headers using @Headers
Right now (09/04/2019) it is not possible to more headers using @Headers. Anyway you can use multiple @Header annotation on the same function if you need more parameters
Author
Coletto Dario, [email protected]
License
Retrofire is available under the MIT license. See the LICENSE file for more info.