Render 4.9.1
| TestsTested | ✗ |
| LangLanguage | SwiftSwift |
| License | MIT |
| ReleasedLast Release | Aug 2017 |
| SwiftSwift Version | 3.1 |
| SPMSupports SPM | ✗ |
Maintained by Alex Usbergo.
Render 4.9.1
- By
- Alex Usbergo
- alexdrone
![]()
Render is a declarative library for building efficient UIs on iOS inspired by React.
- Declarative: Render uses a declarative API to define UI components. You simply describe the layout for your UI based on a set of inputs and the framework takes care of the rest (diff and reconciliation from virtual view hierarchy to the actual one under the hood).
- Flexbox layout: Render includes the robust and battle-tested Facebook's Yoga as default layout engine.
- Fine-grained recycling: Any component such as a text or image can be recycled and reused anywhere in the UI.
From Why React matters:
[The framework] lets us write our UIs as pure function of their states.
Right now we write UIs by poking at them, manually mutating their properties when something changes, adding and removing views, etc. This is fragile and error-prone. [...]
[The framework] lets us describe our entire UI for a given state, and then it does the hard work of figuring out what needs to change. It abstracts all the fragile, error-prone code out away from us.
Installation
If you are using CocoaPods:
Add the following to your Podfile:
pod 'Render'If you are using Carthage:
Add the following line to your Cartfile:
github "alexdrone/Render" "master"
Manually:
Drag bin/Render.framework in your project and add it as an embedded binary.
TL;DR
Render's building blocks are Components (described in the protocol ComponentViewType).
This is what a component looks like:
struct CounterState: StateType {
  let count: Int = 0
}

class CounterComponentView: ComponentView<CounterState> {

  override func render() -> NodeType {
    let circle = Node<UIView> { view, layout, size in
      view.backgroundColor = UIColor.green
      layout.alignSelf = .center
      layout.width = 128
      layout.aspectRatio = 1
    }
    let text = Node<UILabel> { view, layout, size in
      view.text = "\(state.count)"
      view.textAlignment = .center
      layout.margin = 16
    }
    let container = Node<UIView> { view, layout, _ in
      view.backgroundColor = UIColor.black
      view.onTap { [weak self] _ in
      	// When the state changes the component is automatically re-rendered.
        self?.setState { state in state.count += 1 }
      }
      layout.justifyContent = .center
    }
    return container.add(children: [avatar, text])
  }
}

Components
Node<T> is an abstraction around views of any sort that knows how to build, configure and layout the view when necessary.
Every time update(options:) is called, a new tree is constructed, compared to the existing tree and only the required changes to the actual view hierarchy are performed - if you have a static view hierarchy, you might want pass the '.preventViewHierarchyDiff' option to skip this part of the rendering . Also the configure closure passed as argument is re-applied to every view defined in the render() method and the layout is re-computed based on the nodes' flexbox attributes.
Check the demo project for more examples
Components in Render can be stateless or stateful.
Stateless components are essentialy pure functions returning a view hierarchy description from the current component properties value (props)
You can define a statelss component by simply having a function returning a node tree.
 func PaddedLabel(text: String) -> NodeType {
    return Node<UIView>(resueIdentifier: "PaddedLabel") { view, layout, size in
      layout.padding = 4
      view.backgroundColor = ...
      }.add(children: [
        Node<UILabel> { view, _, _ in
          view.text = text
          view.font = ...
        }
    ])
  }
Or by defining a StatelessComponent subclass with some properties.
class PaddedLabelComponentView: StatelessComponent {
  var text: String = ""

  func render() -> NodeType {
    return Node<UIView>(resueIdentifier: "PaddedLabel") { view, layout, size in
      layout.padding = 4
      view.backgroundColor = ...
      }.add(children: [
        Node<UILabel> { view, _, _ in
          view.text = text
          view.font = ...
        }
    ])
  }
Components can be composed in hierarchies:
class ParentComponentView: StatelessComponent {

  func render() -> NodeType {
    return Node<UIScrollView>.add(children: [
        // A pure function returning a node can be be simply added to the node desciption.
        PaddedLabel(text: "foo"),
        // While a component define as a class needs to be added as a child
        // using the ComponentNode function.
        // N.B. Stateful components need to provide a unique 'key' as well in the
        // ComponentNode function - see the stateful components section.
        ComponentNode(PaddedLabelComponentView(), in: self) { $0.text = "foo" }
      ])
    }
  }
As opposed to stateless components, stateful components don't rely uniquely on props to render but they mantain an internal state.
Props vs State
What's the exact difference between props and state?
It's fairly easy to understand how they work—especially when seen in context—but it's also a bit difficult to grasp them conceptually. It's confusing at first because they both have abstract terms and their values look the same, but they also have very different roles.
You could say props + state is the input data for the render() function of a Component, so we need to zoom in and see what each data type represents and where does it come from.
props
props are a Component's configuration, its options if you may. They are received from above and immutable as far as the Component receiving them is concerned.
A Component cannot change its props, but it is responsible for putting together the props of its child Components.
state
The state starts with a default value when a Component mounts and then suffers from mutations in time (mostly generated from user events). It's a representation of one point in time—a snapshot.
A Component manages its own state internally, but—besides setting an initial state—has no business fiddling with the state of its children. You could say the state is private.
In Render a component can change its internal state by calling the setState(options:change:) function.
struct CounterState: StateType {
  let count: Int = 0
}
class CounterComponentView: ComponentView<CounterState> {

  // A property configurable from the outside.
  // The component will increment on tap if this is true, decrement otherwise.
  var shouldIncrement: Bool = true
  // Another simple property.
  var background: UIColor = UIColor.black

  override func render() -> NodeType {
    let circle = ...
    let text = ...
    let container = Node<UIView> { view, layout, _ in
      view.backgroundColor = self.background
      view.onTap { _ in
      	// When the state changes the component is automatically re-rendered.
        self.setState { state in
          if self.shouldIncrement {
            state.count += 1
          } else {
            state.count -= 1
          }
      }
    }
    return container.add(children: [avatar, text])
  }
}
When stateful components are added as children components it is necessary to specify a unique key for them so that the infra will be able to store their internal states:
class ParentComponentView: StatelessComponent {
  func render() -> NodeType {
    return Node<UIScrollView>.add(children: [
        ComponentNode(CounterComponentView(), in: self, key:"counter") { $0.text = "foo" }
      ])
    }
  }
Should this Component have state?
state is optional. Since state increases complexity and reduces predictability, a Component without state is preferable. Even though you clearly can't do without state in an interactive app, you should avoid having too many Stateful Components.
Recap
-
Stateless Component — Only props, no state. There's not much going on besides the
render()function and all their logic revolves around the props they receive. This makes them very easy to follow (and test for that matter). - Stateful Component — Both props and state. They should take care of user interaction and some of the complex business logic, while all visualization and formatting logic should move downstream into as many Stateless Components as possible.
reuseIdentifier vs key
Every node exposes these 2 properties and even if it could be confusing at first, their role is very different.
- reuseIdentifier - Mainly for performance optimisation reasons only - it's a way to flag a way for optimal reuse. Mandatory when your node has a custom creation closure.
- key - Used to give the node a unique identity for state storing purposes - every child component must be constructed with a unique key. Extremely useful in lists.
Lightweight Integration with UIKit
Components are plain UIViews, so they can be used inside a vanilla view hierarchy with autolayout or layoutSubviews.
Similarly plain vanilla UIViews (UIKit components or custom ones) can be wrapped in a Node.
The framework doesn't force you to use the Component abstraction. You can use normal UIViews with autolayout inside a component or vice versa. This is probably one of the biggest difference from Facebook's ComponentKit.
Performance & Thread Model
Render's update(options:) function is performed on the main thread. Diff+Reconciliation+Layout+Configuration runs usually under 16ms for a component with a complex view hierarchy on a iPhone 4S, which makes it suitable for cells implementation (with smooth scrolling).
Components embedded in cells
You can wrap your components in ComponentTableViewCell or ComponentCollectionViewCell and use the classic dataSource/delegate pattern for you view controller.
Declarative UI(Table/Collection)View implementation
You can quickly leverage the efficiency of UITableView and UICollectionView and their cell reuse capabilities by using TableNode or CollectionNode as the container node for your children.
In this way the node's subnodes will be wrapped inside UITableViewCollectionCell or UICollectionNode.
Changes in the collection results in fine grain table changes (add/remove/move cells) as long as every children node in the collection has a unique key.
 override func render() -> NodeType {
    let table = TableNode { _, layout, _ in
      // Size, margins and padding can also be expressed as a % of the parent.
      (layout.percent.height, layout.percent.width) = (100%, 100%)
    }
    return table.add(children: [
      // Any node definition will be wrapped inside a UITableViewCell.
      PaddedLabel(text: "foo"),
      PaddedLabel(text: "bar"),
      // ComponentViews can also be added as child-nodes.
      ComponentNode(MyComponent(), state: state.bar) { $0.props = ... }
    ])
  }
Example projects
The Render catalogue app contains a number of complex components and layouts.
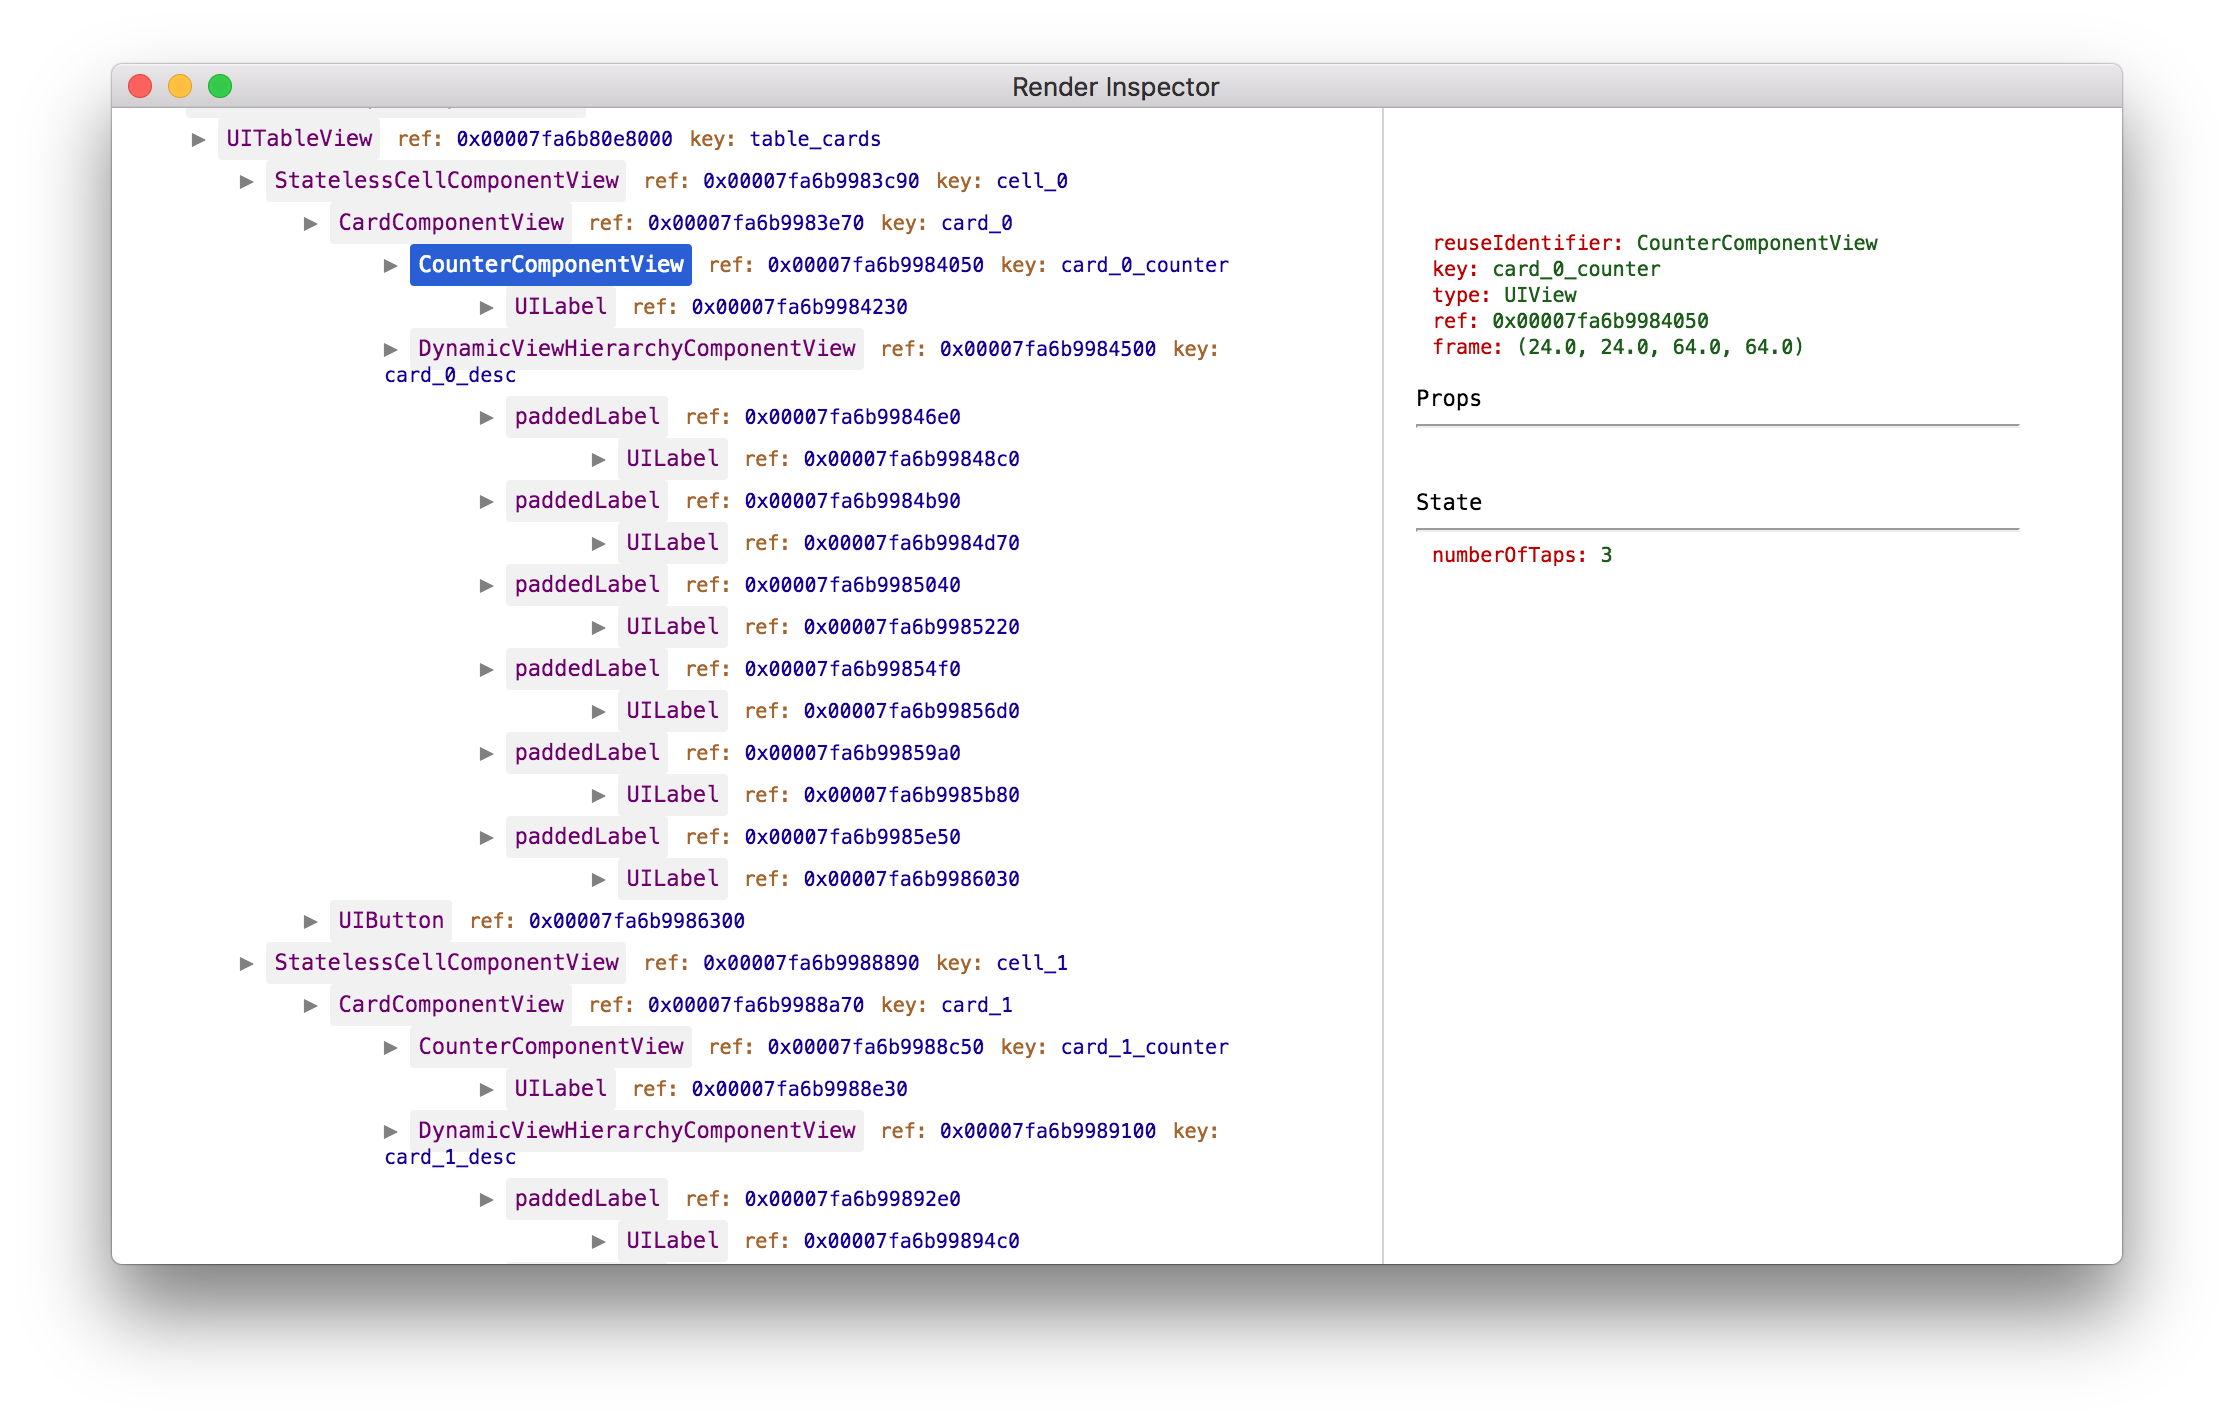
Inspector (Experimental)
When the app is run in the simulator it is possible to inspect Render components, their properties and state with the inspector companion mac app.
To enable the debug server in your app you simply have to call startDebugServer() in your AppDelegate application(_:didFinishLaunchingWithOptions).
class AppDelegate: UIResponder, UIApplicationDelegate {

  func application(_ application: UIApplication, didFinishLaunchingWithOptions launchOptions: [UIApplicationLaunchOptionsKey: Any]?) -> Bool {
    /// Starts the debug server at localhost:8080/inspect
    startDebugServer()
    ...
 }
Use with Dispatch or Reswift
- Dispatch is a Flux-like implementation of the unidirectional data flow architecture in Swift. In this architecture views are simple function of your state - this works especially well with Render's declarative programming style.
Checkout the TodoApp example to see how to get the best out of Dispatch and Render.
- ReSwift is a Redux-like implementation of the unidirectional data flow architecture in Swift.
LICENSE
See the LICENSE file for license details.