QQCorner


支持给 UIView及其子类添加圆角(之后可以修改),或者给 UIImage添加圆角。支持4个圆角半径大小不同。
生成简单渐变色的图片、纯色图片、截屏功能(将layer渲染到UIImage并可以添加圆角)
注意!每次给UIView或CALayer重新设置了frame或约束之后,一定要Update一次!否则会有显示问题。我之所以没有去hook -setFrame: 方法或 -layoutSubviews 方法,也是出于性能考虑,不妨我们手动去update一下了。当然,update的时候,后面的block可以不用再写上一次已经写过的代码了。
我的博客: iOS开发 高性能添加圆角(支持4个不同半径)

Example
To run the example project, clone the repo, and run pod install from the Example directory first.
将整个仓库clone下来,在 Example 文件夹的目录下执行 pod install ,然后运行Example
Installation
QQCorner is available through CocoaPods. To install it, simply add the following line to your Podfile:
QQCorner 支持通过 CocoaPods 安装,简单地添加下面这一行到你的 Podfile 中
pod 'QQCorner'Useage
Objective-C Version
#import <QQCorner/QQCorner.h>
- (void)someMethod {
//UIImage
UIImage *image = [[UIImage imageNamed:@"bookface.jpg"] imageByAddingCornerRadius:QQRadiusMake(20, 30, 40, 50)];
//UIView and its subclasses
//UIView 及其子类
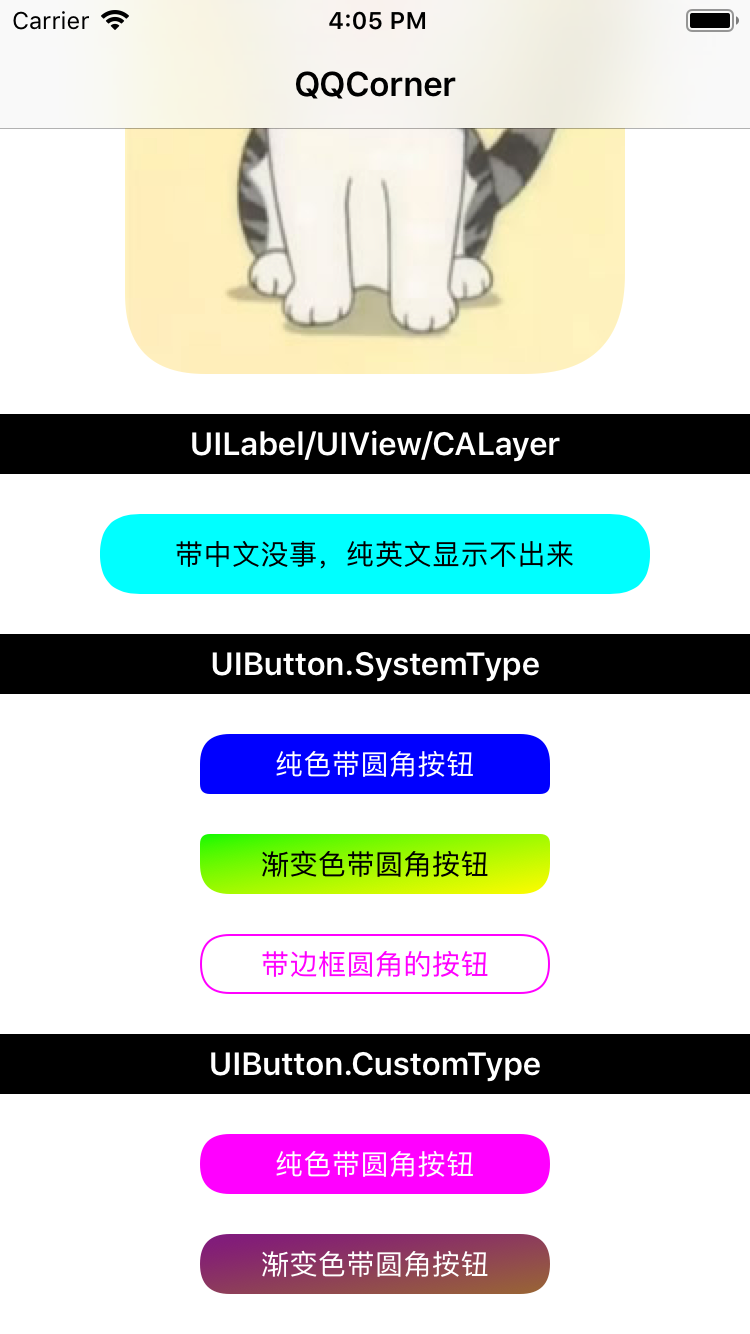
//FIXME: 在UILabel上可能有点小问题,就是text中必须有中文,纯英文的是无法正常显示的。中文是没问题的。
//如果要显示英文或数字,建议使用UIButton设置backgroundImage来实现类似的效果。
UILabel *testLab = [[UILabel alloc] init];
[testLab updateCornerRadius:^(QQCorner *corner) {
corner.radius = QQRadiusMakeSame(20);
corner.borderColor = [UIColor cyanColor];
}];
//UIButton set image/backgroundImage
//给UIButton设置Image或backgroundImage
UIButton *btn = [UIButton buttonWithType:UIButtonTypeSystem];
[btn setBackgroundImage:[UIImage imageWithColor:[UIColor blueColor] size:btn.bounds.size cornerRadius:QQRadiusMake(15, 15, 5, 5)] forState:UIControlStateNormal];
//Gradual changing color
//简单的渐变色,支持两个颜色4种渐变方式
UIButton *graBtn = [UIButton buttonWithType:UIButtonTypeSystem];
[graBtn setBackgroundImage:[UIImage imageWithGradualChangingColor:^(QQGradualChangingColor *graColor) {
graColor.fromColor = [UIColor greenColor];
graColor.toColor = [UIColor yellowColor];
graColor.type = QQGradualChangeTypeUpLeftToDownRight;
} size:graBtn.bounds.size cornerRadius:QQRadiusMake(5, 5, 15, 15)] forState:UIControlStateNormal];
//Border corner
//带边框的圆角
UIButton *borderBtn = [UIButton buttonWithType:UIButtonTypeSystem];
QQCorner *corner = [QQCorner cornerWithRadius:QQRadiusMakeSame(15) fillColor:nil borderColor:[UIColor magentaColor] borderWidth:2];
[borderBtn setBackgroundImage:[UIImage imageWithQQCorner:^(QQCorner *corner) {
corner.radius = QQRadiusMakeSame(15);
corner.borderColor = [UIColor magentaColor];
corner.borderWidth = 2;
} size:borderBtn.bounds.size] forState:UIControlStateNormal];
}
Swift Version
import QQCorner

class SomeClass {

    func someFunction() {
        //UIImage
        let image = UIImage(named: "bookface.jpg")?.addingCornerRadius(QQRadius(upLeft: 20, upRight: 30, downLeft: 40, downRight: 50))

        //UIView and its subclasses
        //UIView 及其子类
        //FIXME: 在UILabel上可能有点小问题,就是text中必须有中文,纯英文的是无法正常显示的。中文是没问题的。
        //如果要显示英文或数字,建议使用UIButton设置backgroundImage来实现类似的效果。
        let testLab = UILabel();
        label.updateCornerRadius { (corner) in
            corner?.radius = QQRadiusMakeSame(20)
            corner?.fillColor = UIColor.cyan
        }

        //UIButton set image/backgroundImage
        //给UIButton设置Image或backgroundImage
        let btn = UIButton(type: .system);
        btn.setBackgroundImage(UIImage(color: UIColor.blue, size: btn.bounds.size, cornerRadius: QQRadius(upLeft: 15, upRight: 15, downLeft: 5, downRight: 5)), for: .normal)

        //Gradual changing color
        //简单的渐变色,支持两个颜色4种渐变方式
        let graBtn = UIButton(type: .system);
        graBtn.setBackgroundImage(UIImage(gradualChangingColor: { (graColor) in
            graColor?.fromColor = UIColor.green
            graColor?.toColor = UIColor.yellow
            graColor?.type = .upLeftToDownRight
        }, size: graBtn.bounds.size, cornerRadius: QQRadius(upLeft: 5, upRight: 5, downLeft: 15, downRight: 15)), for: .normal)

        //Border corner
        //带边框的圆角
        let borderBtn = UIButton(type: .system);
        borderBtn.setBackgroundImage(UIImage(qqCorner: { (corner) in
            corner?.radius = QQRadiusMakeSame(15)
            corner?.borderColor = UIColor.magenta
            corner?.borderWidth = 2
        }, size: borderBtn.bounds.size), for: .normal)
    }

}
Discussion
相信大家也看过很多博客,写得也很不错,都是这种解决办法。我随便列举几个
- 通过设置
CALayer的mask属性来切,这个无法避免离屏渲染,不推荐。 - 通过
UIGraphicsBeginImageContextWithOptions()创建一个 Image 的图形上下文,在上面绘制 path 并裁剪,最终生成新的UIImage,这个可行,但是图片尺寸是有限制的,如果 size 过大,会导致内存暴涨,扛不住,直接GG - iOS 9 之后,
UIImageView设置png格式的图片时,并且没有backgroundColor时,设置其layer的cornerRadius不会触发离屏渲染。
好消息!好消息!WWCD 2018 告诉我们,有 UIGraphicsImageRenderer这么一个类,它比 UIGraphicsBeginImageContextWithOptions()这个方法要降低75%的内存消耗!
坏消息是什么?它只支持 iOS 10 以上的版本。
那么 iOS 10 之前,我们只能用 CGBitmapContextCreate() 来创建位图的上下文。当然它也没法解决内存会暴涨的问题,我们在使用过程中,应该尽量避免分辨率过大的图片。
我看 SDWebImage 也是这么做的。
存在的问题:
我发现用 CGBitmapContextCreate()创建的上下文,里面的 path 不能被裁剪,否则的话边框是绘制不出来的。
这个 path 是 UIBezierPath,但是UIBezierPath的 clip方法不起作用,不过此时可以 fill和 stroke
如果调用 CGContextClip()则整个path都会被裁掉,即不能fill和stroke,但是它是有效的。
用 UIGraphicsBeginImageContextWithOptions()或者 UIGraphicsImageRenderer里面的上下文是没有问题的,UIBezierPath的 clip方法有效!
所以这个问题搞清楚之前,我在 + (UIImage *)imageWithQQCorner:(QQCorner *)corner size:(CGSize)size;中,iOS 10 之前版本,依然使用了 UIGraphicsBeginImageContextWithOptions()这个方法来创建上下文。
Author
QinQi, [email protected]
License
QQCorner is available under the MIT license. See the LICENSE file for more info.