KindredPrints 0.1.2
| TestsTested | ✗ |
| LangLanguage | Obj-CObjective C |
| License | Custom |
| ReleasedLast Release | Dec 2014 |
Maintained by Alex Austin.


KindredPrints 0.1.2
- By
- Alex Austin
Kindred Prints iOS SDK
The Kindred Prints SDK makes it extremely easy to start selling and getting paid for physical printed photos straight from your app. You simply need drop the folder into your iPhone or iPad project, and add a photo through our simple SDK interface to send your user to the checkout flow.
About the Kindred Prints SDK
What You Get
- Payouts straight to you bank account for every print you sell
- Create custom coupons for your users
- Give specific users credits
- Monitor all orders, users on a custom dashboard
- An photo print cart with complete checkout/payments
- All related customer service handled by Kindred
Overview of User Checkout Flow
- You add photos and (optionally) preregister the user for shipment and order notifications
- You present the Kindred Prints order flow
- User sees all photos you added, with list of available products for each photo
- User selects quantities for each order
- User adds/selects shipping destination
- User sees order summary
- User enters credit card to securely pay for items
- User receives order confirmation email
- A day or two later, user receives shipping notification
- The user receives the prints in the mail
Current Print Capabilities
-
4" x 4" glossy premium print
-
4" x 6" glossy premium print
-
Two sided vs. one sided
Our prints can be either one sided or two sided. You can specify the type of print when you send the image request.
How our cart works
When a user chooses to order a print, that images gets added to the Kindred cart. The user is prompted to choose quantities and can finalize the order with one print. However, if the user chooses to go back, he or she can keep choosing other images to order prints from. Every time he adds images to print, those images are added to the Kindred cart. The images remain in the cart until the user completes the purchase or removes them (quitting the app does not remove the images from the user's cart).
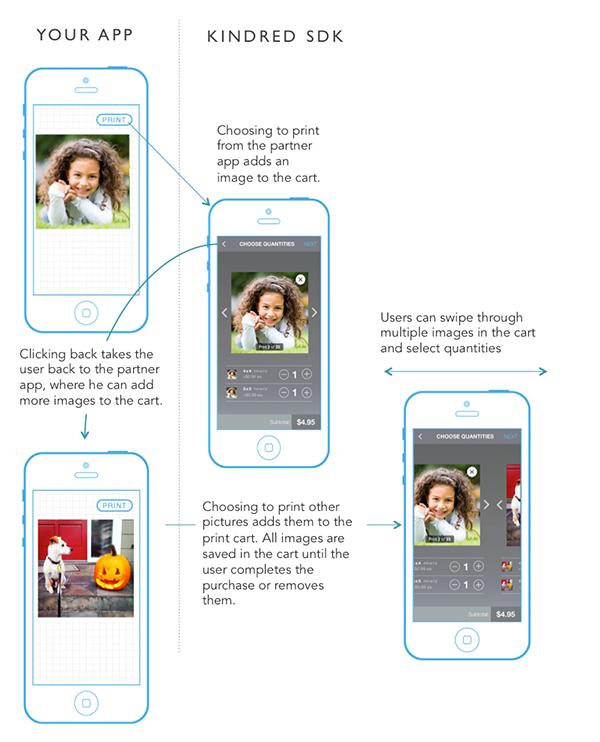
Image types
You can send us user images to be added to the cart from the phone or your server by sending us image URLs or by passing actual images in memory. We allow devs to import photos from a URL (KPURLImage) or a image in memory (KPMEMImage).
- KPURLImage can be created with a URL to a preview size AND full size, or just a full size.
- KPMEMImage is created with a UIImage object in iOS or Bitmap object in android
Aditionally, we can work with you on creating custom images from content your user is creating. For exaple, we are working with a cooking app where we create recipe cards that users can print when they like a particular recipe.
iOS Specific Installation
Download the SDK with Test Project
Follow the instructions in this section if you want to see how an example test app interfaces with the SDK. All publicly callable functions in the SDK are demonstrated.
Option 1: Using git
-
cdinto your development directory. - Run
git clone git://github.com/kindredprints/kindredprints-ios.gitin the command line
Option 2: Manual download
- Download zipped test project and SDK to the folder of your choice
- Unzip the file to your development directory
Afterwards:
Double click KindredPrints-iOS-TestBed.xcodeproj, located in KindredPrints-iOS-TestBed
-
View TestViewController.m and update this line with your test Kindred App ID (grab one by signing up)
static NSString *const KINDRED_APP_ID = @"YOUR_TEST_KEY_HERE";
Run the project and play with the test app.
All the publicly callable SDK functions are demonstrated in TestViewController.m
Download the raw SDK files
If you would prefer to just add the SDK folder to your project:
Grab a zipped copy of the KindredPrints-iOS-SDK folder or use the KindredPrints-iOS-SDK folder out of the test project folder (instructions on downloading above)
Drag and drop the KindredPrints-iOS-SDK folder into your project in Xcode, or add the folder by clicking File -> Add files to ...
Using the SDK
This section demonstrates the functions as employed by some example implementation, but let your imagination run wild.
There are two main ways to use the SDK in your app: Single Photo Workflow and Multiple Photo Workflow
Testing
All testing should be done using your Kindred test key, obtained through signing up. With the test key, none of your orders will get sent to the printer, and no credit cards are charged. Be sure to switch this key to the live version before opening it up to the public, or your users' orders won't go through.
With the Kindred test key, you can use a fake credit card with the number 4242 4242 4242 4242 and any valid future date and CVV.
Example Single Photo Workflow
This type of implementation drives users to checkout based on a single photo. This is primarily useful for apps that deal primarily with editing or improving a single photo.
For this example, we assume that the photo is stored in local memory. For example using remote URLs, see similar methods in the examples below.
Add a button next to the photo that says "Print" (or whatever you feel is appropriate).
-
Add the appropriate imports to the file containing the view controller class with the print button handler:
#import "KPPhotoOrderController.h"
-
Create a method to handle the button click and insert this code into it:
KPMEMImage *img = [[KPMEMImage alloc] initWithImage:(UIImage *)chosenImage];
KPPhotoOrderController *orderController = [[KPPhotoOrderController alloc] initWithKey:@"YOUR_TEST_KEY_HERE" andImages:@[img]];
[self presentViewController:orderPhotosVC animated:YES completion:nil];
- Celebrate -- you're done!
Example Multi Photo Workflow
You would be interested in this example if you are an app that deals with a lot of photos. Let's say you have a whole album of photos, and you want to add 5-10 of them to the photo print cart. Or, you want to give the user the feeling of a cart like experience, and let them individually add photos to the cart before they are ready to "Checkout". You could build a simple "Checkout" button in the top corner of the screen and place an "Add to cart" button next to every photo.
In this example, all photos are located on a remote server, and are passed to the SDK via their URLs. The checkout flow will then cache the photo for display to the user.
Add the "Add to cart" button to your project and place it next to each photo in a list
-
Add the appropriate imports to the file containing the view controller class with the print button handler:
#import "KPPhotoOrderController.h"
-
Create a method to handle the button click and insert this code into it:
KPPhotoOrderController *orderController = [[KPPhotoOrderController alloc] initWithKey:@"YOUR_TEST_KEY_HERE"];
KPURLImage *img = [[KPURLImage alloc] initWithOriginalUrl:@"http://site.com/img.jpg"];
[orderController addImages:@[img]];
Alternatively, if you also store a remote url for a pre rendered preview size image in addition to the original, you can init a KPURLImage like this.
KPURLImage *img = [[KPURLImage alloc] initWithPreviewUrl:@"http://site.com/prevImg.jpg" andOriginalUrl:@"http://site.com/img.jpg"];
Now, add a button somewhere on the display that says "Checkout"
-
Create a method to handle the button click and insert this code into it:
KPPhotoOrderController *orderController = [[KPPhotoOrderController alloc] initWithKey:@"YOUR_TEST_KEY_HERE"];
[self presentViewController:orderController animated:YES completion:nil];
- You're done! The user can now check out all of the images they've added.
Advanced Functionality
Registering a delegate
If you want to register for a callback when the SDK finishes, simply register your class as a KPPhotoOrderControllerDelegate. To do this, follow these instructions:
-
Register your class as a KPPhotoOrderControllerDelegate by placing next to the interface declaration. An example can be found in our TestProject like so:
@interface TestViewController () <KPPhotoOrderControllerDelegate>
-
Add responses to the optional delegate functions like so:
- (void)userDidCompleteOrder:(KPPhotoOrderController *)orderController {
    NSLog(@"USER DID COMPLETE ORDER");
}
- (void)userDidClickCancel:(KPPhotoOrderController *)orderController {
    NSLog(@"USER DID RETURN TO APP");
}
-
Assign the instance of KPPhotoOrderController a delegate before presenting it to the user. As shown here:
KPMEMImage *img = [[KPMEMImage alloc] initWithImage:(UIImage *)chosenImage];
KPPhotoOrderController *orderController = [[KPPhotoOrderController alloc] initWithKey:@"YOUR_TEST_KEY_HERE" andImages:@[img]];
orderController.delegate = self;
[self presentViewController:orderPhotosVC animated:YES completion:nil];
- Done!
Preregistering a user
We require users to enter an email address for a number of reasons, including confirming their order, notifying them when orders are in the mail, and reaching out in case of issues with their order.
However, asking a user to manually enter an email addresses can lower conversion. If you already know the user's email address, you can pass it so they do not need to enter it manually:
KPPhotoOrderController *orderPhotosVC = [[KPPhotoOrderController alloc] initWithKey:@"YOUR_TEST_KEY_HERE"];
[orderPhotosVC preRegisterUserWithEmail:(NSString *)userEmail];
If you know the name of the user as well, we can personalize our emails for a better experience if you call this function.
KPPhotoOrderController *orderPhotosVC = [[KPPhotoOrderController alloc] initWithKey:@"YOUR_TEST_KEY_HERE"];
[orderPhotosVC preRegisterUserWithEmail:(NSString *)userEmail andName:(NSString *)userName];