JJStockView 0.0.7
| TestsTested | ✗ |
| LangLanguage | Obj-CObjective C |
| License | MIT |
| ReleasedLast Release | Nov 2017 |
Maintained by jezz.
JJStockView 0.0.7
- By
- Jezz

JJStockView
模仿股票表格和课程表,左右滑动时,标题部分不动,表头右边和内容右边一起滑动,上下滑动时,表头不动,所有内容一起上下滑动
如何安装
source 'https://github.com/CocoaPods/Specs.git'
platform :ios, '8.0'

target 'TargetName' do
    pod 'JJStockView'
end
$ pod install
如何使用
简单的使用示例:
- (NSUInteger)countForStockView:(JJStockView*)stockView{
    return 30;
}

- (UIView*)titleCellForStockView:(JJStockView*)stockView atRowPath:(NSUInteger)row{
    UILabel* label = [[UILabel alloc] initWithFrame:CGRectMake(0, 0, 100, 30)];
    label.text = [NSString stringWithFormat:@"标题:%ld",row];
    label.textColor = [UIColor grayColor];
    label.backgroundColor = [UIColor colorWithRed:223.0f/255.0 green:223.0f/255.0 blue:223.0f/255.0 alpha:1.0];
    label.textAlignment = NSTextAlignmentCenter;
    return label;
}

- (UIView*)contentCellForStockView:(JJStockView*)stockView atRowPath:(NSUInteger)row{

    UIView* bg = [[UIView alloc] initWithFrame:CGRectMake(0, 0, 1000, 30)];
    bg.backgroundColor = row % 2 == 0 ?[UIColor whiteColor] :[UIColor colorWithRed:240.0f/255.0 green:240.0f/255.0 blue:240.0f/255.0 alpha:1.0];
    for (int i = 0; i < 10; i++) {
        UILabel* label = [[UILabel alloc] initWithFrame:CGRectMake(i * 100, 0, 100, 30)];
        label.text = [NSString stringWithFormat:@"内容:%d",i];
        label.textAlignment = NSTextAlignmentCenter;
        [bg addSubview:label];
    }
    return bg;
}

- (void)viewDidLoad {
    [super viewDidLoad];
    self.navigationItem.title = @"股票表格";
    self.stockView.frame = CGRectMake(0, 0, CGRectGetWidth(self.view.frame), CGRectGetHeight(self.view.frame));
    [self.view addSubview:self.stockView];
}

- (JJStockView*)stockView{
    if(_stockView != nil){
        return _stockView;
    }
    _stockView = [JJStockView new];
    _stockView.dataSource = self;
    _stockView.delegate = self;
    return _stockView;
}
DataSource必须实现,注释解释了各自的作用
@protocol StockViewDataSource <NSObject>

@required
//内容的行数
- (NSUInteger)countForStockView:(JJStockView*)stockView;
//内容左边View
- (UIView*)titleCellForStockView:(JJStockView*)stockView atRowPath:(NSUInteger)row;
//内容右边可滑动View
- (UIView*)contentCellForStockView:(JJStockView*)stockView atRowPath:(NSUInteger)row;
@end
Delegate的实现都是可选的:
@protocol StockViewDelegate <NSObject>
@optional
//左上角的固定不动的View
- (UIView*)headRegularTitle:(JJStockView*)stockView;
//可滑动头部View
- (UIView*)headTitle:(JJStockView*)stockView;
//头部高度
- (CGFloat)heightForHeadTitle:(JJStockView*)stockView;
//内容高度
- (CGFloat)heightForCell:(JJStockView*)stockView atRowPath:(NSUInteger)row;
//点击每行事件
- (void)didSelect:(JJStockView*)stockView atRowPath:(NSUInteger)row;
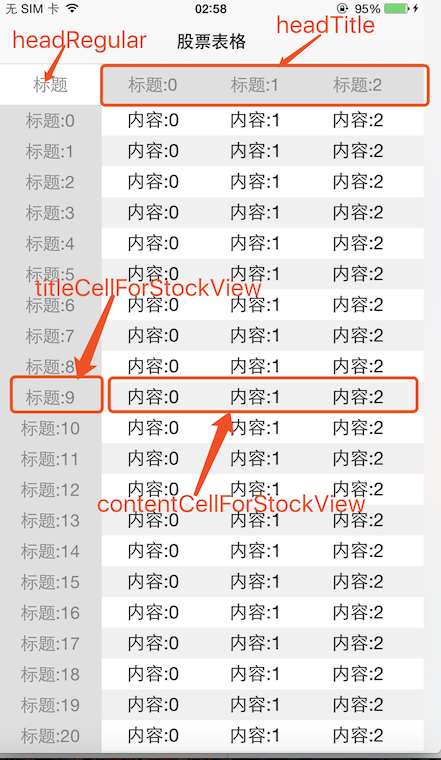
@end下面我用一张图来表现每个元素对应的方法:
这里有详细的Demo示例:
https://github.com/jezzmemo/JJStockView/blob/master/JJStockView/DemoViewController.m
实现原理
- 顶部不变的头部用heightForHeaderInSection显示,用标题和内容两部分组成,内容部分是用UIScrollView作为容器
- 内容部分,用头部类似的结构,cellForRowAtIndexPath实现Cell,分成左右两边部分,左边UIView,右边用UIScrollView作为容器
- 基于以上的结构,在任意一个UIScrollView滑动的时候,头部的UIScrollView和Cell右边的UIScrollView一起来联动,代码片段如下:
- (void)linkAgeScrollView:(UIScrollView*)sender{
    NSArray* visibleCells = [self.stockTableView visibleCells];
    for (JJStockViewCell* cell in visibleCells) {
        if (cell.rightContentScrollView != sender) {
            cell.rightContentScrollView.delegate = nil;//disable send scrollViewDidScroll message
            [cell.rightContentScrollView setContentOffset:CGPointMake(sender.contentOffset.x, 0) animated:NO];
            cell.rightContentScrollView.delegate = self;//enable send scrollViewDidScroll message
        }
    }
    if (sender != self.headScrollView) {
        self.headScrollView.delegate = nil;//disable send scrollViewDidScroll message
        [self.headScrollView setContentOffset:CGPointMake(sender.contentOffset.x, 0) animated:NO];
        self.headScrollView.delegate = self;//enable send scrollViewDidScroll message
    }

    _lastScrollX = sender.contentOffset.x;
}