iStation iOS SDK 开发指南
简介
iStation iOS SDK 是客服系统访客端的解决方案,既包含了客服聊天逻辑管理,也提供了聊天界面,开发者可方便的将客服功能集成到自己的 APP 中。iOS SDK 支持 iOS 8 以上版本,同时支持iPhone、iPad以及横竖屏UI。在iOS 9.2 以上版本中支持 IPv6,能正常通过苹果审核。


SDK 目录讲解
下载完 iStation SDK,得到如下两部分:
- IStationSDK.framework:静态库Framework,包含静态库文件和SDK的头文件
- IStationResource.bundle:SDK的资源文件包
由于 SDK 是静态库,且为了方便开发者使用,我们将 i386、x86_64、armv7、arm64 平台的静态库合并成一个 Fat Library ,导致整个 SDK 比较大。但实际编译后大约只会增加 app 1-2M 大小
系统要求以及依赖第三方框架
-
系统要求
该项目最低支持 iOS 8.0 和 Xcode 9.0。 -
依赖第三方框架
iStation SDK 依赖 Socket.IO-Client-Swift 库,如果选择手动集成iStation SDK则需要用CocoaPods引入Socket.IO库,选择CocoaPods集成则不需要手动添加依赖处理。
SDK 集成和配置
CocoaPods集成
在 Podfile 文件中加入 pod 'IStation_iOS_SDK'
platform :ios, '8.0'
use_frameworks!		#必须加入这一句,因为有依赖swift库

target 'YourApp' do
    pod 'IStation_iOS_SDK'
end
推荐使用CocoaPods集成,在Podfile中加入 IStation_iOS_SDK 的引用即可
手动集成
-
下载 iStation SDK,得到一个 IStationSDK.framework 文件、 IStationResource.bundle 文件夹,将他们导入工程
-
添加 iStation SDK 依赖库
- UIKit.framework
- MobileCoreService.framework
- SystemConfiguration.framework
- AVFoundation.framwork
- CoreGraphics.framework
- ImageIO.framework
- CoreFoundation.framework
- UserNotifications.framework
- libstdc++.6.0.9.tbd
-
添加第三方库:在Podfile中添加Socket.IO的依赖, pod 'Socket.IO-Client-Swift', '~> 13.2.1'
-
在 Build Settings -> Other Linker Flags 中添加 -ObjC
配置工程
- iOS10 权限设置,在Info.plist中加入以下内容:
<key>NSCameraUsageDescription</key>
<string>App需要您的同意,才能访问相机</string>
<key>NSMicrophoneUsageDescription</key>
<string>App需要您的同意,才能访问麦克风</string>
<key>NSPhotoLibraryUsageDescription</key>
<string>App需要您的同意,才能访问相册</string>
- SDK 不支持 bitcode
向 Build Settings → Linking → Enable Bitcode 中设置 NO。
集成遇到问题,请参考 FAQ
使用详解
使用简介
- 在需要使用 SDK 的地方 #import <IStationSDK/IStationSDK.h>。IStationSDK 类是整个SDK的唯一主入口,是一个单例。各个函数简介:
初始化:
	- (void)registerAppKey:(NSString *)appKey appName:(NSString *)appName;

集成客户聊天组件:
	- (IStationChatViewController *)chatViewController;

自定义客户端聊天组件UI效果:
	- (IStationUIConfig *)customUIConfig;

APNs推送:
	- (void)updateApnsToken:(NSData *)token;

注销:
	- (void)logout:(IStationCompletionBlock)completion;

设置用户信息:
	- (void)setUserInfo:(IStationUserVo *)userVo;

设置调试模式获取更多的Log信息,发布应用时建议不开启,用于节省性能开销:
	- (void)setDebugMode;
初始化
- (BOOL)application:(UIApplication *)application didFinishLaunchingWithOptions:(NSDictionary *)launchOptions {
    ......

    [[IStationSDK sharedSDK] registerAppKey:appKey appName:App名称];

    ......

    return YES;
}
appKey 可以通过公司管理员账号登录 “iStation Web端” -> “配置” -> “App Sdk设置” -> “App Key:渠道appKey” 找到, appName对应添加一个 app 时填写的 App 名称, 详细步骤请参见 新建App和上传推送证书
设置用户信息
设置个人信息,用户帐号登录成功之后,调用设置用户信息函数(userID必填,建议同时设置用户昵称(userName))。如果不设置用户信息,则使用匿名用户的方式进行客服咨询。应该在进入聊天咨询界面之前设置用户信息。
IStationUserVo *userVo = [[IStationUserVo alloc]init];
userVo.userID = @"45471429666";      //用户标识,必填
userVo.userName = @"iOS_SDK_用户1";   //用户昵称
userVo.headerImageURL = @"http://visionet.findest.com/letsdesk/assets/img/logo-1.png";  //用户头像
userVo.gender = 1;  //性别,1:男、2:女
userVo.phoneNumber = @"18611111111";  //手机
userVo.telephone = @"021-12345678";  //固定电话
userVo.email = @"[email protected]";  //邮箱

userVo.address = @"上海市长宁区";  //地址
userVo.position = @"人事经理";  //职位
userVo.department = @"人事部";  //单位
userVo.birthday = @"1988-12-12";  //生日(yyyy-MM-dd)
userVo.remark = @"备注SDK";  //备注

// 传递自定义客户信息
userVo.customData = @"[{\"label_cn\":\"订单号\", \"label_en\":\"orderNo\", \"value\":\"1111111\"},"
                      "{\"label_cn\":\"员工号\", \"label_en\":\"empNo\", \"value\":\"2222222\"}]";

[[IStationSDK sharedSDK] setUserInfo:userVo];
#####自定义客户信息使用注意:
| 字段 | 类型 | 说明 |
|---|---|---|
| label_cn | String | 该项数据显示的中文名称 |
| label_en | String | 该项数据显示的英文名称 |
| value | String | 该数据显示的值,类型不做限定,根据实际需要进行设定 |
集成客户聊天组件
[[IStationSDK sharedSDK] chatViewController];应用层获取此 chatViewController 之后,必须嵌入到 UINavigationcontroller 中,就可以获得聊天窗口的UI以及所有功能。 chatViewController 只会使用到导航栏的 self.navigationItem.title。 self.navigationItem.title 放置标题栏; 必须注意,不能在 chatViewController 外层套其他 viewController 之后再嵌入到 UINavigationcontroller。
如果调用代码所在的viewController在UINavigationcontroller中,可以如下方式集成(第一种集成方式):
IStationChatViewController *chatViewController = [[IStationSDK sharedSDK] chatViewController];
chatViewController.chatTitle = @"iStation SDK测试";
chatViewController.hidesBottomBarWhenPushed = YES;
[self.navigationController pushViewController: chatViewController animated:YES];
如果调用代码所在的viewController不在UINavigationcontroller中,可如下方式集成(第二种集成方式):
IStationChatViewController *chatViewController = [[IStationSDK sharedSDK] chatViewController];
chatViewController.chatTitle = @"iStation SDK测试";
chatViewController.hidesBottomBarWhenPushed = YES;

UINavigationController *navController  = [[UINavigationController alloc] initWithRootViewController:chatViewController];
[self presentViewController:navController animated:YES completion:nil];
一般来说,第二种方式会需要在左上角加一个返回按钮,在 “initWithRootViewController:chatViewController” 之前加上:
chatViewController.navigationItem.leftBarButtonItem = [[UIBarButtonItem alloc] initWithTitle:@"返回" style:UIBarButtonItemStyleBordered target:self action:@selector(onBack:)];“onBack” 的样例:
- (void)onBack:(id)sender {
    [self dismissViewControllerAnimated:YES completion:nil];
}
如果您的代码要求所有viewController继承某个公共基类,并且公共基类对UINavigationController统一做了某些处理;或者其他原因导致使用第一种方式集成会有问题;这些情况下,建议您使用第二种方式集成。
监控SDK内的链接跳转动作
在IStationChatViewController控制器中设置链接跳转的监听block即可
如果block返回为NO,则不执行SDK默认处理.如果block返回为YES则执行SDK默认跳转处理:
/**
 *  提供了监控SDK内消息跳转行为的block;
 *  如果设置了block回调,则在链接点击之后执行该block
 *  如果block返回为NO,则不执行SDK默认处理.如果block返回为YES则执行SDK默认跳转处理
 */
typedef BOOL (^IStationLinkClickBlock)(NSString *linkAddress);

@interface IStationChatViewController : UIViewController

...

/**
 *  监控SDK内消息跳转行为的block
 *
 *  @return 是否执行SDK默认的跳转行为
 */
@property (nonatomic, copy) IStationLinkClickBlock linkClickBlock;

...

@end
参考代码:
//启动聊天界面
IStationChatViewController *chatViewController = [[IStationSDK sharedSDK] chatViewController];
chatViewController.chatTitle = @"iStation SDK测试";
//设置回调
chatViewController.linkClickBlock = ^(NSString *urlString) {
    ViewController2 *viewController2 = [[UIStoryboard storyboardWithName:@"Main" bundle:[NSBundle mainBundle]] instantiateViewControllerWithIdentifier:@"ViewController2"];
    [self.navigationController pushViewController:viewController2 animated:YES];
    return NO;
};
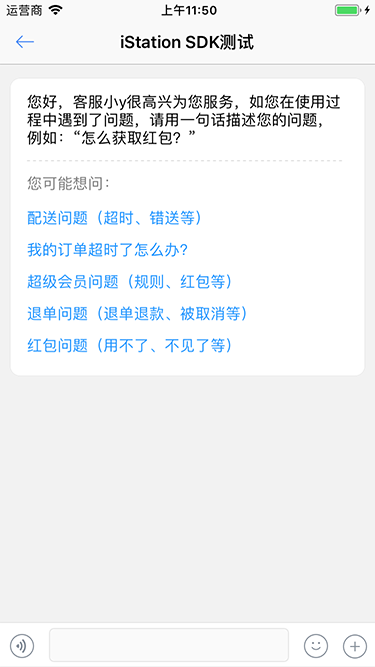
集成热点引导问题
在IStationChatViewController控制器中设置需要显示的热点引导问题ID,热点引导问题ID获取参考:如何获取热点引导问题ID
@interface IStationChatViewController : UIViewController

...

/**
 *  热点引导问题ID
 */
@property (nonatomic, strong) NSString *faqId;

...

@end
参考代码:
//启动聊天界面
IStationChatViewController *chatViewController = [[IStationSDK sharedSDK] chatViewController];
chatViewController.chatTitle = @"iStation SDK测试";
chatViewController.faqId = @"27";  //跳转时指定热点引导问题ID
chatViewController.hidesBottomBarWhenPushed = YES;
[self.navigationController pushViewController: chatViewController animated:YES];
效果图如下:
自定义客户端聊天组件UI效果
获取自定义UI类对象
[[IStationSDK sharedSDK] customUIConfig];IStationUIConfig是负责自定义UI的类;目前主要是定义聊天界面中的字体颜色、气泡图片、头像等。相关设置必须在集成客户聊天组件之前进行。 IStationUIConfig 只是负责替换部分皮肤相关内容,不包含所有的图片素材的替换,调整UI样例代码:
/**
 *  访客文本消息字体颜色
 */
[[IStationSDK sharedSDK] customUIConfig].customMessageTextColor = [UIColor blackColor];

/**
 *  客服文本消息字体颜色
 */
[[IStationSDK sharedSDK] customUIConfig].serviceMessageTextColor = [UIColor blackColor];

/**
 *  客户文本消息内嵌链接字体颜色
 */
[[IStationSDK sharedSDK] customUIConfig].customMessageLinkTextColor = [UIColor colorWithRed:128.0/255.0 green:233.0/255.0 blue:255.0/255.0 alpha:1.0];

/**
 *  客服文本消息内嵌链接字体颜色
 */
[[IStationSDK sharedSDK] customUIConfig].serviceMessageLinkTextColor = [UIColor colorWithRed:0.0/255.0 green:165.0/255.0 blue:224.0/255.0 alpha:1.0];

/**
 *  提示文本消息字体颜色
 */
[[IStationSDK sharedSDK] customUIConfig].tipMessageTextColor = [UIColor grayColor];

/**
 *  提示文本消息背景颜色
 */
[[IStationSDK sharedSDK] customUIConfig].tipMessageBackgroundColor = [UIColor whiteColor];

/**
 *  输入框文本消息字体颜色
 */
[[IStationSDK sharedSDK] customUIConfig].inputTextColor = [UIColor blackColor];

/**
 *  消息时间颜色
 */
[[IStationSDK sharedSDK] customUIConfig].messageTimeColor = [UIColor grayColor];

/**
 *  消息tableview的背景图片
 */
UIImageView *imageView = [[UIImageView alloc] initWithImage:[UIImage imageNamed:@"chat_bg"]];
imageView.contentMode = UIViewContentModeScaleToFill;
[[IStationSDK sharedSDK] customUIConfig].chatBackground = imageView;

/**
 *  客户头像URL,优先使用URL加载图片
 */
[[IStationSDK sharedSDK] customUIConfig].customerHeadURL = [NSURL URLWithString:@"http://visionet.findest.com/letsdesk/assets/img/logo-1.png"];

/**
 *  客户头像
 */
[[IStationSDK sharedSDK] customUIConfig].customerHeadImage = [UIImage imageNamed:@"customer_avatar"];

/**
 *  客户消息气泡normal图片
 */
[[IStationSDK sharedSDK] customUIConfig].customerMessageBubbleNormalImage =
									[[UIImage imageNamed:@"chat_send_text_bk"]
                             resizableImageWithCapInsets:UIEdgeInsetsMake(26,26,26,26)
                             resizingMode:UIImageResizingModeStretch];

/**
 *  客户消息气泡pressed图片
 */
[[IStationSDK sharedSDK] customUIConfig].customerMessageBubblePressedImage =
									[[UIImage imageNamed:@"chat_send_text_press_bk"]
                              resizableImageWithCapInsets:UIEdgeInsetsMake(26,26,26,26)
                              resizingMode:UIImageResizingModeStretch];

/**
 *  客服消息气泡normal图片
 */
[[IStationSDK sharedSDK] customUIConfig].serviceMessageBubbleNormalImage =
									[[UIImage imageNamed:@"chat_receive_text_bk"]
                              resizableImageWithCapInsets:UIEdgeInsetsMake(26,26,26,26)
                              resizingMode:UIImageResizingModeStretch];

/**
 *  客服消息气泡pressed图片
 */
[[IStationSDK sharedSDK] customUIConfig].serviceMessageBubblePressedImage =
									[[UIImage imageNamed:@"chat_receive_text_press_bk"]
                              resizableImageWithCapInsets:UIEdgeInsetsMake(26,26,26,26)
                              resizingMode:UIImageResizingModeStretch];

/**
 *  默认是YES,默认进入聊天界面,是文本输入模式的话,会弹出键盘,设置为NO,可以修改为不弹出
 */
[IStationUIConfig sharedInstance].isShowKeyboard = YES;

/**
 *  常见问题简介字体颜色
 */
[[IStationSDK sharedSDK] customUIConfig].faqDescriptionTextColor = [UIColor blackColor];

/**
 *  常见问题项字体颜色
 */
[[IStationSDK sharedSDK] customUIConfig].faqItemTextColor = [UIColor colorWithRed:35.0/255.0 green:150.0/255.0 blue:255.0/255.0 alpha:1.0];
APNs推送
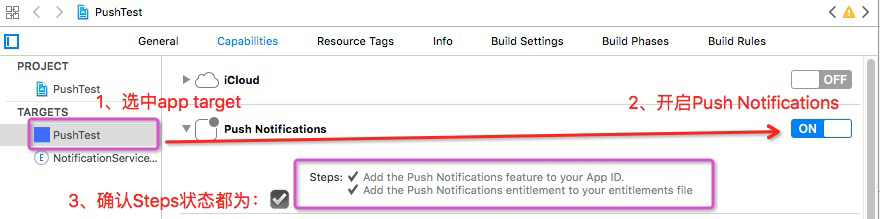
-
请开启Application Target的Capabilities->Push Notifications选项,如图:
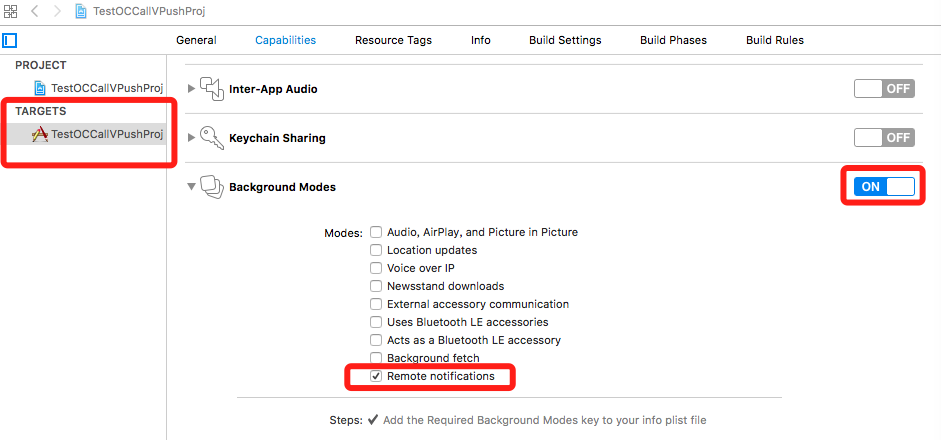
-
请开启Application Target的Capabilities->Background Modes -> Remote notifications选项:
-
注册APNs推送
- (BOOL)application:(UIApplication *)application didFinishLaunchingWithOptions:(NSDictionary *)launchOptions {
    ......

    //传入正确的App名称
    [[IStationSDK sharedSDK] registerAppKey:appKey appName:App名称];

    //注册APNs推送
    if ([[UIDevice currentDevice].systemVersion floatValue] >= 10.0) {
        [UNUserNotificationCenter currentNotificationCenter].delegate = self;
        [[UNUserNotificationCenter currentNotificationCenter] requestAuthorizationWithOptions:(UNAuthorizationOptionBadge | UNAuthorizationOptionSound | UNAuthorizationOptionAlert) completionHandler:^(BOOL granted, NSError * _Nullable error) {
	        if (!error) {
	            NSLog(@"request authorization succeeded!");
	        }
	    }];
        [[UIApplication sharedApplication] registerForRemoteNotifications];
    } else {
        //小于 iOS 10.0
        UIUserNotificationSettings *settings = [UIUserNotificationSettings settingsForTypes:UIUserNotificationTypeAlert | UIUserNotificationTypeBadge | UIUserNotificationTypeSound categories:nil];
        [application registerUserNotificationSettings:settings];
        [[UIApplication sharedApplication] registerForRemoteNotifications];
    }

    ......

    return YES;
}- 把 APNs Token 传给 SDK
- (void)application:(UIApplication *)app didRegisterForRemoteNotificationsWithDeviceToken:(NSData *)deviceToken {
    ......

    [[IStationSDK sharedSDK] updateApnsToken:deviceToken];

    ......
}- 接收APNs推送消息
// iOS8、iOS9 接收APNs推送的方法
- (void)application:(UIApplication *)application didReceiveRemoteNotification:(NSDictionary *)userInfo fetchCompletionHandler:(void(^)(UIBackgroundFetchResult))completionHandler {
    NSLog(@"收到APNs通知消息:%@", userInfo);
    //Required
    completionHandler(UIBackgroundFetchResultNewData);
}

// iOS10以及之后的版本接收APNs推送的方法
// 前台收到推送
- (void)userNotificationCenter:(UNUserNotificationCenter *)center willPresentNotification:(UNNotification *)notification withCompletionHandler:(void (^)(UNNotificationPresentationOptions options))completionHandler {
    NSLog(@"收到APNs通知消息:%@", notification.request.content.userInfo);
    if([notification.request.trigger isKindOfClass:[UNPushNotificationTrigger class]]) {
        //远程通知
    } else {
        //判断为本地通知
    }
    completionHandler(UNNotificationPresentationOptionAlert | UNNotificationPresentationOptionSound | UNNotificationPresentationOptionBadge);
}

// 点击通知栏触发的推送
- (void)userNotificationCenter:(UNUserNotificationCenter *)center didReceiveNotificationResponse:(UNNotificationResponse *)response withCompletionHandler:(void(^)())completionHandler {
    NSLog(@"收到APNs通知消息:%@", response.notification.request.content.userInfo);
    if([response.notification.request.trigger isKindOfClass:[UNPushNotificationTrigger class]]) {
        //远程通知
    } else {
        //判断为本地通知
    }
    completionHandler();
}
注销
[[IStationSDK sharedSDK] logout:^{
    NSLog(@"注销成功!");
}];
应用层退出自己的账号时需要调用 SDK 的注销操作,该操作会通知服务器进行 APNs 推送信息的解绑操作,避免用户已退出但推送依然发送到当前设备的情况发生。
常见问题
如果集成过程中遇到任何问题,可查看 FAQ
补充说明
如果您看完此文档后,还有任何集成方面的疑问,可以参考下 iOS SDK Demo 源码: https://github.com/sykesiStation/IStation_iOS_SDK_Demo.git。
源码充分的展示了 iOS SDK 的能力,并且为集成 iOS SDK 提供了样例代码。