
CiaoTransitions


Table of Contents
- Description
- Example
- Installation
- Usage
- Configuration
- Transition Types
- Apps using CiaoTransitions
- Author
- Credits
- Contributing
- License
Description
With CiaoTransitions you can make fancy custom push and modal transitions in your ios projects. You only need to follow some simple steps to implement it. Ciao is customizable and easy to use.
- Make awesome transitions
- Totally customizable
- App Store simulated transition included!
- Easy usage
- Supports iOS, developed in Swift 4
Example
To run the example project, clone the repo, and run pod install from the Example directory first.

Installation
Ciao is available through CocoaPods. To install
it, simply add the following line to your Podfile and run pod install:
pod 'CiaoTransitions'Then you can import it when you need
import CiaoTransitionsUsage
In the example you will see some custom transitions that can be used in your project. Once you've installed, follow next steps. It's really simple:
1. Add CiaoTransition to your presented view controller
Add CiaoTransition to your presented view controller. This is neccessary to save your retain your transition for dismissed interaction. Also you could need it if have some scroll view. In this case, you should call didScroll method when the view is scrolled
class DetailViewController: CiaoBaseViewController, UIScrollViewDelegate {

    @IBOutlet weak var scrollView: UIScrollView!

    var ciaoTransition: CiaoTransition?

    override func viewDidLoad() {
        super.viewDidLoad()
        scrollView.delegate = self
    }

    func scrollViewDidScroll(_ scrollView: UIScrollView) {
        ciaoTransition?.didScroll(scrollView)
    }
}
Important: If the view have some Scroll View, you must implement UIScrollViewDelegate protocol and call
didScrollmethod when the view is scrolled. This is needed byCiaoTransitionto manage interactive transitions.
2. Instace CiaoTransition with your values
Before presenting your view controller, you need to create an instance of CiaoTransition and add it to your presented view controller.
// How to instance a CiaoTransition object
let ciaoTransition = CiaoTransition(
		style: CiaoTransitionStyle,
		configurator: CiaoConfigurator? = nil,
		scaleConfigurator: CiaoScaleConfigurator? = nil,
		appStoreConfigurator: CiaoAppStoreConfigurator? = nil)
CiaoConfigurator is used to setup your custom values for transition animation
CiaoScaleConfigurator is required to make
scalestyle transitionsCiaoAppStoreConfigurator is required to make
appStorestyle transitions
Example with Storyboard
override func prepare(for segue: UIStoryboardSegue, sender: Any?) {
    guard let detailViewController = segue.destination as? DetailViewController else { return }
    let ciaoTransition = CiaoTransition(style: .vertical)
    detailViewController.ciaoTransition = ciaoTransition
    navigationController?.delegate = ciaoTransition
}
Example push with Xibs
func presentDetailView() {
	let ciaoTransition = CiaoTransition(style: .vertical)
	let detailViewController = DetailViewController()
	detailViewController.ciaoTransition = ciaoTransition
	navigationController?.delegate = ciaoTransition
	navigationController?.pushViewController(detailViewController, animated: true)
}
Example modal with Xibs
func presentDetailView() {
	let ciaoTransition = CiaoTransition(style: .vertical)
	let detailViewController = DetailViewController()
	detailViewController.ciaoTransition = ciaoTransition
	detailViewController.transitioningDelegate = ciaoTransition
	present(detailViewController, animated: true, completion: nil)
}
Example modal with Navigation Controller
func presentDetailView() {
let ciaoTransition = CiaoTransition(style: .vertical)
let detailViewController = DetailViewController()
detailViewController.ciaoTransition = ciaoTransition

let navigationController = UINavigationController(rootViewController: detailViewController)
navigationController.transitioningDelegate = ciaoTransition

present(navigationController, animated: true, completion: nil)
}
Configuration
CiaoConfigurator
Customize your transition creating an instance of CiaoConfigurator
/// Present animation duration
public var duration: TimeInterval = 0.8

/// This block is executed when the view has been presented
public var presentCompletion: (()->Void)? = nil

/// This block is executed when the view has been dismissed
public var dismissCompletion: (()->Void)? = nil

/// Enable or disable fade effect on main view controller
public var fadeOutEnabled = true

/// Enable or disable fade effect on presented view controller
public var fadeInEnabled = false

/// Enable or disable scale 3d effect on back main view controller
public var scale3D = true

/// Enable or disable lateral translation on main view controller
public var lateralTranslationEnabled = false

/// Enable or disable lateral swipe to dismiss view
public var dragLateralEnabled = false

/// Enable or disable vertical swipe to dismiss view
public var dragDownEnabled = true
Then, you can pass these configuration params through CiaoTransition instance:
let configurator = CiaoConfigurator()
let ciaoTransition = CiaoTransition(style: .vertical, configurator: configurator)
CiaoScaleConfigurator
Scale transition configurator is required to make scale transitions. For this, Ciao need some information about view you are going to scale. First create an instance of CiaoScaleConfigurator and setup your custom params.
/// Source image view is going to be scaled from your initial view controller
public var scaleSourceImageView: UIImageView?

/// Source image view frame converted to superview in view controller.
public var scaleSourceFrame: CGRect = .zero

/// This is the tag asigned to your image view in presented view controller
public var scaleDestImageViewTag: Int = 1000000000

/// Destination image view frame in presented view controller
public var scaleDestFrame: CGRect = .zero
To setup
scaleSourceFrameit's important convert rect in source image view frame to superview in view controller. See next example:
// Convert image view frame to view under collection view
let rectInView = cell.convert(cell.imageView.frame, to: collectionView.superview)
scaleConfigurator.scaleSourceFrame = rectInView
Tagging your image view in presented view controller is required to help
CiaoTransitiongetting the view to make interactive transitions. Remember using the same tag in your image view &scaleDestImageViewTag
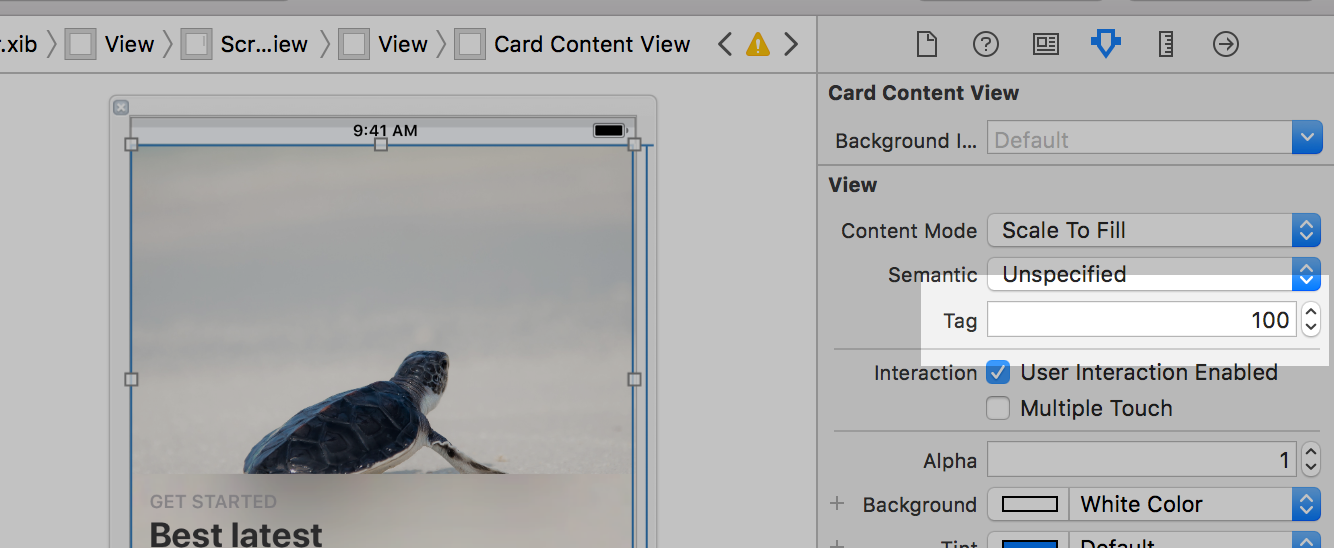
scaleConfigurator. scaleDestImageViewTag = 100CiaoAppStoreConfigurator
App Store transition configurator is required to simulate app store interactive transitions. For this, Ciao need some information about view you are going to scale. First create an instance of CiaoAppStoreConfigurator and setup your custom params.
/// Collection view cell used to expand the card view
let fromCell: CiaoCardCollectionViewCell

/// This is the tag asigned to your expanded view in presented view controller
let toViewTag: Int
See next example to instance the configurator:
let appStoreConfigurator = CiaoAppStoreConfigurator(fromCell: cell, toViewTag: 100)Transition Types
Basic Transitions
/// Vertical transition. Drag down or lateral to dismiss the view (by default).
CiaoTransitionStyle.vertical

/// Lateral translation transition. Drag down or lateral to dismiss the view (by default).
CiaoTransitionStyle.lateral

/// Transition with scaled image. Drag down or lateral to dismiss the view (by default).
CiaoTransitionStyle.scaleImage
Special Transitions
/// Special simulated App Store transition. Drag down or lateral to dismiss the view (by default).
CiaoTransitionStyle.appStore
Extra
Additionally you can enable or disable dismiss gesture transitions whenever you want.
// Enable gesture interactive transitions on dismiss
ciaoTransition.enable()

// Disable gesture interactive transitions on dismiss
ciaoTransition.disable()
Apps using CiaoTransitions
If you use CiaoTransitions I'd love to hear about it and feature your app here!

Author
Alberto Aznar, [email protected]
Credits
I used open source project iOS 11 App Store Transition made by Wirawit Rueopas to simulate one of transitions.
Contributing
Feel free to collaborate with ideas
- Fork it!
- Create your feature branch:
git checkout -b my-new-feature - Commit your changes:
git commit -am 'Add some feature' - Push to the branch:
git push origin my-new-feature - Submit a pull request :D
License
Ciao is available under the MIT license. See the LICENSE file for more info.