CTShowcase


CTShowcase is a showcase library for iOS that lets you to highlight individual views in your app using static or dynamic effects.
Compatibility
CTShowcase can be used both from Objective-C and Swift code.
v2.0+ requires Swift 3 and Xcode 8 v2.2+ requires Swift 4 and Xcode 9 v2.3+ requires Swift 4.2 and Xcode 10 v2.4+ requires Swift 5.0 and Xcode 10.2
This document shows examples using the latest version of the library.
Installation
Using Carthage
To install CTShowcase using Carthage, add the folowing line into your Cartfile:
github "CTShowcase/CTShowcase" ~> 2.4
Then run the carthage update command to build the framework and drag the built CTShowcase.framework into your XCode project.
Using CocoaPods
To install CTShowcase using CocoaPods, add the following line into your Podfile:
pod "CTShowcase", "~> 2.4"
Then run the pod install command and use the created workspace to open your project from now on.
Manual Install
Just add the files CTShowcaseView.swift and CTRegionHighlighter.swift to your project
Running the Example project
The example project is located in the Example directory. The framework target is already added as a dependency to it therefore you can run it directly.
Usage
The usage of CTShowcase is very simple.
Create an instance of CTShowcaseView
let showcase = CTShowcaseView(title: "New Feature", message: "Here's a brand new button you can tap!", key: @"displayed") { () -> () in
                print("This closure will be executed after the user dismisses the showcase")
            }
Setup the showcase for a view available in your layout
showcase.setup(for: newButton)and finally, show the showcase
showcase.show()That's it! CTShowcaseView will automatically determine the best location to display the title and message.
You can dismiss the showcase by tapping anywhere on it.
CTShowcaseView will use the key parameter to determine whether the showcase was displayed before, and won't display it again if it was. If you want the showcase to be displayed more than once, pass nil as the key. Similarly, if you don't need to do anything within the closure, pass it as nil as well.
Or you can simply use the provided convenience initializer:
let showcase = CTShowcaseView(title: "New Feature", message: "Here's a brand new button you can tap!")You can optionally give an offset and margin value when setting up a showcase by using the following method instead of setup(for:)
showcase.setup(for: self.button, offset: CGPointZero, margin: 5)Offset will determine how much the highlight will be shifted relative to the location of the target view. Margin determines the spacing between the borders of the target view and the inside border of the highlight.
Configuration
CTShowcaseView exposes the labels it uses to display the title and message as properties.
Therefore you can set their properties such as the font or color by accessing them directly.
showcase.titleLabel.font = UIFont.boldSystemFont(ofSize: 15)
showcase.messageLabel.textColor = UIColor.yellow
CTShowcaseView uses an instance of a class conforming to the CTRegionHighlighter protocol to draw its highlight.
CTShowcase comes with two classes that already conform to his protocol so that you don't have to create one your own to start using it. These classes are: CTStaticGlowHighlighter and CTDynamicGlowHighlighter. Each one can draw a rectangular or circular highlight and has other properties that allows you to customize their appearance.
###CTStaticGlowHighlighter
This is the default highlighter used by the CTShowcaseView. It draws non-animated highlights.
You can customize its properties before setting up the showcase if you don't like their defaults.
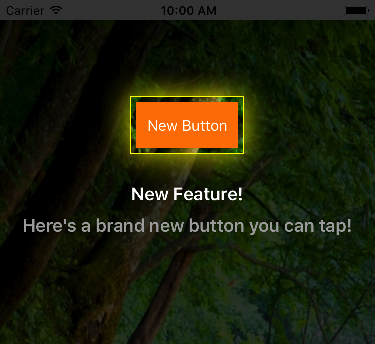
let showcase = CTShowcaseView(title: "New Feature", message: "Here's a brand new button you can tap!")

let highlighter = showcase.highlighter as! CTStaticGlowHighlighter

highlighter.highlightColor = UIColor.yellow

showcase.setup(for: self.button, offset: CGPointZero, margin: 5)
showcase.show()
The result will look like this:
###CTDynamicGlowHighlighter
This is the animated version of the static highlighter. In order to use it, create an instance and set it as the highlighter of your CTShowcaseView instance.
let showcase = CTShowcaseView(title: "New Feature", message: "Here's a brand new button you can tap!")

let highlighter = CTDynamicGlowHighlighter()

// Configure its parameters if you don't like the defaults
highlighter.highlightColor = UIColor.yellow
highlighter.animDuration = 0.5
highlighter.glowSize = 5
highlighter.maxOffset = 10

// Set it as the highlighter
showcase.highlighter = highlighter

showcase.setup(for: self.button)
showcase.show()
The resulting effect will look like this:
If you set its type to circular
highlighter.highlightType = .CircleYou'll end up with a circular highlight as shown below:
Extending CTShowcase
The classes provided with CTShowcase should be sufficient for most applications, but in case you want to add different highlight effects, that's easy to do as well.
Just create a new class conforming to the CTRegionHighlighter protocol and use it as the highlighter of the CTShowcaseView instance. Check the comments in the code to find out what the draw(on:targetRect:) and layer(for:targetRect:) methods in the protocol should do.