Brightcove-Player-SDK 5.3.4
| TestsTested | ✗ |
| LangLanguage | Obj-CObjective C |
| License | Commercial |
| ReleasedLast Release | Aug 2017 |
Maintained by Jim Whisenant, Steve Bushell, Tim Rodgers.
Brightcove-Player-SDK 5.3.4
- By
- Brightcove
Brightcove Player SDK for iOS, version 5.3.4.774
Important Notice
This release, version 5.3.4, will be the final version to appear on cocoapods.org. If you are looking for the latest version of the Brightcove Player SDK, please visit https://github.com/brightcove/brightcove-player-sdk-ios.
You can still install using CocoaPods, but the Brightcove Player SDK podspecs will no longer be hosted on cocoapods.org. Starting with version 6.0, Brightcove Player SDK podspecs are hosted in a new private podspecs repository at https://github.com/brightcove/BrightcoveSpecs.git
Please visit https://github.com/brightcove/brightcove-player-sdk-ios for full details on installing and using the latest version.
Supported Platforms
iOS 8.0 and above.
tvOS 9.0 and above.
ARC is required.
Please note:
- The Brightcove PlayerUI Plugin is now integrated into the core Brightcove Player SDK Framework. This provides a fully-featured and customizable set of controls in your player.
- PlayerUI controls are not supported on Apple TV.
- PlayerUI controls automatically switch to ad mode during playback. This works with Once and FreeWheel ads. Google IMA ads use their own ad controls.
- Please see important information in the Built-In PlayerUI Controls section below regarding this integration, using the Brightcove PlayerUI Controls, and migrating to the integrated PlayerUI Controls.
Installation
The Brightcove Player SDK provides two installation packages for iOS, a static library framework and a dynamic framework. Deployment is supported on iOS 8 and above.
The Brightcove Player SDK provides a dynamic framework to support tvOS 9.0 and above.
Manual
To add the Brightcove Player SDK to your project manually:
- Download the latest zipped release from our release page.
- Add
BrightcovePlayerSDK.frameworkto your project. Be sure to use the version corresponding to your target, iOS or tvOS. - On the "Build Settings" tab of your application target, ensure that the "Framework Search Paths" include the path to the framework. This should have been done automatically unless the framework is stored under a different root directory than your project.
- On the "General" tab of your application target, add the following to the "Link
Binary With Libraries" section:
AVFoundationCoreMediaCoreMotionGLKitMediaPlayerSafariServicesWebKitBrightcovePlayerSDK.framework
- (Dynamic Framework only) On the "General" tab of your application target, add 'BrightcovePlayerSDK.framework' to the "Embedded Binary" section.
- (Dynamic Framework only) On the "Build Phases" tab, add a "Run Script" phase with the command
bash ${BUILT_PRODUCTS_DIR}/${FRAMEWORKS_FOLDER_PATH}/BrightcovePlayerSDK.framework/strip-frameworks.sh. Check "Run script only when installing". This will remove unneeded architectures from the build, which is important for App Store submission. - (Static Framework only) On the "Build Settings" tab of your application target, add
-ObjCto the "Other Linker Flags" build setting. - (Static Framework only) Locate the file
bcovpuiiconfont.ttfwithin theBrightcovePlayerSDK.frameworkbundle and drag it directly into your project listing so that the font file becomes a part of your app. After dragging the file, be sure to add it to your app's build target when prompted to do so. Once your app is built, the font file should reside in the app bundle at the same level as the app's Info.plist file. The font file supplies some of theBrightcovePlayerUIinterface elements, but it does not need to be listed in the plist itself.
Imports
The Brightcove Player SDK for iOS can be imported into code a few different ways:
@import BrightcovePlayerSDK;
#import <BrightcovePlayerSDK/BrightcovePlayerSDK.h>
#import <BrightcovePlayerSDK/[specific-class].h>
Quick Start
Playing video with the Brightcove Player SDK for iOS:
// ** Customize these values with your own account information **
static NSString * const kViewControllerPlaybackServicePolicyKey = @"...";
static NSString * const kViewControllerAccountID = @"...";
static NSString * const kViewControllerVideoID = @"...";

BCOVPlayerSDKManager *manager = [BCOVPlayerSDKManager sharedManager];
id<BCOVPlaybackController> controller = [manager createPlaybackController];
self.controller = controller; // store this to a strong property
[self.view addSubview:controller.view];

BCOVPlaybackService *service = [[BCOVPlaybackService alloc] initWithAccountId:kAccountId
                                                                    policyKey:kPlaybackServicePolicyKey];
								[service findVideoWithVideoID:kViewControllerVideoID
                   								   parameters:nil
			       		                 		   completion:^(BCOVVideo    *video,
                                 							    NSDictionary *jsonResponse,
																NSError      *error) {

										[controller setVideos:@[ video ]];
										[controller play];

             			        }];
You need to keep the controller from being automatically released at the end of the method. A common way to do this is to store a reference to the controller in a strong instance variable.
Built-In PlayerUI Controls
As of version 5.1.0, the Brightcove Player SDK has the Brightcove PlayerUI Plugin integrated into its framework, so you can use its fully-featured set of controls for playback and advertising right out of the box.
The PlayerUI is quick to set up, displays ad controls for Once and FreeWheel, and can be customized by creating your own layouts.
Converting from Native Controls to PlayerUI Controls
If you were previously using the native controls via the defaultControlsViewStrategy like this:
BCOVPlayerSDKManager *manager = [BCOVPlayerSDKManager sharedManager];
id<BCOVPlaybackController> playbackController = [manager createPlaybackControllerWithViewStrategy:[manager defaultControlsViewStrategy]];
You should now set the view strategy to nil:
BCOVPlayerSDKManager *manager = [BCOVPlayerSDKManager sharedManager];
id<BCOVPlaybackController> playbackController = [manager createPlaybackControllerWithViewStrategy:nil];
You also no longer need to add the Playback Controller's view to your hierarchy, so you can remove code like this:
self.playbackController.view.frame = self.videoView.bounds;
self.playbackController.view.autoresizingMask = UIViewAutoresizingFlexibleHeight | UIViewAutoresizingFlexibleWidth;
[self.videoView addSubview:self.playbackController.view]
Instead, you will associate the Playback Controller with a new Player View and add that to your view hierarchy, as described in the Setting up PlayerUI Controls section of this document.
Migrating from the Brightcove PlayerUI Plugin
With version 5.1 of the Brightcove Player SDK, the PlayerUI controls are integrated into the core framework, and so it's no longer necessary to use a separate Brightcove PlayerUI plugin. If you were previously using the Brightcove PlayerUI plugin, and had installed it manually, you may need to make a few modifications to your project:
- Remove the reference to BrightcovePlayerUI.framework from your project listing
- In your target's Build Settings, remove any reference to the BrightcovePlayerUI.framework from your Framework Search Paths
- In your target's General settings, remove any reference to BrightcovePlayerUI from the Embedded Binaries and Linked Frameworks and Libraries sections
If you install Brightcove libraries using CocoaPods, you can remove the BrightcovePlayerUI dependency from your Podfile, and then run pod update in Terminal.
In your project code, any specific #import of a PlayerUI header file can be converted from #import <BrightcovePlayerUI/filename.h> to #import <BrightcovePlayerSDK/filename.h>. Alternately, you can import all the headers at once with @import BrightcovePlayerSDK;.
Setting up PlayerUI Controls
Follow the guidelines below for setting up the PlayerUI controls.
Create a property in your UIViewController to keep track of the BCOVPUIPlayerView. The BCOVPUIPlayerView will contain both the Playback Controller's view, and the controls view.
// PlayerUI's Player View
@property (nonatomic) BCOVPUIPlayerView *playerView;
Create the BCOVPUIBasicControlView, and then the BCOVPUIPlayerView. This is where we associate the Playback Controller (and thus all the videos it plays) with the controls.
Set the player view to match the video container from your layout (videoView) when it resizes.
// Create and configure Control View.
BCOVPUIBasicControlView *controlView = [BCOVPUIBasicControlView basicControlViewWithVODLayout];
self.playerView = [[BCOVPUIPlayerView alloc] initWithPlaybackController:self.playbackController options:nil controlsView:controlView];
self.playerView.frame = self.videoView.bounds;
self.playerView.autoresizingMask = UIViewAutoresizingFlexibleHeight | UIViewAutoresizingFlexibleWidth;
Finally, add the BCOVPUIPlayerView to your video container, videoView.
// Add BCOVPUIPlayerView to your video view.
[self.videoView addSubview:self.playerView];
Reminder: The PlayerUI uses a small font file for various graphics. If you are installing the static framework, and not using CocoaPods, be sure to add the file bcovpuiiconfont.ttf from the BrightcovePlayerSDK.framework bundle directly to your project listing so that the font file is copied into the app bundle
BCOVPUIPlayerViewOptions
The BCOVPUIPlayerViewOptions class allows you to customize some BCOVPlayerUI behavior at initialization. You can customize the following:
-
jumpBackIntervalThe time in seconds the player will seek back when the jump back button is pressed. -
hideControlsIntervalThe time in seconds after the last touch event, before the controls are hidden. -
hideControlsAnimationDurationThe time in seconds it takes for the controls to animate to hidden. -
showControlsAnimationDurationThe time in seconds it takes for the controls to animate to visible. -
learnMoreButtonBrowserStyleSetting that determines if tapping the "Learn More" button on an ad will display the clickthrough link in an external browser (default setting) or an internal browser. -
presentingViewControllerThe UIViewController subclass to use for presenting other view controllers (like the closed caption selection view controller).
Options can be set using the following method:
    BCOVPlayerSDKManager *manager = [BCOVPlayerSDKManager sharedManager];
    id<BCOVPlaybackController> controller = [manager createPlaybackController];

    BCOVPUIPlayerViewOptions *options = [[BCOVPUIPlayerViewOptions alloc] init];
    options.jumpBackInterval = 5;

    BCOVPUIPlayerView *playerView = [[BCOVPUIPlayerView alloc] initWithPlaybackController:playbackController options:options];
Supplied Layouts
Three layouts are provided to support different types of video:
-
BCOVPUIControlLayout basicVODControlLayoutis a basic layout for general on-demand video streams. -
BCOVPUIControlLayout basicLiveControlLayoutis a layout for live video. -
BCOVPUIControlLayout basicLiveDVRControlLayoutis a layout for live video streams with DVR controls.
You typically set a new layout immediatley after your BCOVPUIPlayerView is created, but you can also set a new layout at any time. For example, you can set a new VOD layout like this:
playerView.controlsView.layout = [BCOVPUIControlLayout basicVODControlLayout]
Custom Layouts
In addition to the default layouts, you can create your own highly customized layouts by instantiating a new BCOVPUIControlLayout with your own design.
-
First, create the controls that will go in your layout using
BCOVPUIBasicControlView layoutViewWithControlFromTag:width:elasticity:. Each control is packaged in aBCOVPUILayoutViewthat determines the control spacing. -
You can set the
widthof each layout view to the default width (which is based on the type of control), or you can specify your own width. -
Use the
elasticityargument to determine how much the layout view containing the control reizes its width to fill the control bar.- An elasticity of zero means the size of the layout view will be fixed.
- An elasticity value greater than zero determines how much the layout view will grow to fill available space relative to all other elastic views in that control bar. A layout view with an elasticity value of 2.0 will grow twice as fast as a layout view with an elasticity value of 1.0. Typically a row of layout views will have at least one control with an elasticity greater than zero.
Here are examples of creating a variety of basic controls.
// Create various standard layout views
// Standard play/pause button
BCOVPUILayoutView *playbackLayoutView = [BCOVPUIBasicControlView layoutViewWithControlFromTag:BCOVPUIViewTagButtonPlayback width:kBCOVPUILayoutUseDefaultValue elasticity:0.0];

// Standard jump back button
BCOVPUILayoutView *jumpBackButtonLayoutView = [BCOVPUIBasicControlView layoutViewWithControlFromTag:BCOVPUIViewTagButtonJumpBack width:kBCOVPUILayoutUseDefaultValue elasticity:0.0];

// Current time indicator
BCOVPUILayoutView *currentTimeLayoutView = [BCOVPUIBasicControlView layoutViewWithControlFromTag:BCOVPUIViewTagLabelCurrentTime width:kBCOVPUILayoutUseDefaultValue elasticity:0.0];

// Time separator - typically the '/' character
BCOVPUILayoutView *timeSeparatorLayoutView = [BCOVPUIBasicControlView layoutViewWithControlFromTag:BCOVPUIViewTagLabelTimeSeparator width:kBCOVPUILayoutUseDefaultValue elasticity:0.0];

// Video duration label
BCOVPUILayoutView *durationLayoutView = [BCOVPUIBasicControlView layoutViewWithControlFromTag:BCOVPUIViewTagLabelDuration width:kBCOVPUILayoutUseDefaultValue elasticity:0.0];

// Slider bar used for scrubbing through the video
// The elasticity is set to 1 so that it can resize to fill available space
BCOVPUILayoutView *progressLayoutView = [BCOVPUIBasicControlView layoutViewWithControlFromTag:BCOVPUIViewTagSliderProgress width:kBCOVPUILayoutUseDefaultValue elasticity:1.0];

// Closed caption button
// This button is initially hidden ('removed'), and will be shown
// if closed captions or audio tracks are available.
BCOVPUILayoutView *closedCaptionLayoutView = [BCOVPUIBasicControlView layoutViewWithControlFromTag:BCOVPUIViewTagButtonClosedCaption width:kBCOVPUILayoutUseDefaultValue elasticity:0.0];
closedCaptionLayoutView.removed = YES;

// The full-screen button
BCOVPUILayoutView *screenModeLayoutView = [BCOVPUIBasicControlView layoutViewWithControlFromTag:BCOVPUIViewTagButtonScreenMode width:kBCOVPUILayoutUseDefaultValue elasticity:0.0];

// AirPlay button
// This button is initially hidden ('removed'), and will be shown
// if AirPlay devices are available.
BCOVPUILayoutView *externalRouteLayoutView = [BCOVPUIBasicControlView layoutViewWithControlFromTag:BCOVPUIViewTagViewExternalRoute width:kBCOVPUILayoutUseDefaultValue elasticity:0.0];
externalRouteLayoutView.removed = YES;

// Empty view - used as a spacer
BCOVPUILayoutView     *spacerLayoutView1 = [BCOVPUIBasicControlView layoutViewWithControlFromTag:BCOVPUIViewTagViewEmpty width:1.0 elasticity:1.0];

// Empty view - used as a spacer
BCOVPUILayoutView *spacerLayoutView2 = [BCOVPUIBasicControlView layoutViewWithControlFromTag:BCOVPUIViewTagViewEmpty width:1.0 elasticity:1.0];

// Empty view - will have a custom UIImageView added as a subview
BCOVPUILayoutView *logoLayoutView1 = [BCOVPUIBasicControlView layoutViewWithControlFromTag:BCOVPUIViewTagViewEmpty width:80.0 elasticity:1.0];

// Empty view - will have a custom UIImageView added as a subview
BCOVPUILayoutView *logoLayoutView2 = [BCOVPUIBasicControlView layoutViewWithControlFromTag:BCOVPUIViewTagViewEmpty width:36.0 elasticity:0.0];
Note that you can also create an empty layout view, into which you can place your own view (logo, control, nothing, etc.). This code shows how to place a UIImage logo inside the logoLayoutView1 we created above.
// Create logo image inside an image view for display in control bar.
UIImage *logoImage1 = [UIImage imageNamed:@"myLogo"];
UIImageView *logoImageView1 = [[UIImageView alloc] initWithImage:logoImage1];

logoImageView1.autoresizingMask = UIViewAutoresizingFlexibleWidth | UIViewAutoresizingFlexibleHeight;
logoImageView1.contentMode = UIViewContentModeScaleAspectFit;
logoImageView1.frame = logoLayoutView1.frame;

// Add image view to our empty layout view.
[logoLayoutView1 addSubview:logoImageView1];
Now that there are various controls packaged in layout views, they are ordered into arrays, each of wihch represents a single line of controls, i.e. a control bar. Note that you can have different layouts for portrait and landscape orientations, so you will typically set up two different arrays of control bars.
In the standard layout for landscape orientation, controls are arranged in a single array, and then that array is stored in another array representing the entire set of controls.
        NSArray *standardLayoutLine1 = @[ playbackLayoutView, jumpBackButtonLayoutView, currentTimeLayoutView, timeSeparatorLayoutView, durationLayoutView, progressLayoutView, spacerLayoutView1, logoLayoutView1, spacerLayoutView2, closedCaptionLayoutView, screenModeLayoutView, externalRouteLayoutView ];
        NSArray *standardLayoutLines = @[ standardLayoutLine1 ];
In the compact layout for portrait orientation, two arrays of controls are created, one for each line. These arrays are packaged into another array representing the compact layout.
Note that the exact same objects are used for most of the controls in each layout. When this is done, and you switch between portrait and landscape orientations, the object will be moved to its new position using smooth animation.
        NSArray *compactLayoutLine1 = @[ currentTimeLayoutView, progressLayoutView, durationLayoutView ];
        NSArray *compactLayoutLine2 = @[ playbackLayoutView, jumpBackButtonLayoutView, spacerLayoutView1, closedCaptionLayoutView, screenModeLayoutView, externalRouteLayoutView, logoLayoutView2 ];
        NSArray *compactLayoutLines = @[ compactLayoutLine1, compactLayoutLine2 ];
Finally, now that there are two layout configurations (one for full width, and one for compact width), you can create a new BCOVPUIControlLayout object, and set it in the player's control view.
        BCOVPUIControlLayout *customLayout = [[BCOVPUIControlLayout alloc] initWithStandardControls:standardLayoutLines compactControls:compactLayoutLines];
		playerView.controlsView.layout = customLayout;
If you have controls that you need to show or hide frequently, you can set the removed property on that control's layout view. When you have changed your controls, call setNeedsLayout on the playerView's controlView:
	logoLayoutView1.removed = YES;
    [playerView.controlsView setNeedsLayout];
You can also customize several general BCOVPUIControlLayout properties:
-
controlBarHeightsets the size of each row of controls. -
horizontalItemSpacingsets the spacing between eachBCOVPUILayoutViewin each control bar. -
compactLayoutMaximumWidthdetermines which set of controls is used. If the control view is smaller thancompactLayoutMaximumWidth, the compact control set will be used, otherwise the standard controls will be used.
To change the set of controls that are displayed, you must create and install a new BCOVPUIControlLayout. New controls can be installed at any time.
More Customization Examples
For more examples of PlayerUI customization, you can look at the sample code in the PlayerUI folder of the BrightcoveOS GitHub repository:
https://github.com/BrightcoveOS/ios-player-samples
Video 360
The Native Player SDK includes support for interactively displaying 360 degree spherical videos. 360 videos should be tagged with a "projection" field property containing the value "equirectangular". These videos will be loaded and played in the same way as other videos, but they will be displayed in an OpenGL ES layer instead of an AVPlayerLayer.
Note: "equirectangular" is the only projection format supported for 360 source videos at this time.
The PlayerUI also has built-in support for Video 360, providing default panning gestures, gyroscopic motion detection for the view, and a new Video 360 button that appears when a Video 360 asset is playing. This button appears only on iPhones, and lets you toggle betwen the normal view and a "VR Goggles" view, where the screen is split in two, with the same scene rendered for each eye so that the device can be used in a head-mounted configuration. On iPads no Video 360 button is needed because there is only a single mode of operation: motion detection with panning gesture support.
Supporting Video 360 is as simple as playing a video. When the "projection" field property is detected, the Native Player SDK will automatically handle setting up and displaying the video in OpenGL ES, and installing the Video 360 button when appropriate.
If you are playing 360 videos outside of Video Cloud, be sure to add a "projection" property to the BCOVVideo object with the value "equirectangular".
To provide the best user experience with the VR Goggles mode, you should use a BCOVPUIPlayerViewDelegate method to detect when this mode is enabled. This allows you to force the device into landscape orientation (since that is the only orientation that makes sense for a VR Goggles view).
The following code shows how you could handle a forced orientation change when switching back and forth between a normal 360 view, and VR Goggles mode.
	// Set this to YES when displaying a VR goggles video
	@property (nonatomic) BOOL landscapeOnly;

	// UIViewController override:
   // Lets us control the orientation of the device
	- (UIInterfaceOrientationMask)supportedInterfaceOrientations
	{
	    if (self.landscapeOnly)
	    {
	        return UIInterfaceOrientationMaskLandscape;
	    }

	    return UIInterfaceOrientationMaskAll;
	}

    // BCOVPUIPlayerViewDelegate method
	- (void)didSetVideo360NavigationMethod:(BCOVPUIVideo360NavigationMethod)navigationMethod
	                       projectionStyle:(BCOVVideo360ProjectionStyle)projectionStyle
	{
	    switch (projectionStyle)
	    {
	        case BCOVVideo360ProjectionStyleNormal:
	            NSLog(@"BCOVVideo360ProjectionStyleNormal");
	            self.landscapeOnly = NO;
	            break;

	        case BCOVVideo360ProjectionStyleVRGoggles:
	            NSLog(@"BCOVPUIVideo360NavigationDeviceMotionTracking");

	            self.landscapeOnly = YES;

	            {
	                UIDeviceOrientation currentDeviceOrientation = [UIDevice currentDevice].orientation;
	                switch (currentDeviceOrientation)
	                {
	                    case UIDeviceOrientationLandscapeLeft:
	                    case UIDeviceOrientationLandscapeRight:
	                        // all good
	                        break;
	                    default:
	                    {
	                        // switch orientation
	                        NSNumber *value = [NSNumber numberWithInt:UIInterfaceOrientationLandscapeLeft];
	                        [[UIDevice currentDevice] setValue:value forKey:@"orientation"];
	                        break;
	                    }
	                }
	            }
	            break;
	    }

	    [UIViewController attemptRotationToDeviceOrientation];
	}
The PlayerUI will install gestures to handle navigation around the 360 video, but if you are using your own controls you can set the view parameters of the virtual camera yourself. The BCOVPlaybackController protocol's viewProjection property lets you set these parameters. The property is a BCOVVideo360ViewProjection class with basic virtual camera settings like pan, tilt, and zoom. To change settings, make a copy of the current instance, change the settings on the new instance, and then assign it back to the viewProjection property.
Architectural Overview
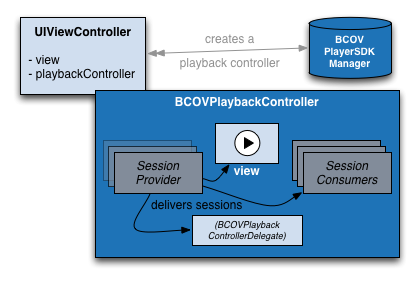
The entry point to the Brightcove Player SDK for iOS is the BCOVPlayerSDKManager singleton object. This Manager handles registration of plugin components and some other housekeeping tasks, but it primarily serves as an object factory. Your app's view controller obtains a reference to the Manager, and uses it to create a BCOVPlaybackController. The playback controller's view property exposes a UIView containing the AVPlayerLayer object that ultimately presents your video content on the screen. The playback controller also accepts a BCOVPlaybackControllerDelegate, which you can implement to respond to various video playback events.
The playback controller offers methods and properties to affect playback of the current video. However, internally, the playback controller delegates to a BCOVPlaybackSession object. Playback sessions do the actual work of preparing and playing video content, and contain the video's metadata and AVPlayer. The playback controller has mechanisms to advance from the current playback session to the next playback session, either automatically at the end of a video, or manually with a method call. Once the playback controller has advanced to a new session, the previous session is discarded and cannot be used again.
There are two other elements of the playback controller: a BCOVPlaybackSessionProvider, and a list of BCOVPlaybackSessionConsumers. As the name would suggest, the playback session provider is responsible for creating playback sessions and delivering them to the playback controller. The playback controller then delivers the session to each of the playback session consumers in the list. Both the session provider and session consumer APIs are designed for use by plugin developers, and are not detailed in this document.
In addition to the playback functionality provided by the classes described above, there are a handful of value classes. These are used to hold data specific to the Player SDK for iOS. Each of these is described in more detail in its own section below.
Play, Pause, and Seek
The Brightcove Player SDK for iOS provides play, pause, and seek methods on the BCOVPlaybackController. It is important to use these methods instead of using the AVPlayer equivalent. In their default implementations, these objects forward the calls directly to the corresponding method on the AVPlayer. However, if you are using plugins, they may override the default behavior to add functionality. For example, if using an advertising plugin, calling [BCOVPlaybackController play] the first time might cause pre-roll to play before starting the content. To find out more about how a plugin may override the default behavior, please refer to each plugin README.md or by checking for a category extension on BCOVSessionProviderExtension that the plugin may add.
Calling play, pause, or seek on the AVPlayer directly may cause undefined behavior.
Preloading videos
NOTE: Preloading videos is no longer recommended, and this functionality may be removed in a future release.
The Brightcove Player SDK for iOS provides the ability to preload upcoming videos in a playlist. By default, this functionality is disabled because of the large amount of memory preloading may use. You can turn on preloading to help ensure futures videos load quickly, however you might want to take into account the amount of memory available on the client's device and speed of their connection. If they are not on Wifi, preloading a video may affect the current video's network resources.
BCOVBasicSessionProviderOptions and BCOVBasicSessionLoadingPolicy provide two factory methods to modify preloading behavior that are described below:
-
+sessionPreloadingNeverThis method returns a session preloading policy that never preloading videos. This is the default setting. -
+sessionPreloadingWithProgressPercentage:This method returns a session preloading policy that preloads the next video in a playlist after the provided percentage of the current video has been reached. If a value below 0 or greater than 100 is used, thensessionPreloadingNeveris used. Some plugins may ignore this setting.
An example:
     BCOVPlayerSDKManager *manager = [BCOVPlayerSDKManager sharedManager];
 [1] BCOVBasicSessionLoadingPolicy *policy = [BCOVBasicSessionLoadingPolicy sessionPreloadingWithProgressPercentage:50];
      BCOVBasicSessionProviderOptions *options = [[BCOVBasicSessionProviderOptions alloc] init];
      options.sessionPreloadingPolicy = policy;
      id<BCOVPlaybackSessionProvider> provider = [manager createBasicSessionProviderWithOptions:options];
- Create a session preloading policy which starts preloading of an upcoming session when the current session reaches 50% of progress.
Source Selection (HLS, MP4, HTTP/HTTPS)
The Brightcove Player SDK for iOS provides clients the ability to attach multiple url and delivery types (BCOVSource) to a single video (BCOVVideo). For example, if your videos are being retrieved by the Playback Service, there may be a mix of HLS or MP4 renditions for a single video, along with HTTP and HTTPS versions. Which one of these sources that get selected is determined by a source selection policy block. The default source selection policy will select the first HLS BCOVSource on each BCOVVideo, with HTTPS sources preferred over HTTP.
Source selection can be overridden by creating a BCOVBasicSessionProviderOptions and using it to create a BCOVBasicSessionProvider. For example:
BCOVPlayerSDKManager *sdkManager = [BCOVPlayerSDKManager sharedManager];

BCOVBasicSessionProviderOptions *options = [[BCOVBasicSessionProviderOptions alloc] init];
options.sourceSelectionPolicy = <policy>

id<BCOVPlaybackSessionProvider> provider = [sdkManager createBasicSessionProviderWithOptions:options];
id<BCOVPlaybackController> playbackController = [sdkManager createPlaybackControllerWithSessionProvider:provider viewStrategy:nil];
If this default selection policy does not work for you, there are a few alternatives to selecting a source:
-
If retrieving videos from Video Cloud via the Playback Service, before calling
-[BCOVPlaybackController setVideos:], use the update method on theBCOVVideoto only contain the source you want (see the "Values" section for more info). -
You can use the helper method
[BCOVBasicSourceSelectionPolicy sourceSelectionHLSWithScheme:scheme]to create a policy that prefers a specific scheme. This is the method used to create the default source selection policy that prefers HTTPS. -
Similar to updating the video object, you may also implement your own source selection block.
  options.sourceSelectionPolicy = ^ BCOVSource *(BCOVVideo *video) {

     <Check video.sources for source>
     <Return source>

  };
Please be aware there are App Store limitations regarding the use of MP4 videos. Check the latest Apple Developer information for details.
Obtaining Content and Ad playback Information
The Brightcove Player SDK for iOS provides two mechanisms for obtaining playback information. The playback controller provides a delegate property that implements BCOVPlaybackControllerDelegate. A delegate can implement these optional methods to get notified of playback metadata like progress, duration changes, and other events. If an ad plugin is installed, it may also use this delegate to provide information about ad playback. The lifecycle event delegate method provides events to signal changes in playback state. For example, when a player goes from the paused state to the playing state, the lifecycle event delegate method will be called with the kBCOVPlaybackSessionLifecycleEventPlay event. The default Lifecycle events are declared in BCOVPlaybackSession. Plugins provided by Brightcove add additional lifecycle events which are defined in each plugin.
The playback controller allows for a single delegate. In many cases, this will be enough to retrieve information; the delegate implementations can disseminate values and events to different parts of the app as necessary. In cases where multiple delegates would be required, as is the case when developing a plugin, the BCOVPlaybackSessionConsumer delegates provide equivalent functionality to the BCOVPlaybackControllerDelegate methods, including ad data.
Here is an example of how one might use BCOVPlaybackSessionConsumer to create an analytics plugin:
@interface XYZAnalytics : NSObject <BCOVPlaybackSessionConsumer>
@end

@implementation XYZAnalytics

- (void)playbackSession:(id<BCOVPlaybackSession>)session didProgressTo:(NSTimeInterval)progress
{
    //react to progress event
}

@end
To use the plugin:
BCOVPlayerSDKManager *sdkManager = [BCOVPlayerSDKManager sharedManager];
id<BCOVPlaybackController> controller = [sdkManager createPlaybackController];
XYZAnalytics *analytics = [[XYZAnalytics alloc] init];
[controller addSessionConsumer:analytics];
Handling network interruptions and slowdowns
When the application experiences network interruptions, the AVPlayer used by the BCOVPlaybackController may stop attempting to recover if the interruption lasts too long. If this occurs, the lifecycle delegate method will be called with a kBCOVPlaybackSessionLifecycleEventFailedToPlayToEndTime event. When this event occurs, playback will not recover automatically. In order to recover from this event, you will need to detect when the network recovers in your client code.
Once you have determined that the network has recovered, you can use - [BCOVPlaybackController resumeVideoAtTime:withAutoPlay:] to re-initialize the player. You will need to keep track of where you want to resume to. The player will make its best effort to suppress lifecycle events and progress events, in order to prevent ads from replaying or from analytics being interfered with.
Upon calling - [BCOVPlaybackController resumeVideoAtTime:withAutoPlay:], the player will send a lifecycle event of type kBCOVPlaybackSessionLifecycleEventResumeBegin. kBCOVPlaybackSessionLifecycleEventResumeComplete will be sent if this action succeeds, otherwise kBCOVPlaybackSessionLifecycleEventResumeFail will be sent.
You must wait before calling - [BCOVPlaybackController resumeVideoAtTime:withAutoPlay:] a second time until you have received either kBCOVPlaybackSessionLifecycleEventResumeComplete or kBCOVPlaybackSessionLifecycleEventResumeFail from the previous call. You may wish to impose a retry limit, before giving the user a message that their network is too unstable.
When the AVPlayer is still able to access the network, but the video stalls because the network is too slow, the lifecycle delegate method will be called with a kBCOVPlaybackSessionLifecycleEventPlaybackStalled event. When playback is able to resume, the lifecycle delegate method will be called with a kBCOVPlaybackSessionLifecycleEventPlaybackRecovered event. These events only cover the case where normal playback stopped and does not cover buffering that occurs during a seek or initial load of the video.
When the video is initially loading, when a seek occurs, or when playback stalls due to a slow network, the lifecycle delegate method will be called with a kBCOVPlaybackSessionLifecycleEventPlaybackBufferEmpty event. When playback is able to resume, the lifecycle delegate method will be called with a kBCOVPlaybackSessionLifecycleEventPlaybackLikelyToKeepUp event. You may wish to implement a loading spinner in this case.
Subclassing
Except where explicitly documented otherwise, none of the classes in the Player SDK for iOS are designed to be subclassed. Creating a subclass of any SDK class that is not explicitly designed to be subclassed, especially any of the value classes, could result in unpredictable behavior.
Values
Also known as "model objects", these classes (BCOVPlaylist, BCOVVideo, BCOVSource, BCOVCuePoint, BCOVCuePointCollection) are used to represent data in the Player SDK for iOS. It is crucial to understand that these data types are treated as values, rather than identities. By this, we mean that if you have two instances of a value class which have the exact same data, they represent the same idea or value, even though they are technically two different objects at separate memory addresses. In other words, neither SDK code nor your client code should ever use identity comparisons ("pointer equality") with value objects. Instead, each value class implements -isEqual: and provides a class-specific equality method overload, either of which should be used instead.
This is bad:
if (myVideo == session.video) // Could lead to bugs!
These are good (and functionally equivalent):
if ([myVideo isEqualToVideo:session.video])
if ([myVideo isEqual:session.video])
The internals of the Player SDK for iOS may do such things as memoize values or make defensive copies, so relying on the pointer address to check for equality will end up causing you pain.
Another quality of value classes in the Player SDK for iOS is that they are immutable. Once you have an instance of a value, you should not try to subvert this immutability in any way, as it may lead to unpredictable behavior. If in your code you wish to "modify" a value in some fashion, your only recourse is to create a new value. As a convenience to help clients obtain "modified" values, each of the value classes offers an -update: method which takes a block that allows you to operate on a mutable copy of the original value.
Here is an example of using this method to create a "modified" version of an existing video object, but with different properties:
BCOVVideo *video1; // (properties include a key "foo" whose value is "bar")
BCOVVideo *video2 = [video1 update:^(id<BCOVMutableVideo> mutable) {

    mutable.properties = @{ @"foo": @"quux" };

}];

NSLog(@"foo is %@", video1.properties[@"foo"]); // prints "foo is bar"
NSLog(@"foo is %@", video2.properties[@"foo"]); // prints "foo is quux"

// Both video1 and video2 are still immutable objects:
video1.properties = otherDictionary; // causes compiler error
video2.properties = otherDictionary; // causes compiler error
As you can see in the example, video1 has not been changed by the -update method call. Instead, this method returns a copy of video1, except with the modifications made in the body of the block. You should never allow the mutable copy to escape the block (such as by assigning it to a __block variable), instead use the immutable object returned by the -update method after you have made your modifications.
Retrieving Brightcove Assets Using the Playback Service
The playback service class, BCOVPlaybackService, provides functionality for retrieving your Brightcove video assets and playlists via the Brightcove Playback API , including rich metadata such as text tracks, previews, and thumbnails. The following example shows how to retrieve a video with a video ID. Methods for retrieving a video or playlist with that video's reference ID are also available..
[1] NSString *policyKey = <your-policy-key>;
    NSString *accountId = <your-account-id>;
    NSString *videoID = <your-video-id>;

    BCOVPlayerSDKManager *manager = [BCOVPlayerSDKManager sharedManager];
    id<BCOVPlaybackController> controller = [manager createPlaybackControllerWithViewStrategy:nil];
    [self.view addSubview:controller.view];

    BCOVPlaybackService *playbackService = [[BCOVPlaybackService alloc] initWithAccountId:accoundId
                                                                                policyKey:policyKey];
    [playbackService findVideoWithVideoID:videoID
                               parameters:nil
                               completion:^(BCOVVideo *video,
                                            NSDictionary *jsonResponse,
                                            NSError      *error) {

                                   [controller setVideos:@[ video ]];
                                   [controller play];

                               }];
- The playback service requests policy key for authentication. To learn more about policy key and how to obtain one, please refer to the policy key documentation.
View Strategy
NOTE: Using a view strategy block is no longer recommended, as this functionality may be removed in a future release.
BCOVPlaybackController objects are constructed with a view strategy, which allows you, as the client of the SDK, to define the exact UIView object that is returned from the playback controller's view property. This is important when using plugins that affect the playback controller's view, such as an advertising plugin that overlays the video view with an ad view. Imagine trying to integrate custom controls with such a plugin: normally, custom controls are just regular UIView objects in the view hierarchy that float above the playback controller's video view. But with an advertising plugin, you generally want the ads to float over your custom controls. How to accomplish this without having in-depth knowledge of the structure of the playback controller's view hierarchy? The solution is to construct a view strategy that composes the video view, your custom controls, and the advertising view in a hierarchy of your choosing. The playback controller will call this view strategy the first time you access its view property. The final UIView object returned from the strategy will serve as its view permanently (until the controller is destroyed).
Many apps will have no need to create a view strategy, and can simply pass nil when creating a new playback controller. This will create a standard video view in the playback controller. However, for apps that do need the control offered by a view strategy, we provide a more detailed explanation here.
The BCOVPlaybackControllerViewStrategy typedef aliases (and documents) this more complex block signature:
UIView *(^)(UIView *view, id<BCOVPlaybackController> playbackController);
This signature describes an Objective-C block that returns a UIView and takes two parameters: a UIView and a playback controller. The return value is easy to understand: it is the UIView object that you want the playback controller's view property to point to. But what about the parameters to the block; what is the UIView that is passed as the first parameter? And why is the playback controller passed as the second parameter?
The first parameter is a UIView that would have become the playback controller's view property, if your view strategy didn't exist to specify otherwise. To illustrate, you could create a pointless no-op view strategy by implementing the block to return its view parameter directly:
BCOVPlaybackControllerViewStrategy viewStrategy =
        ^ UIView *(UIView *videoView, id<BCOVPlaybackController> playbackController) {

    return videoView;

};
This has the same effect as passing a nil view strategy when creating the playback controller.
The second parameter is the same playback controller object to which the view strategy has been given. Why would the view strategy need to reference its playback controller? In many cases, it probably doesn't, and the second parameter can be safely ignored. But some apps might need a view strategy that adds a session consumer to the playback controller. For example, to update custom controls every time the controller advances to a new playback session, you need to be notified of new sessions. The playback controller is made available in the second parameter to the block, so that the view strategy can add any necessary session consumers.
It is very important not to retain this reference to the playback controller. That is, it is safe to use within the block if you need, but don't try to assign it to a __block variable or global variable so that you can access it later. The parameter is passed in only because there is no playback controller reference that can be closed-over within the block at the time the view strategy is defined.
Here's an example of a more sensible view strategy implementation:
BCOVPlaybackControllerViewStrategy viewStrategy =
        ^(UIView *videoView, id<BCOVPlaybackController> playbackController) {

    // Create some custom controls for the video view,
    // and compose both into a container view.
    UIView<BCOVPlaybackSessionConsumer> *myControlsView = [[MyControlsView alloc] init];
    UIView *controlsAndVideoView = [[UIView alloc] init];
    [controlsAndVideoView addSubview:videoView];
    [controlsAndVideoView addSubview:myControlsView];

    // Compose the container with an advertising view
    // into another container view.
    UIView<BCOVPlaybackSessionConsumer> *adView = [[SomeAdPluginView alloc] init];
    UIView *adAndVideoView = [[UIView alloc] init];
    [adAndVideoView addSubview:controlsAndVideoView];
    [adAndVideoView addSubview:adView];

    [playbackController addSessionConsumer:myControlsView];
    [playbackController addSessionConsumer:adView];

    // This container view will become `playbackController.view`.
    return adAndVideoView;

};
Let's review what this view strategy does in detail: first, it creates a custom controls view that conforms to the BCOVPlaybackSessionConsumer protocol. (Note that custom views are not required to conform to this protocol; some other non-view object could have been added as a session consumer instead. This just makes the example easier to follow.) Notice how the view hierarchy is composed in this view strategy block: a container view is created to hold both the video view and the controls. These views are added in an order such that the controls will appear over the video view. Next, a container view is created to hold the ad view and the first container view. They are added in an order such that the ad view will appear over the container with the custom controls and video view. Finally, the custom controls and the ad view are registered as session consumers, so that when a new playback session is delivered to the playback controller, these views can subscribe to the appropriate events on the session.
Again, for most use cases it should suffice to not use a view strategy at all. Just add the playback controller's view to a view hierarchy, and compose custom controls on top of it. But for more nuanced cases such as when using certain plugins, it helps to have an opportunity to take control of the composition of the playback controller's view, and that's exactly why you can pass a view strategy to the BCOVPlayerSDKManager when creating a new playback controller.
There is one caveat to using a view strategy: you must not access the playback controller's view property from within the view strategy block. Since the block is being called because the playback controller's view property was accessed for the first time, accessing the view property again within the view strategy block will cause your program to crash.
Playing Video In The Background and Picture In Picture
By default, when an iOS application is sent to the background, or the device is locked, iOS will pause any video that is playing. To change this behavior, set the allowsBackgroundAudioPlayback property of the BCOVPlaybackController object to YES. (The default value is NO, indicating playback will pause in the background.)
You should also follow the guidelines set by Apple in Technical Q&A QA1668 to set the proper background modes and audio session category for your app.
It's important that the AVPlayerLayer be detached from the AVPlayer before the app is switched to the background (and reattached when the app returns to the foreground). The Brightcove Player SDK will handle this for you when allowsBackgroundAudioPlayback is set to YES.
Finally, when playing background videos (and particularly when using playlists), you should use the iOS MPRemoteCommandCenter API to give the user playback control on the lock screen and in the control center. Note that MPRemoteCommandCenter is only available in iOS 7.1 and later; if you need to support iOS 7.0, you should use UIApplication's beginReceivingRemoteControlEvents and endReceivingRemoteControlEvents.
Important Picture in Picture Note: When you want to support background audio and Picture in Picture on the same player, you must update the pictureInPictureActive property on BCOVPlaybackController with the Picture in Picture status. If you are using the AVPictureInPictureController, you can use the pictureInPictureControllerDidStartPictureInPicture: and pictureInPictureControllerDidStopPictureInPicture: delegate methods to update this property.
Combining Plugins
If you need to combine Player SDK plugins, for example to add subtitles to a DRM-protected video which plays ads managed by Google IMA. To achieve this, BCOVSessionProviders from each plugin are created and chained together, and the chain is used to construct the BCOVPlaybackController.
BCOVPlayerSDKManager *sdkManager = [BCOVPlayerSDKManager sharedManager];

IMASettings *imaSettings = [[IMASettings alloc] init];
imaSettings.ppid = kViewControllerIMAPublisherID;
imaSettings.language = kViewControllerIMALanguage;
imaSettings.enableBackgroundPlayback = self.allowBackgroundAudioPlayback;

IMAAdsRenderingSettings *renderSettings = [[IMAAdsRenderingSettings alloc] init];
renderSettings.webOpenerPresentingController = self;

BCOVIMAAdsRequestPolicy *adsRequestPolicy =
    [BCOVIMAAdsRequestPolicy videoPropertiesVMAPAdTagUrlAdsRequestPolicy];


// create the sidecar subtitles session provider. it has no upstream session provider.
id<BCOVPlaybackSessionProvider> *sidecarSessionProvider =
    [sdkManager createSidecarSubtitlesSessionProviderWithUpstreamSessionProvider:nil];

// create the IMA session provider with an upstream sidecar subtitles session provider.
id<BCOVPlaybackSessionProvider> *imaSessionProvider =
    [sdkManager createIMASessionProviderWithSettings:imaSettings
                                adsRenderingSettings:renderSettings
                                    adsRequestPolicy:adsRequestPolicy
                                         adContainer:self.playerView.contentOverlayView
                                      companionSlots:nil
                             upstreamSessionProvider:sidecarSessionProvider];

// create the playback controller using the session provider chain.
id<BCOVPlaybackController> *playbackController =
    [sdkManager createPlaybackControllerWithSessionProvider:imaSessionProvider
                                               viewStrategy:nil];
The chaining of session providers creates a linked list of objects whose order is important to the proper function of the Player SDK. In the example above, the Sidecar Subtitles session provider is placed upstream from the IMA session provider. When combined with the FairPlay plugin, Fairplay is placed upstream from the Sidecar Subtitles session provider.
Buffer Optimization
Overview
With the release of iOS 10, you now have control over the size of the forward playback buffer used by the AVPlayer. This is done by setting the preferredForwardBufferDuration property in the AVPlayerItem class.
By default, the Brightcove Native Player SDK sets the preferredForwardBufferDuration property in a way that optimizes overall bandwidth without sacrificing playback quality. This behavior can be overridden with your own values.
Default Behavior
Everyone pays for bandwidth, so it's important to reduce bandwidth consumption without affecting playback quality. New with version 5.2.0, the Brightcove Native Player SDK manages the buffer size for you dynamically as the video plays.
Prior to iOS 10, the AVPlayer buffered as much video data as it practicably could, up to around 50 Megabytes. This is fine for the video viewing model where a user selects a video and then watches it until the end, but many modern apps now "tease" videos with autoplay, hoping to secure engagement after a few seconds. A lot of users simply move on to different videos. With aggressive buffering you can end up with several minutes of buffered video that are thrown away with each video impression.
The Brightcove Native Player SDK addresses this problem by starting the video with a small baseline buffer, and then increasing it as the user watches more of the video. After a certain point, the buffer size is capped since it is not practical or helpful to make it too large.
Modifying The Default Behavior
If you want to keep the default behavior of the Brightcove Native Player SDK, but modify the minimum and maximum values used for the buffer sizes, you can do the following when setting up the BCOVPlaybackController:
// Create mutable dictionary to hold new values
NSMutableDictionary *options = self.playbackController.options.mutableCopy;

// Set new values in dictionary
options[kBCOVBufferOptimizerMethodKey] = @(BCOVBufferOptimizerMethodDefault);
options[kBCOVBufferOptimizerMinimumDurationKey] = @(min);
options[kBCOVBufferOptimizerMaximumDurationKey] = @(max);

// Set new dictionary in your playback controller
self.playbackController.options = options;
These options should be set before calling -BCOVPlaybackController setVideos:.
min and max values:
- These are floating point values that you can set as the new minimum and maximum buffer durations.
- If the values are set too small, playback may stall under erratic network conditions.
- If the values are set too large, the
AVPlayermay buffer data that is never viewed. - Testing based on your expected use cases is important.
- Values are specified in seconds of time, and must be greater than or equal to 1.0. (Zero is a special value in the
AVPlayerItemthat tells theAVPlayerto determine its own buffer size, as is done with iOS 9 and earlier).
Turning Off Buffer Optimization
If you do not want any buffer optimization active in your current playback session, you can use the same technique, but set the optimziation method to "None" as follows:
// Create mutable dictionary to hold new values
NSMutableDictionary *options = self.playbackController.options.mutableCopy;

// Set new values in dictionary
options[kBCOVBufferOptimizerMethodKey] = @(BCOVBufferOptimizerMethodNone);

// Set new dictionary in your playback controller
self.playbackController.options = options;
With the method set to “None”, iOS will maintain full control of the forward buffer size, as is done on iOS 9 and earlier.
Implementing Your Own Buffer Optimization Method
If you want to set your own buffer size for playback, first turn off buffer optimization as described in the previous section. Then, you can implement the following BCOVPlaybackController delegate method:
- (void)playbackController:(id<BCOVPlaybackController>)controller didAdvanceToPlaybackSession:(id<BCOVPlaybackSession>)session
{
  // Make sure the property exists on the current AVPlayerItem. This will return false for iOS 9 or earlier.
  if ([session.player.currentItem respondsToSelector:NSSelectorFromString(@"preferredForwardBufferDuration")])
  {
    // Set your preferredForwardBufferDuration value here.
	 session.player.currentItem.preferredForwardBufferDuration = newPreferredForwardBufferDurationValue;
  }
}
Important: You must compile against the iOS 10 SDK to use the preferredForwardBufferDuration property directly. Do not attempt to access this property on iOS 9 or earlier, or your app will crash.
If you want to change the buffer size dynamically over time, you can set session.player.currentItem.preferredForwardBufferDuration in the BCOVPlaybackController's progress delegate method in a similar fashion:
- (void)playbackController:(id<BCOVPlaybackController>)controller playbackSession:(id<BCOVPlaybackSession>)session didProgressTo:(NSTimeInterval)progress
{
  // Make sure the property exists on the current AVPlayerItem. This will return false for iOS 9 or earlier.
  if ([session.player.currentItem respondsToSelector:NSSelectorFromString(@"preferredForwardBufferDuration")])
  {
    // Set preferredForwardBufferDuration based on your own logic here
	 session.player.currentItem.preferredForwardBufferDuration = newPreferredForwardBufferDurationValue;
  }
}
Note: Apple specifically put "preferred" in preferredForwardBufferDuration because you can set any value you want, but generally speaking the AVPlayer player will use it only as a guideline. Also keep in mind that setting it to zero returns full control of the buffer size to the AVPlayer.
Using an AVPlayerViewController with a BCOVPlaybackController
Overview
You can use the AVPlayerViewController instead of the AVPlayerLayer used by the BCOVPlaybackSession class. Using the AVPlayerViewController allows the player to use the native iOS and tvOS player controls, but there are limitations to this approach (see below).
To use the AVPlayerViewController, you can set a BCOVPlaybackController dictionary property called kBCOVAVPlayerViewControllerCompatibilityKey:
BCOVPlayerSDKManager *sdkManager = [BCOVPlayerSDKManager sharedManager];

id<BCOVPlaybackController> playbackController;

NSMutableDictionary *mutableOptions = self.playbackController.options.mutableCopy;
// To use the AVPlayerViewController
mutableOptions[kBCOVAVPlayerViewControllerCompatibilityKey] = @YES;

// To use the BCOVPlaybackSession's AVPlayerLayer
// mutableOptions[kBCOVAVPlayerViewControllerCompatibilityKey] = @NO;

self.playbackController.options = mutableOptions;
The default value of kBCOVAVPlayerViewControllerCompatibilityKey is @NO, which means that a BCOVPlaybackController created without this dictionary property explicitly set will use the BCOVPlaybackSession's AVPlayerLayer by default.
Limitations to Using the AVPlayerViewController
Advertising: Using the AVPlayerViewController's AVPlayerLayer will not work with the iOS SDK advertising plugins: IMA Plugin FreeWheel Plugin OnceUX Plugin
due to the use by those plugins of a separate instance of the AVPlayer.
Analytics: When using the AVPlayerViewController, the video_engagement events sent to the Brightcove Analytics server will report 0 for player_width and player_height.
Frequently Asked Questions
My content won't load. Is there an easy way to test whether the URL points to a valid video?
If the content is packaged as MP4, you can paste the URL directly into most web browsers, and the video should play (or download to your filesystem, where you can play it locally). If the content is packaged as HLS, you can use QuickTime Player to test it: select File -> Open Location… and paste in the .m3u8 playlist URL, and the video should play.
I can hear the audio track playing, but the video freezes for a few seconds sporadically. What's happening?
This is a common symptom of having called a main thread-only UIKit or AVFoundation method from a non-main thread. The delegate methods on BCOVPlaybackControllerDelegate are always called on the main thread.
Why do I see a message in the log indicating that no source has been found?
This message indicates that the default source selection policy can't figure which source to pick. The default policy selects the first source whose deliveryMethod is kBCOVSourceDeliveryHLS ("HLS"). If no HLS source is found, its fallback behavior will select the first source whose deliveryMethod is kBCOVSourceDeliveryMP4 ("MP4"). If no source with a deliveryMethod of "HLS" or "MP4" exists on the video, the policy will select the video's first source (regardless of deliveryMethod). If you aren't happy with its selection, you can use -[BCOVPlayerSDKManager createBasicSessionProviderWithOptions:] and pass in an instance of BCOVBasicSessionProviderOptions with a custom sourceSelectionPolicy property set. When creating videos and sources manually, ensure that the sources are created with the appropriate deliveryMethod.
Apple recommends that apps which play video should still play audio even when the device is muted. Why doesn't the Brightcove Player SDK for iOS respect these guidelines?
The API which controls whether an app emits audio in iOS apps is the AVAudioSession API. An audio session is global to an app, which means that its configuration affects both the sounds that are emitted by the AVPlayers created by the Player SDK, as well as other sounds that an app may produce. Since the Player SDK cannot know how the app wants the audio session configured for those other sounds, it doesn't affect the audio session at all. This means that unless you explicitly configure your app's audio session otherwise, you inherit the default behavior of suppressing any and all audio when the device is muted, including audio emitted by AVPlayers. To conform to Apple's recommendations regarding audio playback, you (the app developer) must configure the audio session according to your app's specific needs.