ZLayout 1.0.1
| TestsTested | ✓ |
| LangLanguage | SwiftSwift |
| License | MIT |
| ReleasedLast Release | Oct 2017 |
| SwiftSwift Version | 4.0 |
| SPMSupports SPM | ✗ |
Maintained by fanticqq.
ZLayout 1.0.1
- By
- fanticqq
A lightweight framework for layout views with Swift.
Example
To run the example project, clone the repo, and run pod install from the Example directory first.
Anchoring
To place a view relative to the parent you can use anchoring. The most simple example is anchoring to center of parent.
view1.anchor(toParentEdge: .centerParent, width: 50, height: 50)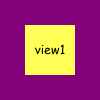
To fill superview you can use specific case of ZLayoutEdge named .all. In this case width and height parameters will be ignored.
view1.anchor(toParentEdge: .all, inset: UIEdgeInsets(top: 5, left: 5, bottom: 5, right: 5))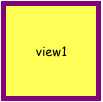
You can do the same via .superView value for width and height.
centerView1.anchor(toParentEdge: .centerParent, width: .superView, height: .superView, inset: UIEdgeInsets(top: 5, left: 5, bottom: 5, right: 5))Gravity means corner which will be centered by default but you can pick one of these:
.center,.top,.bottom,.left or .right
view1.anchor(toParentEdge: .left, width: 50, height: 50, offset: CGPoint(x: 5, y: 0))
view2.anchor(toParentEdge: .right, width: 50, height: 50, offset: CGPoint(x: -5, y: 0))
view3.anchor(toParentEdge: .top, width: 50, height: 50, offset: CGPoint(x: 0, y: 5))
view4.anchor(toParentEdge: .bottom, width: 50, height: 50, offset: CGPoint(x: 0, y: -5))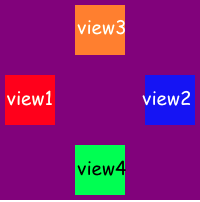
Alignment
Another way to layout your views is align view relative to another one.
view1.align(on: .leftOffset(20), relativeTo: centerView, withGravity: .top, width: 80, height: 30)
view2.align(on: .leftOffset(20), relativeTo: centerView, withGravity: .center, width: 80, height: 30)
view3.align(on: .leftOffset(20), relativeTo: centerView, withGravity: .bottom, width: 80, height: 30)
view4.align(on: .rightOffset(20), relativeTo: centerView, withGravity: .top, width: 80, height: 30)
view5.align(on: .rightOffset(20), relativeTo: centerView, withGravity: .center, width: 80, height: 30)
view6.align(on: .rightOffset(20), relativeTo: centerView, withGravity: .bottom, width: 80, height: 30)
view7.align(on: .topOffset(20), relativeTo: centerView, withGravity: .left, width: 30, height: 80)
view8.align(on: .topOffset(20), relativeTo: centerView, withGravity: .right, width: 30, height: 80)
view9.align(on: .topOffset(20), relativeTo: centerView, withGravity: .center, width: 30, height: 80)
view10.align(on: .bottomOffset(20), relativeTo: centerView, withGravity: .left, width: 30, height: 80)
view11.align(on: .bottomOffset(20), relativeTo: centerView, withGravity: .right, width: 30, height: 80)
view12.align(on: .bottomOffset(20), relativeTo: centerView, withGravity: .center, width: 30, height: 80)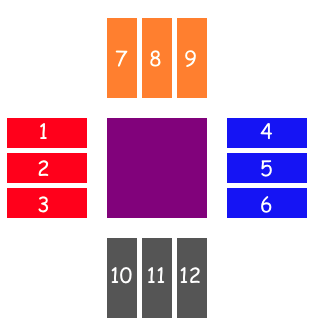
Also you can stretch view to another after alignment via alignAndFill method
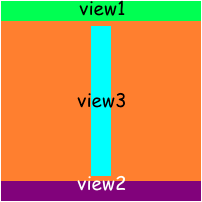
view1.anchor(toParentEdge: .top, width: .superView, height: 20)
view2.anchor(toParentEdge: .bottom, width: .superView, height: 20)
view3.alignAndFill(on: .bottomOffset(5), relativeTo: topView, withGravity: .center, stretchTo: bottomView, trailingPadding: 5, size: 20)
Here size means width or height, it depends on alignment type.
License
ZLayout is available under the MIT license. See the LICENSE file for more info.