ZAlertView 1.0.4
| TestsTested | ✗ |
| LangLanguage | SwiftSwift |
| License | MIT |
| ReleasedLast Release | Nov 2017 |
| SwiftSwift Version | 3.0 |
| SPMSupports SPM | ✗ |
Maintained by Thuong Nguyen.
ZAlertView 1.0.4
- By
- Thuong Nguyen
ZAlertView - AlertView written in Swift


Introduction
ZAlertView is a highly customizable dialog (exaggerated, right?) view which can be used as a substitution for UIAlertView. It's written in Swift. This is the gift I give to myself on my 26th birthday.
Import
For Swift
import ZAlertViewFor Objective-C
#import "ZAlertView-Swift.h"Usage
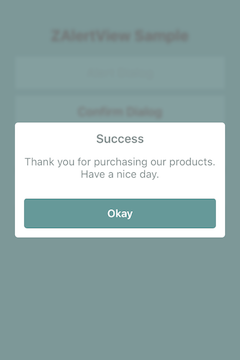
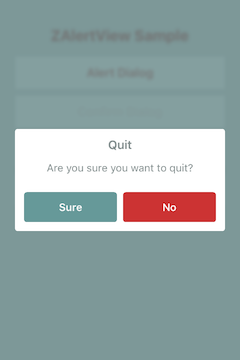
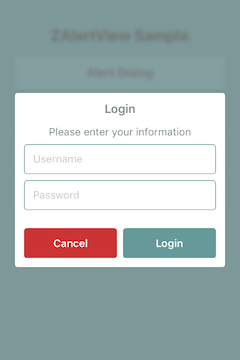
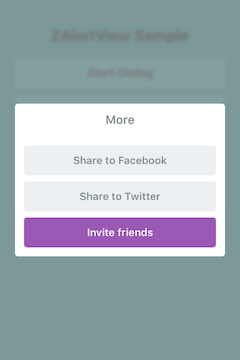
There are 3 types of dialog that ZAlertView currently supports: Alert, Confirmation (Yes/No) and Multiple choice. TextFields can also be added to any of those types.
  public enum AlertType: Int {
    case Alert
    case Confirmation
    case MultipleChoice
  }
To create and show a dialog, first of all, import the module at the beginning of the file:
import ZAlertViewThen show the dialog as below:
  let dialog = ZAlertView()
  dialog.show()
There are more convenient constructors for you to use:
  ZAlertView(title: "Title", message: "Message", alertType: AlertType.Alert)

  ZAlertView(title: "Title", message: "Message", closeButtonText: "Close this popup", closeButtonHandler: nil)

  ZAlertView(title: "Title", message: "Message", okButtonText: "Sure, I do", cancelButtonText: "No way")

  ZAlertView(title: "Title", message: "Message", isOkButtonLeft: false, okButtonText: "Cool, do it", cancelButtonText: "Stop it", okButtonHandler: nil, cancelButtonHandler: nil)
And button handler (TouchHandler) is just a lambda:
(ZAlertView) -> ()There are plenty of attributes that you can use to make your own style for the whole app:
  public static var padding: CGFloat
  public static var innerPadding: CGFloat
  public static var cornerRadius: CGFloat
  public static var buttonHeight: CGFloat
  public static var buttonSectionExtraGap: CGFloat
  public static var textFieldHeight: CGFloat
  public static var backgroundAlpha: CGFloat
  public static var blurredBackground: Bool
  public static var showAnimation: ShowAnimation
  public static var hideAnimation: HideAnimation

  // Font
  public static var alertTitleFont: UIFont?
  public static var messageFont: UIFont?
  public static var buttonFont: UIFont?

  // Color
  public static var positiveColor: UIColor?
  public static var negativeColor: UIColor?
  public static var neutralColor: UIColor?
  public static var titleColor: UIColor?
  public static var messageColor: UIColor?
  public static var cancelTextColor: UIColor?
  public static var normalTextColor: UIColor?

  //Text field style
  public static var textFieldTextColor: UIColor?
  public static var textFieldBorderColor: UIColor?
  public static var textFieldBackgroundColor: UIColor?
There are also some basic animations:
  public enum ShowAnimation: Int {
    case FadeIn
    case FlyLeft
    case FlyTop
    case FlyRight
    case FlyBottom
  }

  public enum HideAnimation: Int {
    case FadeOut
    case FlyLeft
    case FlyTop
    case FlyRight
    case FlyBottom
  }
For a specific dialog, there are customizable properties as below:
  public var alertType: AlertType
  public var alertTitle: String?
  public var message: String?
  public var okTitle: String?
  public var cancelTitle: String?
  public var closeTitle: String?
  public var isOkButtonLeft: Bool
  public var allowTouchOutsideToDismiss: Bool
  public var width: CGFloat = ZAlertView.AlertWidth
  public var height: CGFloat = ZAlertView.AlertHeight

  // Master views
  public var backgroundView: UIView!
  public var alertView: UIView!
For dialogs that need multiple buttons, please use AlertType.MultipleChoice. In such case, use the convenient method to add buttons to the dialog. Cool things is that we can use hex color directly here:
  public func addButton(title: "Button", touchHandler: TouchHandler)

  public func addButton(title: "Button", color: UIColor?, titleColor: UIColor?, touchHandler: TouchHandler)

  public func addButton(title: "Button", hexColor: String, hexTitleColor: String, touchHandler: TouchHandler)

  public func addButton(title: "Button", font: UIFont, touchHandler: TouchHandler)

  public func addButton(title: "Button", font: UIFont, color: UIColor?, titleColor: UIColor?, touchHandler: TouchHandler)
Similarly, we can also add textfields to the dialog. Each textfield needs an identifier for later manipulation:
  public func addTextField(identifier: String, placeHolder: String)

  public func addTextField(identifier: String, placeHolder: String, isSecured: Bool)

  public func addTextField(identifier: String, placeHolder: String, keyboardType: UIKeyboardType)

  public func addTextField(identifier: String, placeHolder: String, keyboardType: UIKeyboardType, font: UIFont, padding: CGFloat, isSecured: Bool)
To get a textfield:
public func getTextFieldWithIdentifier(identifier: String) -> UITextField?Installation
ZAlertView is available through CocoaPods. To install
it, simply add the following line to your Podfile:
pod 'ZAlertView'Author
Thuong Nguyen, [email protected]
License
ZAlertView is available under the MIT license. See the LICENSE file for more info.