JustUiKit 0.2.1
| TestsTested | ✗ |
| LangLanguage | SwiftSwift |
| License | MIT |
| ReleasedLast Release | Feb 2017 |
| SwiftSwift Version | 3.0 |
| SPMSupports SPM | ✗ |
Maintained by abcd_1234.
JustUiKit 0.2.1
- By
- lfkdsk
JustUiKit
iOS UI Kit With Android-Style Tools. JustUiKit contains JustLinearLayout, JustFrameLayout and so on. It is designed to make Android developers build iOS UI easily. Also for iOS developers, it provides a new way to build UI.
How To Install?
- Copy to your project
Copy JustUiKit folder from the demo project to your project
-
Installation with CocoaPods
CocoaPods is a dependency manager for Objective-C/Swift, which automates and simplifies the process of using 3rd-party libraries like TangramKit in your projects. You can install it with the following command:
$ sudo gem install cocoapodsTo integrate TangramKit into your Xcode project using CocoaPods, specify it in your Podfile:
platform :ios, '8.0'
pod 'JustUiKit', '~> 0.2.1'
Then, run the following command:
$ pod install
Quick Start
JustLinearLayout
A Layout that arranges its children in a single column or a single row. The direction of the row can be set by orientation. You can also specify gravity, which specifies the alignment of all the child elements by set gravity or specify that specific children grow to fill up any remaining space in the layout by setting the weight member of LinearLayoutParams. The default orientation is horizontal.
Gravity & Margin & Orientation
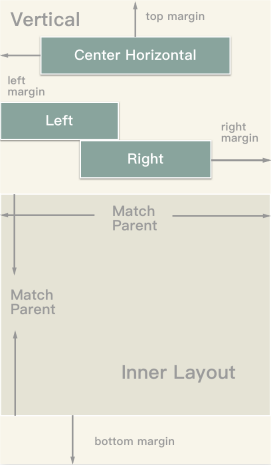
You can set Gravity to make Views be layouted at a specify space of parentView. Also set Margin will remain spaces in the four directions of the View. In default, LinearLayout layout children in Horizontal direction, and you can change it to Veritcal.
Example:
let parentView = JustLinearLayout(frame: UIScreen.main.bounds, orientation: .Vertical)
let params = LinearLayoutParams(
                width: LayoutParams.WRAP_CONTENT,
                height: LayoutParams.WRAP_CONTENT)
let centerParams = LinearLayoutParams(params)
centerParams.layoutGravity = Gravity.Horizontal.getValue()

let marginParams = LinearLayoutParams(params)
marginParams.topMargin = 10

parentView.addView(createView(), centerParams)
parentView.addView(createView(), marginParams)
Padding & weight

With the Padding in four directions, you can remain inner space of the view. And Weight describes how the child views are positioned. Defaults to Gravity.TOP | Gravity.LEFT. If this layout has a VERTICAL orientation, this controls where all the child views are placed if there is extra vertical space. If this layout has a HORIZONTAL orientation, this controls the alignment of the children.
See Gravity to get more details.
Example:
let parentView = JustLinearLayout(frame: UIScreen.main.bounds, orientation: .Vertical)
let params = LinearLayoutParams(
                width: LayoutParams.WRAP_CONTENT,
                height: LayoutParams.WRAP_CONTENT)
params.weight = 1
let paddingParams = LinearLayoutParams(params)
paddingParams.paddingTop = 10
parentView.addView(createView(), params)
parentView.addView(createView(), paddingParams)
JustFrameLayout
FrameLayout is designed to block out an area on the screen to display a single item. Generally, FrameLayout should be used to hold a single child view, because it can be difficult to organize child views in a way that’s scalable to different screen sizes without the children overlapping each other. You can, however, add multiple children to a FrameLayout and control their position within the FrameLayout by assigning gravity to each child, using the layoutGravity.
Overlap on left
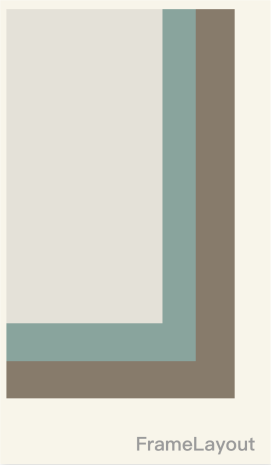
if don’t use any Margin or Padding to change view’s position. All the Views will be add like stack and overlap on the left|top of the screen.
Example:
let parentView: JustFrameLayout = JustFrameLayout(width:MATCH_PARENT, height:MATCH_PARENT)
let params: FrameLayoutParams = JustFrameLayoutParams(width: WRAP_CONTENT, height: WRAP_CONTENT)
parentView.addView(createView(rgb:0xE4E1D8), params)
parentView.addView(createView(rgb:0x89A49D), params)
parentView.addView(createView(rgb:0x877B6B), params)
Layout With Gravity
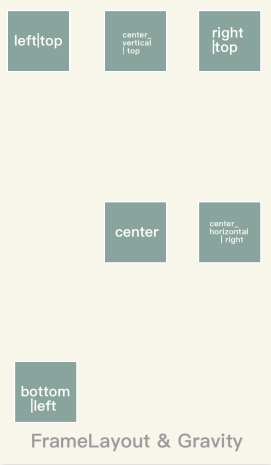
You can use horizontal and vertical gravity. Also You can use like left|bottom, center_horizontal|center_vertical to use them at the same time.
See Gravity to get more details.
Example:
let parentView: FrameLayout = FrameLayout(width:MATCH_PARENT, height:MATCH_PARENT)
let params: FrameLayoutParams = FrameLayoutParams(width: WRAP_CONTENT, height: WRAP_CONTENT)

let b_l = FrameLayoutParams(params)
b_l.layoutGravity = Gravity.BOTTOM | Gravity.TOP
let c_r = FrameLayoutParams(params)
c_r.layoutGravity = Gravity.CENTER_HORIZONTAL | Gravity.RIGHT
parentView.addView(createView(rgb:0xE4E1D8), b_l)
parentView.addView(createView(rgb:0x89A49D), c_r)
parentView.addView(createView(rgb:0x877B6B), params)
JustRelativeLayout
A Layout where the positions of the children can be described in relation to each other or to the parent.
Note that you cannot have a circular dependency between the size of the RelativeLayout and the position of its children. For example, you cannot have a RelativeLayout whose height is set to WRAP_CONTENT and a child set to ALIGN_PARENT_BOTTOM.
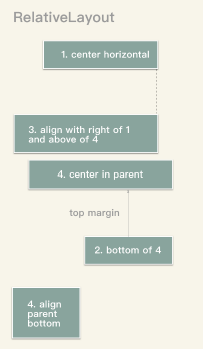
In RelativeLayout, you can use all the Margin,Padding and Gravity. Also You can use some Align functions. Such as, if a view is alignLeftTo, its left edge will be set equal to the anchor view. You can use a set of functions like leftOf, rightOf, bottomOf set the current view to the left of anchor view.
// view1 view2 view3 view4 view5
let params = RelativeLayoutParams.generateDefaultParams()
let params1 = RelativeLayoutParams(params)
params1.centerInHorizontal()
let params2 = RelativeLayoutParams(params)
params2.bottomTo(view4)
params2.topMargin = xxx
let params3 = RelativeLayoutParams(params)
param3.alignRightTo(view1)
let params4 = RelativeLayoutParams(params)
params4.centerInParent()
let params5 = RelativeLayoutParams(params)
params5.alignParentBottom()
// add view to parent
Rule in RelativeLayout
| Constants | Description |
|---|---|
| ABOVE | Rule that aligns a child’s bottom edge with another child’s top edge. |
| ALIGN_BASELINE | Rule that aligns a child’s baseline with another child’s baseline. |
| ALIGN_BOTTOM | Rule that aligns a child’s bottom edge with another child’s bottom edge. |
| ALIGN_LEFT | Rule that aligns a child’s left edge with another child’s left edge. |
| ALIGN_PARENT_BOTTOM | Rule that aligns the child’s bottom edge with its RelativeLayout parent’s bottom edge. |
| ALIGN_PARENT_LEFT | Rule that aligns the child’s left edge with its RelativeLayout parent’s left edge. |
| ALIGN_PARENT_RIGHT | Rule that aligns the child’s right edge with its RelativeLayout parent’s right edge. |
| ALIGN_PARENT_TOP | Rule that aligns the child’s top edge with its RelativeLayout parent’s top edge. |
| ALIGN_RIGHT | Rule that aligns a child’s right edge with another child’s right edge. |
| ALIGN_TOP | Rule that aligns a child’s top edge with another child’s top edge. |
| BELOW | Rule that aligns a child’s top edge with another child’s bottom edge. |
| CENTER_HORIZONTAL | Rule that centers the child horizontally with respect to the bounds of its RelativeLayout parent. |
| CENTER_IN_PARENT | Rule that centers the child with respect to the bounds of its RelativeLayout parent. |
| CENTER_VERTICAL | Rule that centers the child vertically with respect to the bounds of its RelativeLayout parent. |
| END_OF | Rule that aligns a child’s start edge with another child’s end edge. |
| LEFT_OF | Rule that aligns a child’s right edge with another child’s left edge. |
| RIGHT_OF | Rule that aligns a child’s left edge with another child’s right edge. |
Gravity
Must be one or more (separated by ’|’) of the following constant values.
| Constant | Value | Description |
|---|---|---|
| top | 0x30 | Push object to the top of its container, not changing its size. |
| bottom | 0x50 | Push object to the bottom of its container, not changing its size. |
| right | 0x05 | Push object to the right of its container, not changing its size. |
| center_vertical | 0x10 | Place object in the vertical center of its container, not changing its size. |
| center_horizontal | 0x01 | Place object in the horizontal center of its container, not changing its size. |
| center | 0x11 | Place the object in the center of its container in both the vertical and horizontal axis, not changing its size. |
Feedback
Please send your feedback as long as there occurs any inconvenience or problem. You can contact me with:
- Email: [email protected]
- Weibo: @亦狂亦侠_亦温文
- Blog: 刘丰恺
License
    MIT License

    Copyright (c) 2017 JustWe

    Permission is hereby granted, free of charge, to any person obtaining a copy
    of this software and associated documentation files (the "Software"), to deal
    in the Software without restriction, including without limitation the rights
    to use, copy, modify, merge, publish, distribute, sublicense, and/or sell
    copies of the Software, and to permit persons to whom the Software is
    furnished to do so, subject to the following conditions:

    The above copyright notice and this permission notice shall be included in all
    copies or substantial portions of the Software.

    THE SOFTWARE IS PROVIDED "AS IS", WITHOUT WARRANTY OF ANY KIND, EXPRESS OR
    IMPLIED, INCLUDING BUT NOT LIMITED TO THE WARRANTIES OF MERCHANTABILITY,
    FITNESS FOR A PARTICULAR PURPOSE AND NONINFRINGEMENT. IN NO EVENT SHALL THE
    AUTHORS OR COPYRIGHT HOLDERS BE LIABLE FOR ANY CLAIM, DAMAGES OR OTHER
    LIABILITY, WHETHER IN AN ACTION OF CONTRACT, TORT OR OTHERWISE, ARISING FROM,
    OUT OF OR IN CONNECTION WITH THE SOFTWARE OR THE USE OR OTHER DEALINGS IN THE
    SOFTWARE.